
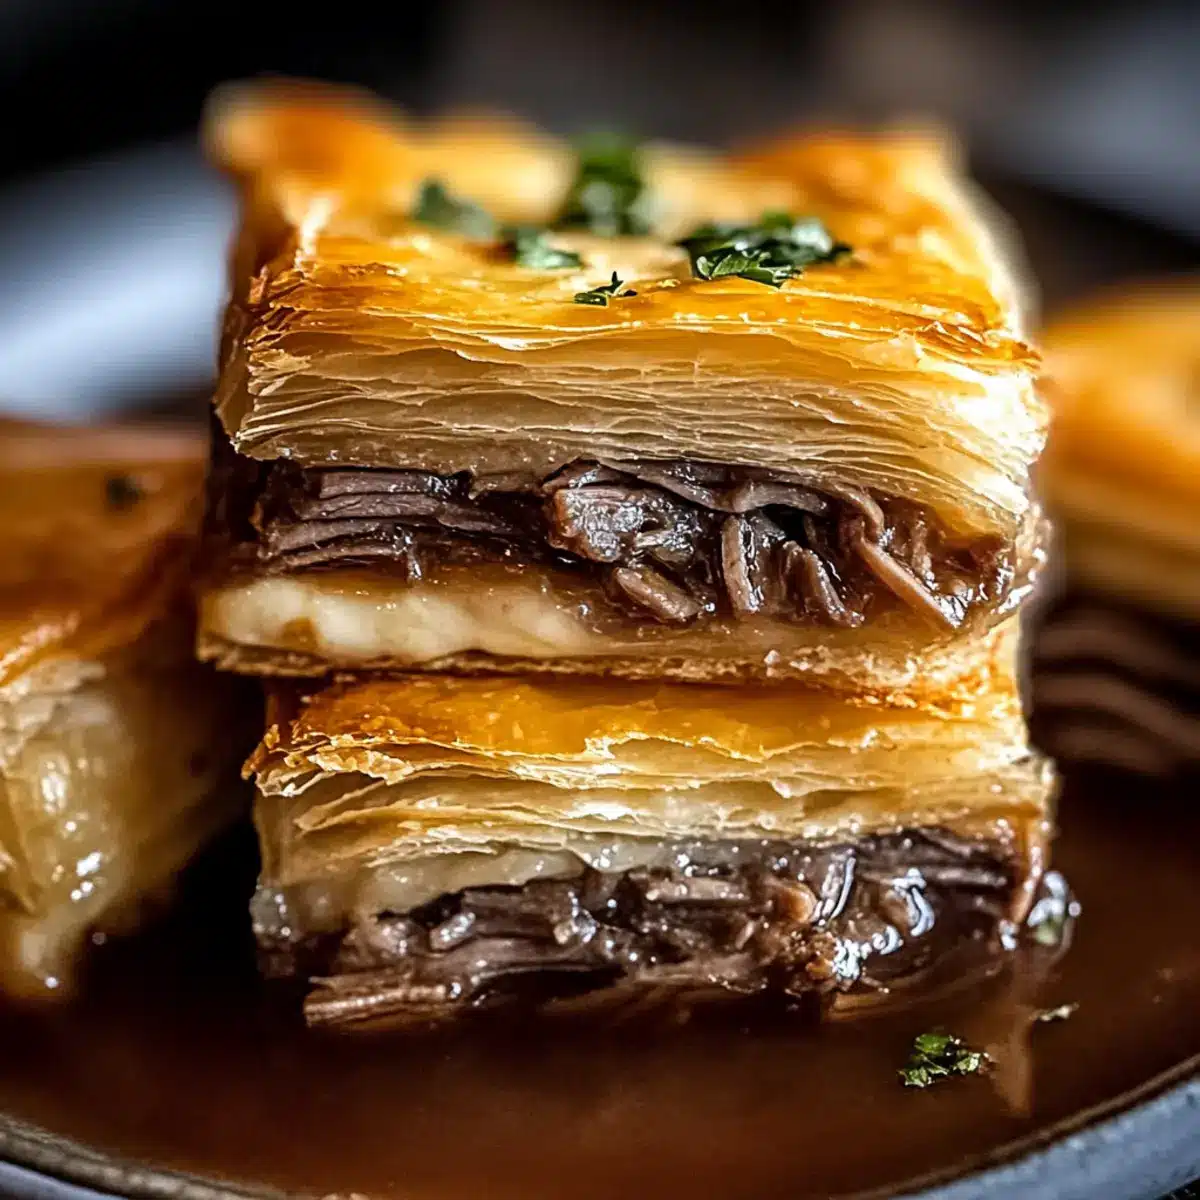
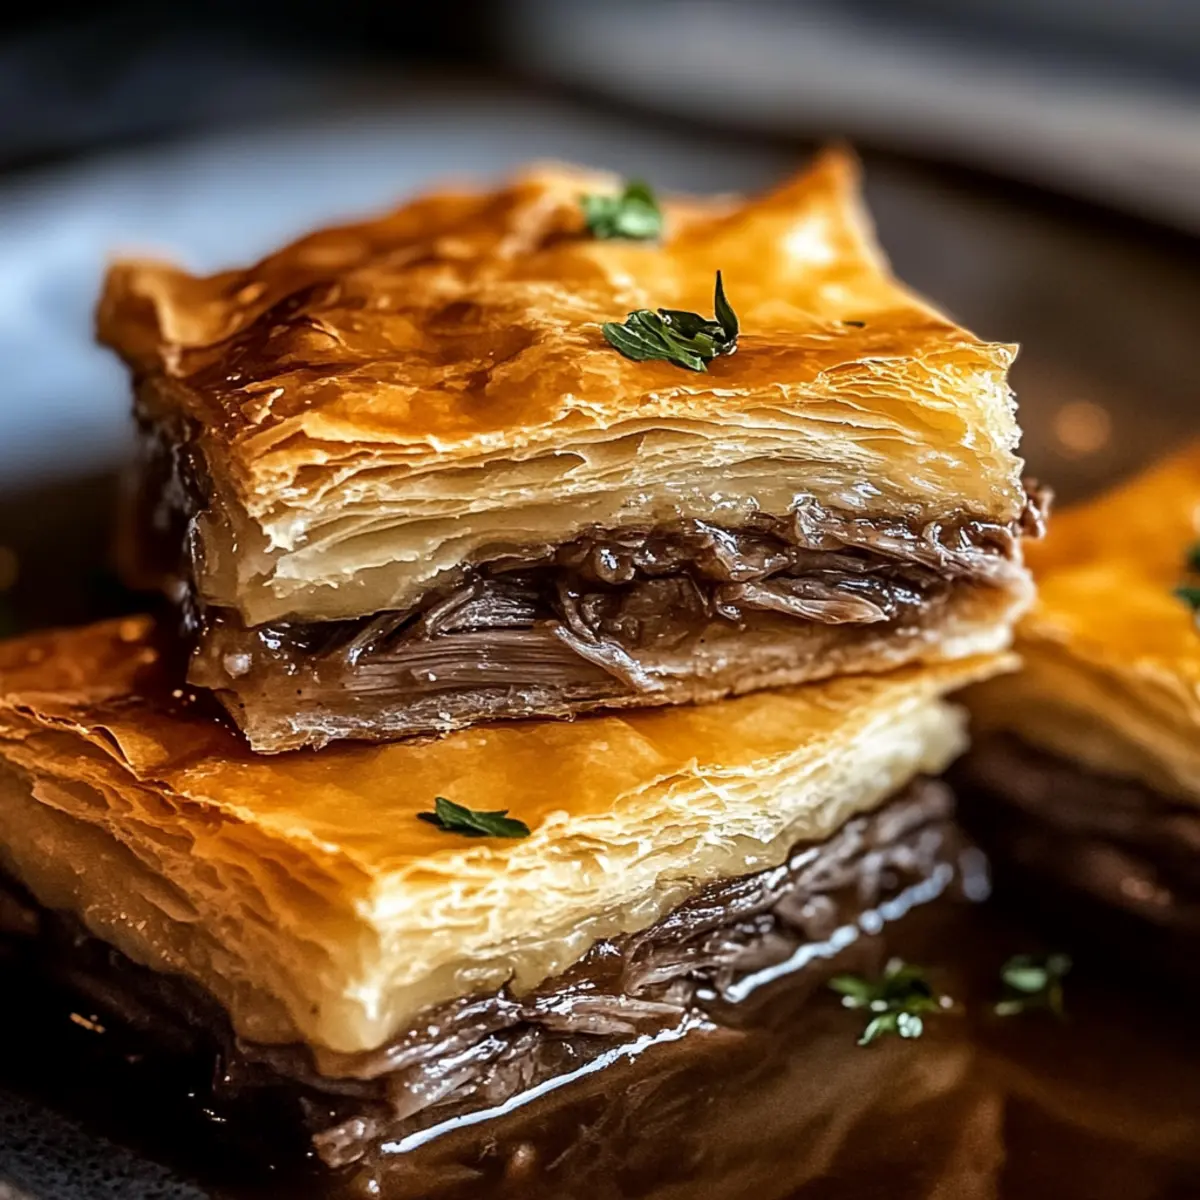
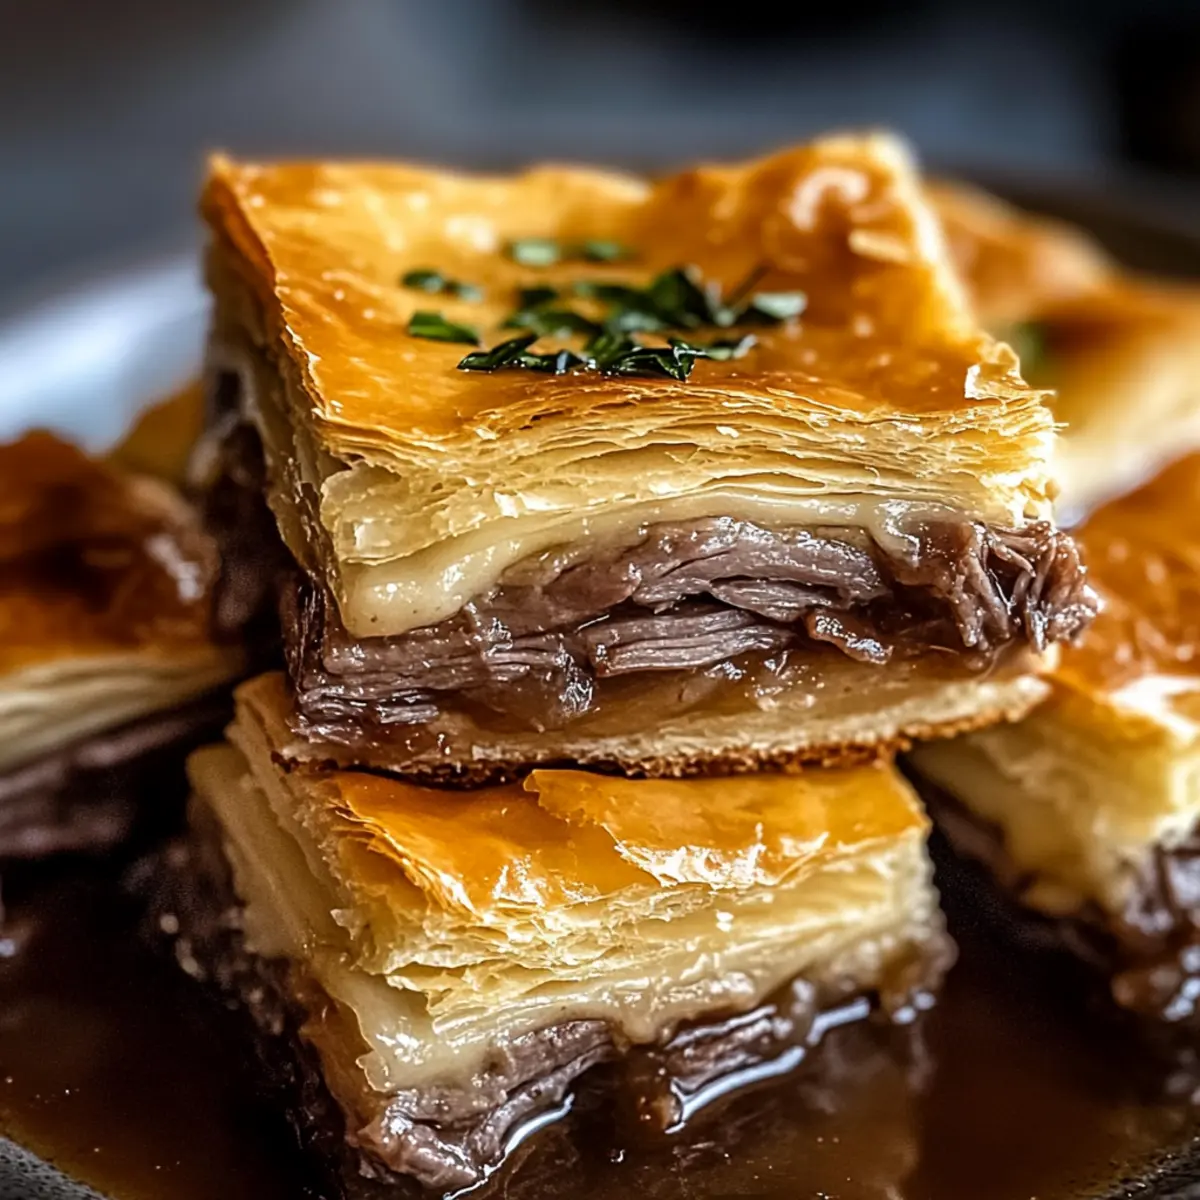
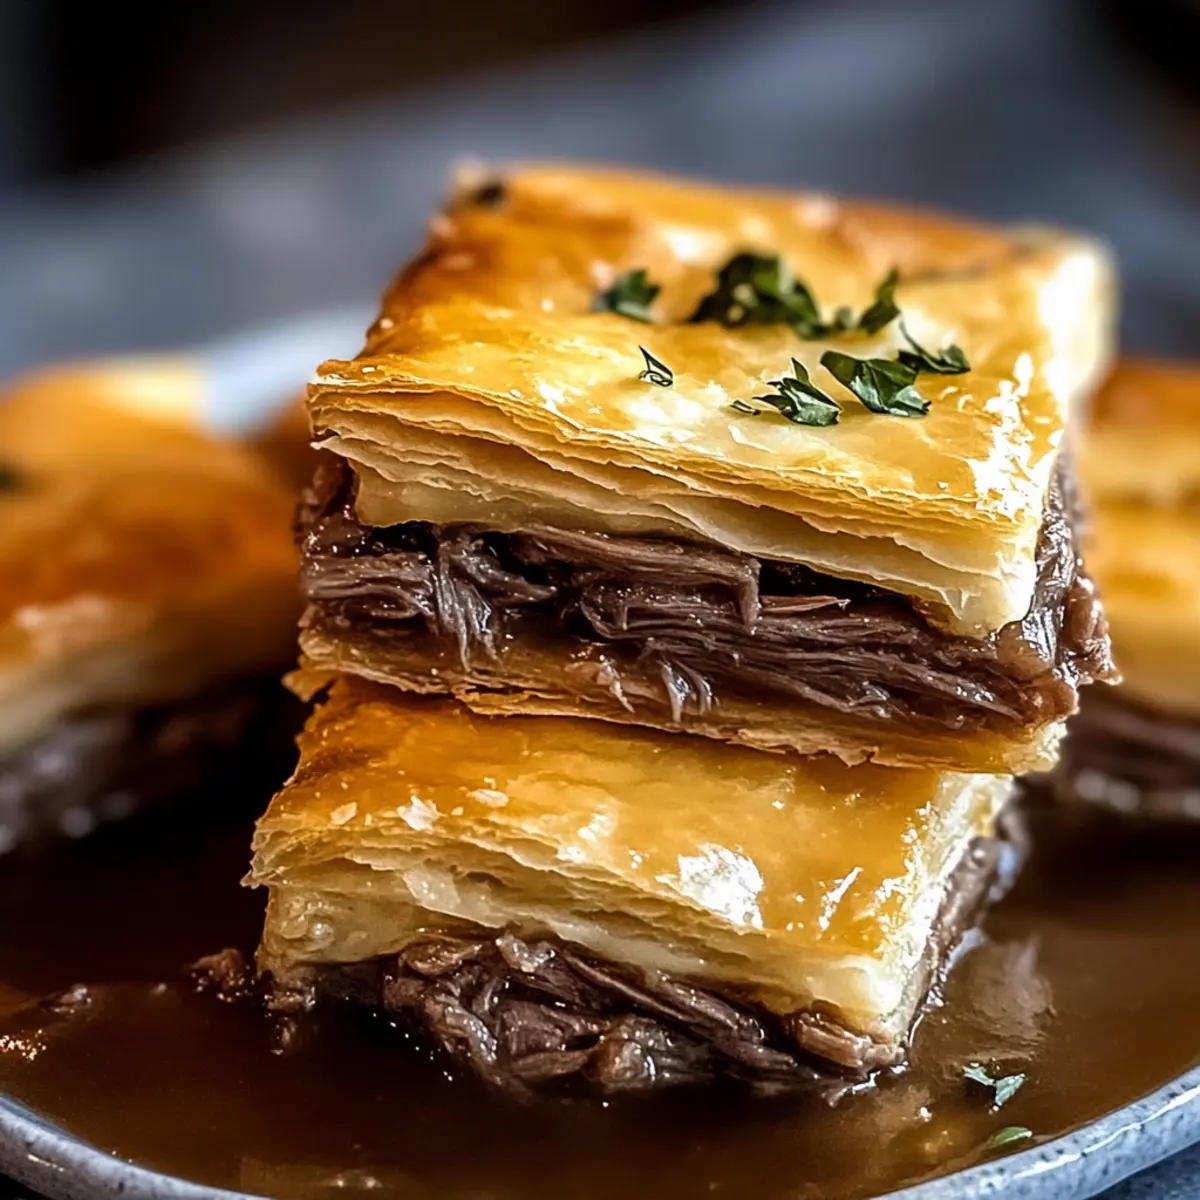
As I stood in the kitchen, the scent of warming crescent rolls filled the air, instantly transporting me to cozy family gatherings. Today, I’m excited to share my twist on comfort food: Easy French Dip Squares. This dish is everything you love about the classic French Dip sandwich, but in a shareable casserole form that’s perfect for any occasion. With layers of tender deli roast beef and gooey melted Swiss cheese, these squares are not only crowd-pleasers but also incredibly easy to whip up, making them a go-to for potlucks, parties, or busy weeknights. Who wouldn’t want to dive into a flaky, buttery treat that pairs effortlessly with a warm dipping broth? Ready to impress your friends and family? Let’s dive into this delectable recipe together!
Why are French Dip Squares so appealing?
Simplicity: With minimal prep time, you can create a dish that feels gourmet without the fuss.
Crowd-Pleaser: Perfect for parties, these squares will have everyone asking for seconds!
Comfort Food: Rich layers of beef and cheese will warm your heart while satisfying your cravings.
Versatility: Mix in your favorite ingredients or swap out proteins for endless flavor combinations!
Dipping Delight: Don’t forget the beef broth for dipping, turning each bite into a delightful experience, much like the classic Pumpkin French Toast, but with a savory twist.
Make-Ahead Magic: Assemble in advance and bake right before serving to make entertaining a breeze.
French Dip Squares Ingredients
• Here’s everything you need to make these irresistible French Dip Squares!
For the Base
- Refrigerated Crescent Rolls – Provide a flaky, buttery base that holds everything together; puff pastry can be a great substitute for a different texture.
For the Filling
- Deli Roast Beef – The star of the show, giving a tender, savory flavor; sliced turkey or ham can work for a lighter option.
- Swiss Cheese – Melts to perfection, adding a creamy layer that complements the roast beef; try provolone or cheddar for a different flavor kick.
- Dry Onion Soup Mix – Brings an oniony depth to the dish; sautéed onions with beef bouillon can replicate its flavor.
- Garlic Powder – Infuses a subtle garlic flavor into the filling; fresh garlic is a fantastic alternative if you adjust the quantity.
For the Topping
- Melted Butter – Enhances richness and helps the soup mix adhere to the delicious layers; olive oil can be swapped in for a lighter alternative.
- Worcestershire Sauce – Adds umami depth that takes it to the next level; soy sauce is a suitable substitute if needed.
For Dipping
- Beef Broth – Essential for that traditional French Dip experience, providing a warm, savory dip; homemade or low-sodium broth will enrich the flavor.
Step‑by‑Step Instructions for French Dip Squares
Step 1: Preheat the Oven
Start by preheating your oven to 375°F (190°C). While the oven warms up, grab a 9×13 inch baking dish and spray it lightly with non-stick cooking spray to ensure easy release of your French Dip Squares after baking.
Step 2: Prepare the Base Layer
Unroll the first can of refrigerated crescent rolls and carefully press the seams together to form a solid base. Lay this dough evenly across the bottom of the prepared baking dish, ensuring it covers the entire surface to create a flaky foundation for your delicious squares.
Step 3: Add Layers
Evenly distribute your deli-sliced roast beef over the crescent roll base, covering it completely with tender pieces. Next, sprinkle a generous layer of grated Swiss cheese on top, ensuring every bite will be filled with that creamy, melt-in-your-mouth flavor.
Step 4: Make Seasoning Mixture
In a small bowl, combine the dry onion soup mix, melted butter, Worcestershire sauce, and garlic powder. Stir until well blended, then drizzle this savory mixture evenly over the cheese layer, allowing the flavors of the French Dip Squares to meld beautifully.
Step 5: Top with Dough
Unroll the second can of crescent rolls and place it across the top of the filling. Pinch the seams together to create one smooth layer, making sure the topping fully encases the beef and cheese beneath, sealing in all that deliciousness.
Step 6: Bake
Position the baking dish in the preheated oven and allow your French Dip Squares to bake for 15-20 minutes. Keep an eye on them, and look for a golden brown top as an indication that they are ready to be removed from the oven.
Step 7: Prepare Dipping Sauce
While the squares are baking, pour some beef broth into a small pot and warm it over medium heat. For a richer flavor, consider adding a pinch of salt or a dash of Worcestershire sauce to the broth, enhancing the dipping experience for your French Dip Squares.
Step 8: Cool and Cut
Once your French Dip Squares are baked to perfection, take them out of the oven and let them cool for about 5-10 minutes. This cooling step is essential for cleaner cuts; then, slice them into squares and serve alongside the warm beef broth for dipping.
Expert Tips for French Dip Squares
• Seal Those Seams: Be sure to pinch the crescent roll seams tightly to avoid any leaks during baking, ensuring a perfect presentation.
• Watch the Browning: Keep a close eye on your squares while they bake; they can brown quickly. If needed, cover with foil to prevent over-browning.
• Let Them Rest: Allowing the French Dip Squares to cool for a few minutes before cutting helps prevent cheese spillage and ensures cleaner squares.
• Flavor Variations: Experiment with different cheeses like provolone or cheddar for a unique flavor twist that complements the savory beef beautifully.
• Make Ahead: You can assemble the French Dip Squares ahead of time, refrigerate them, and bake just before serving—perfect for stress-free entertaining!
How to Store and Freeze French Dip Squares
Fridge: Store any leftover French Dip Squares in an airtight container in the fridge for up to 3 days. Ensure they are fully cooled before sealing to preserve their texture.
Freezer: If you want to enjoy them later, freeze the baked squares for up to 2 months. Wrap them tightly in plastic wrap followed by aluminum foil for maximum freshness.
Reheating: When you’re ready to eat, thaw the frozen squares overnight in the fridge. Reheat in the oven at 350°F (175°C) for about 15-20 minutes until warmed through.
Make-Ahead: You can assemble these squares ahead of time and store them in the fridge for up to 24 hours before baking. Perfect for meals when you’re short on time!
What to Serve with Easy French Dip Squares
Elevate your dining experience by pairing these delightful squares with side dishes that enhance their comforting flavors and textures.
-
Crispy Fries: The golden crunch of fries is the perfect contrast to the soft, cheesy squares, making every bite satisfying.
-
Fresh Green Salad: A light salad with a zesty vinaigrette provides a refreshing balance to the rich flavors of the French Dip Squares.
-
Coleslaw: The creamy crunch of coleslaw adds a delightful texture and tang, making every bite a burst of flavors.
-
Garlic Bread: A warm slice of garlic bread will complement the savory beef and cheese while soaking up the dipping broth.
-
Roasted Vegetables: Seasonal, roasted veggies add an earthy flavor and colorful presentation to your meal, enhancing its overall appeal.
-
Creamy Potato Salad: The cool and creamy contrast pairs beautifully while the savory notes of the salad echo the flavors of the squares.
-
Pickles or Pickled Veggies: A tangy bite of pickles offers a refreshing crunch against the rich ingredients of the dish.
-
Brewed Iced Tea: A glass of cold iced tea, sweetened or unsweetened, refreshingly cuts through the richness of the meal.
-
Chocolate Brownies: For dessert, indulge in fudgy brownies that provide a satisfying end to the meal, adding a hint of sweetness to balance the savory.
Make Ahead Options
These French Dip Squares are perfect for meal prep enthusiasts! You can assemble the entire dish up to 24 hours in advance by layering the crescent rolls, roast beef, and Swiss cheese, then topping with the seasoning mixture. Just cover it tightly with plastic wrap and refrigerate. To maintain quality, ensure the layers are sealed well to prevent drying out. When you’re ready to bake, simply preheat your oven and pop it in, adding an extra few minutes to the baking time if it’s straight from the fridge. This way, you’ll have delicious, restaurant-quality French Dip Squares with minimal effort, perfect for busy weeknights or impromptu gatherings!
French Dip Squares Variations & Substitutions
Let’s make these delightful French Dip Squares even more suited to your tastes and dietary preferences!
-
Dairy-Free: Use a dairy-free cheese alternative and plant-based butter for a delicious option that everyone can enjoy.
For those avoiding dairy, a nut-based cheese can provide creaminess without the guilt. The texture will still surprise you! -
High-Protein: Swap in lean, shredded chicken or turkey for a lighter protein option that packs a punch.
Feel free to experiment! The beauty of these squares is how they adapt to your favorite proteins while keeping that comforting essence. -
Veggie-Packed: Toss in sautéed mushrooms and spinach for a nutritious twist with vibrant flavors.
By incorporating these veggies, you add depth and texture. Plus, the earthy mushrooms pair beautifully with the rich beef! -
Herb-Infused: Add fresh or dried herbs like thyme or rosemary to the filling for an aromatic twist.
Just a sprinkle can elevate the flavor profile, reminiscent of cozy family dinners where each bite is infused with warmth. -
Spicy Kick: Incorporate jalapeños or switch to pepper jack cheese for those who love heat.
A little kick can transform the dish, taking it from comfort food to an exciting culinary adventure! -
Gluten-Free: Substitute the crescent rolls with gluten-free dough or tortillas for a delicious gluten-free experience.
No one will miss the wheat! The end result will still be flaky and flavorful, ensuring inclusivity at your gatherings. -
Mini Bites: Create bite-sized versions using a muffin tin for perfect party appetizers.
These mini French Dip Squares are perfect for gatherings, giving each guest a quick, tasty treat to enjoy.
For more delicious inspirations, try serving these alongside a salad or some crispy fries for a complete meal, or if you crave a cozy dessert, check out my French Butter Cake that rounds out the meal beautifully!
French Dip Squares Recipe FAQs
How do I choose ripe ingredients for French Dip Squares?
Absolutely! When selecting deli roast beef, look for tender cuts that should be vibrant in color without browning or slime. For cheeses, choose fresh blocks of Swiss or your preferred variety—avoid pre-shredded cheeses as they may contain additives that hinder melting. If you’re using fresh garlic, it should be firm and free from soft spots.
How do I store leftover French Dip Squares?
You can store leftover French Dip Squares in an airtight container in the refrigerator for up to 3 days. Make sure they are fully cooled before you seal them up to keep that perfect texture. If you haven’t eaten them within that time frame, it’s best to discard them to avoid any risk of spoilage.
Can I freeze French Dip Squares?
Yes, you can definitely freeze French Dip Squares! I recommend wrapping the cooled squares tightly in plastic wrap followed by aluminum foil to keep them fresh. They can be stored in the freezer for up to 2 months. When you’re ready to enjoy, thaw them overnight in the fridge, and then reheat them in the oven at 350°F (175°C) for about 15-20 minutes until warm.
What should I do if my French Dip Squares turn out soggy?
Very! If you find your squares turning out soggy, it could be due to excess moisture from the ingredients or insufficient baking time. Ensure that the roast beef is well-drained and that you’re not adding too much sauce into the layers. Also, be sure to bake them until the top is beautifully golden brown for a crisp finish. If you’re worried, you can also bake them in a preheated oven, starting from a cold dish, to help achieve that ideal texture.
Can I make French Dip Squares ahead of time?
Absolutely! You can assemble your French Dip Squares up to 24 hours in advance. Simply store them covered in the refrigerator until you’re ready to pop them in the oven right before serving. Just remember to add a few extra minutes to the baking time if they’re cold from the fridge.
Are French Dip Squares suitable for those with dietary restrictions?
Very! If you’re catering to someone with dietary restrictions, consider using sliced turkey or ham as a lighter version of the protein. For dairy-free options, try using vegan cheese and a plant-based broth. Always check the labels of your ingredients to ensure they’re free from allergens for guests with reactions.
Delicious French Dip Squares: Easy Comfort Food for Everyone
Ingredients
Equipment
Method
- Preheat your oven to 375°F (190°C). Lightly spray a 9x13 inch baking dish with non-stick cooking spray.
- Unroll the first can of refrigerated crescent rolls and press the seams together to form a solid base. Lay this dough evenly across the bottom of the prepared baking dish.
- Evenly distribute your deli-sliced roast beef over the crescent roll base, covering it completely. Next, sprinkle a layer of grated Swiss cheese on top.
- In a small bowl, combine the dry onion soup mix, melted butter, Worcestershire sauce, and garlic powder. Drizzle this mixture evenly over the cheese layer.
- Unroll the second can of crescent rolls and place it across the top of the filling, pinching the seams together to encase the filling.
- Bake in the preheated oven for 15-20 minutes until golden brown.
- While the squares are baking, warm some beef broth in a small pot over medium heat.
- Once baked, let the squares cool for about 5-10 minutes, then slice into squares and serve with warm beef broth for dipping.
Leave a Reply