
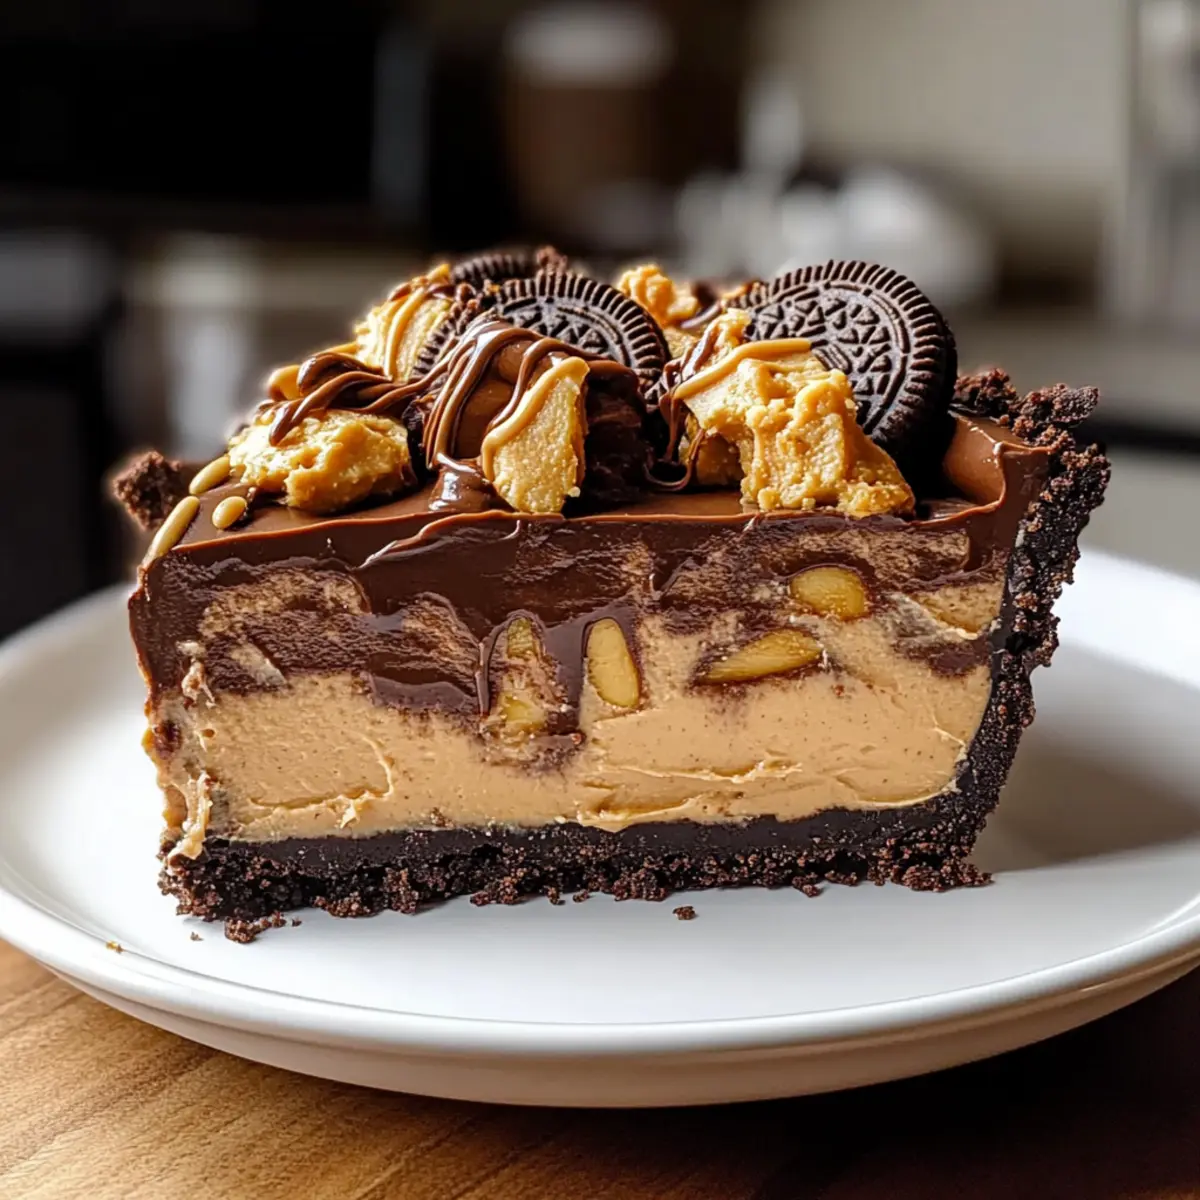
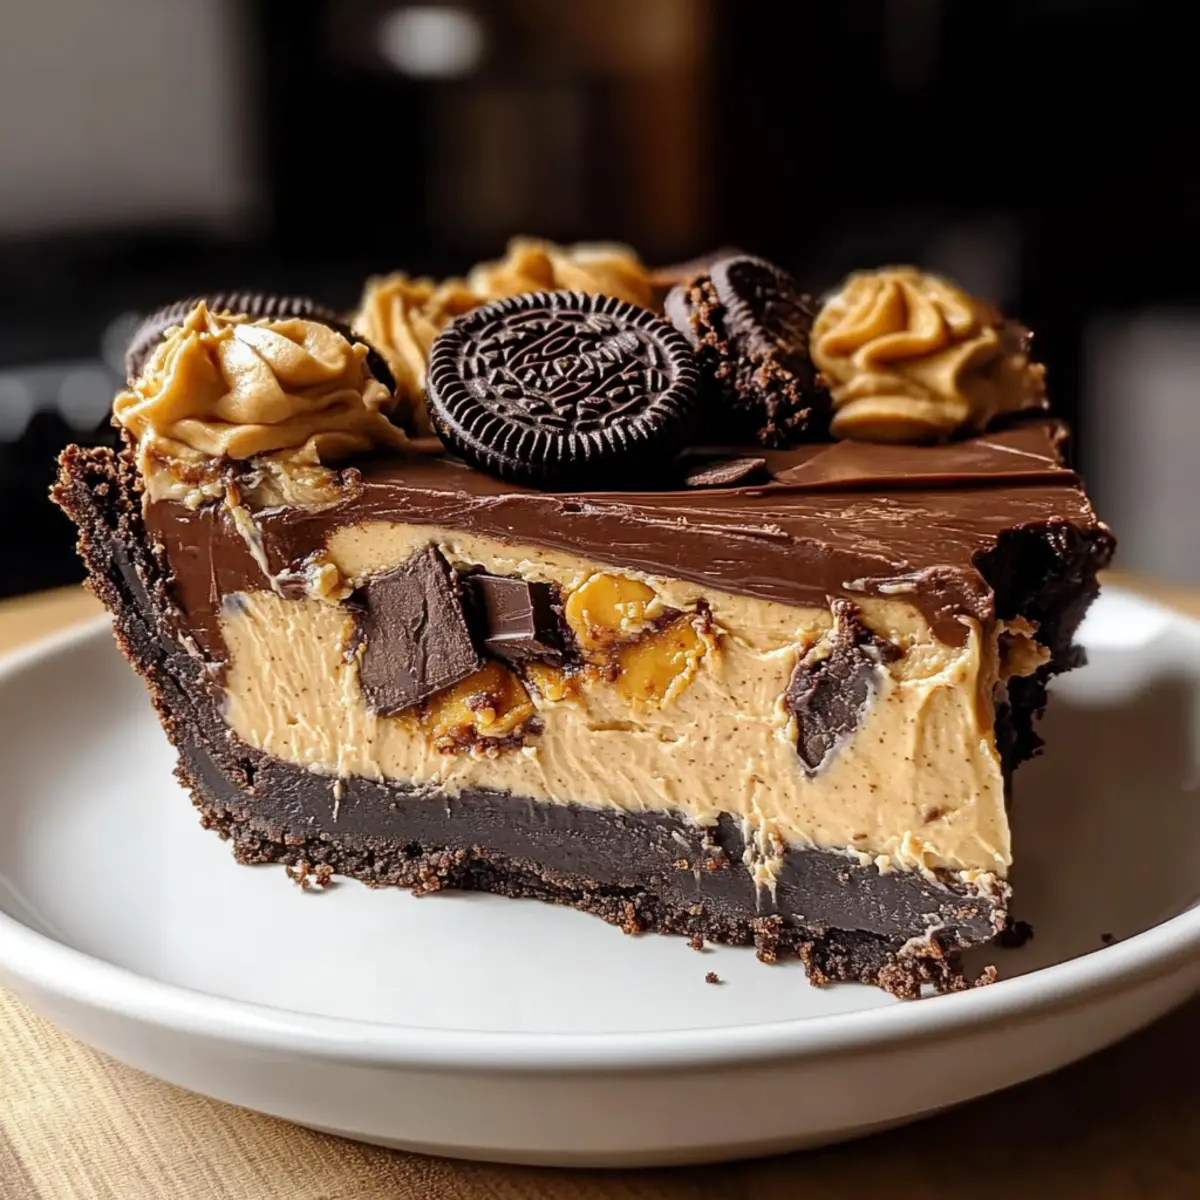
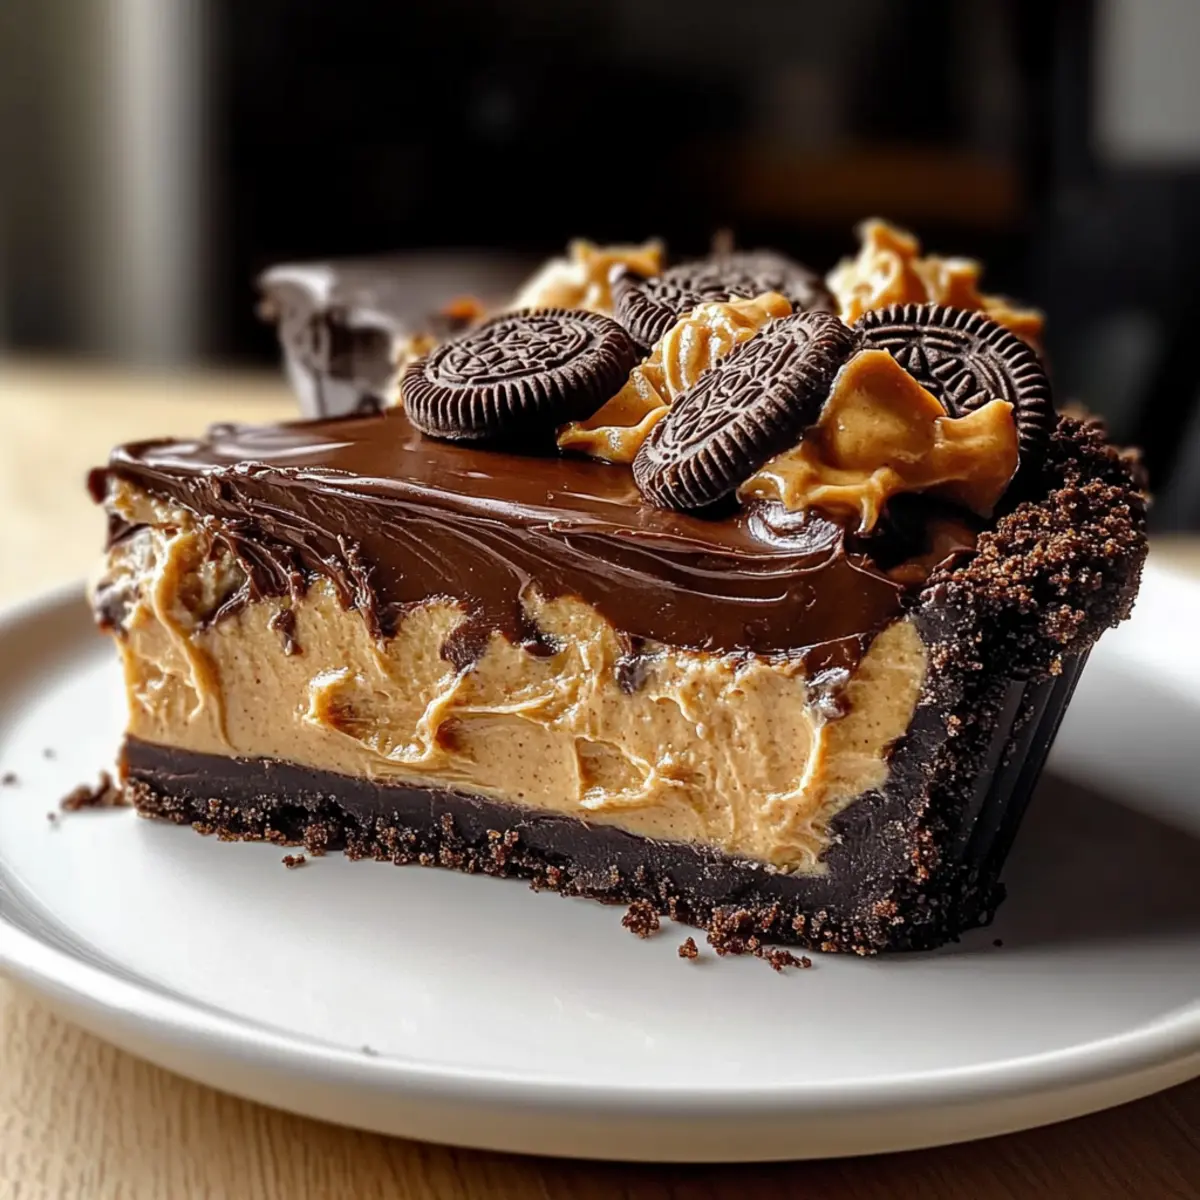
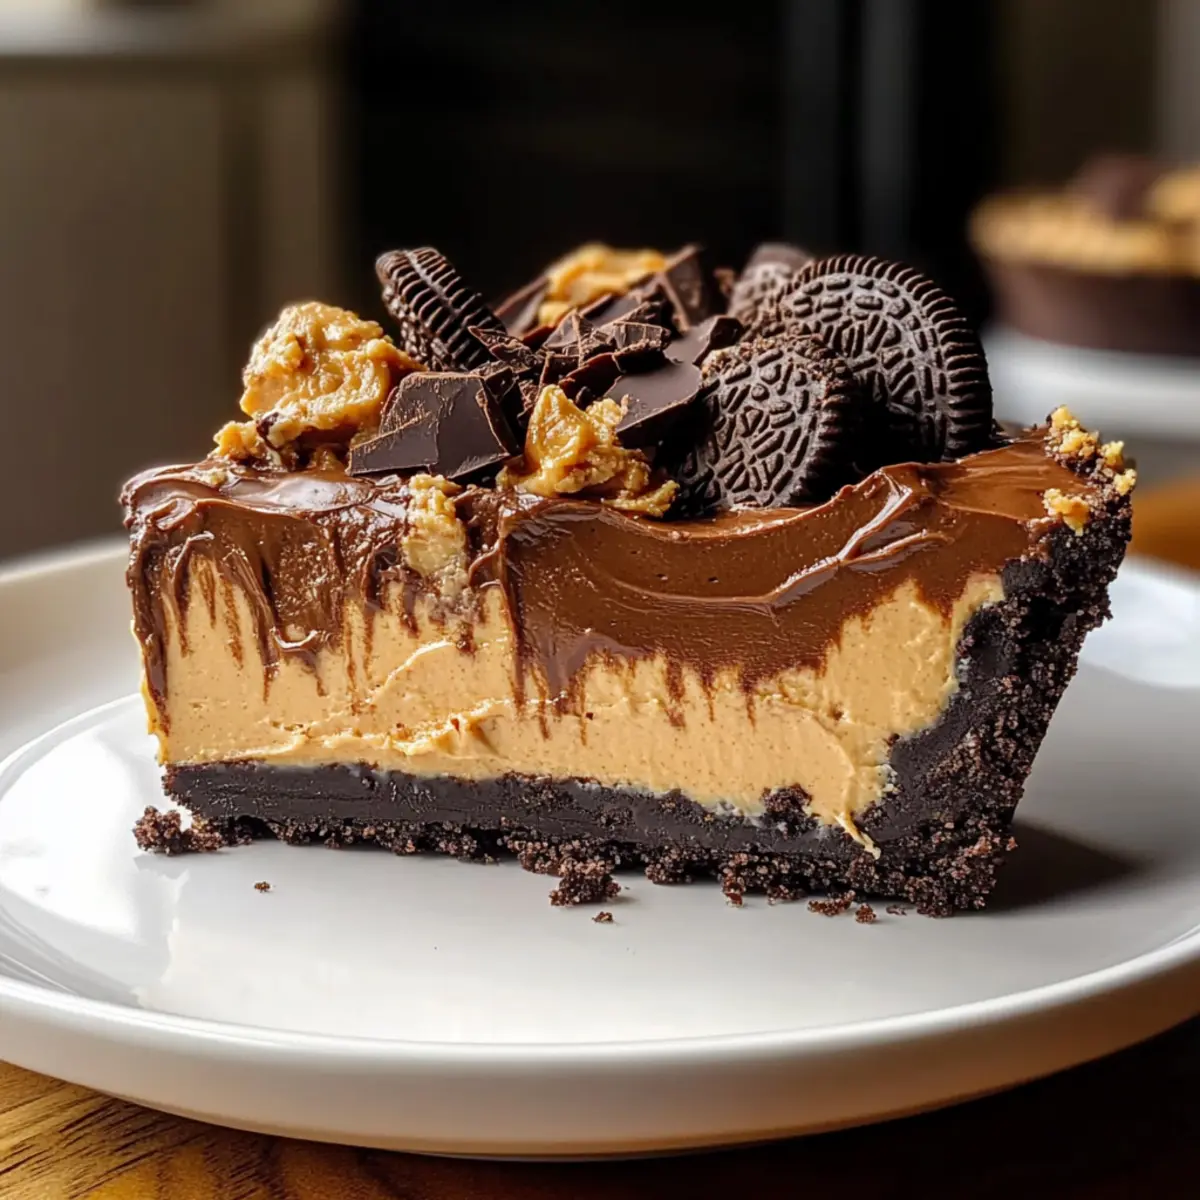
As I rummaged through my pantry in search of a quick sweet treat, an idea struck me: why not whip up a delightful no-bake dessert? Enter the incredible Chocolate Peanut Butter Pie! This indulgent creation features layers of luscious chocolate and creamy peanut butter that melt in your mouth, all resting on a crunchy Oreo crust. Perfect for those special occasions or simply when you need a little pick-me-up, this pie not only saves you time but also leaves everyone asking for seconds. Best of all, its straightforward preparation means that even the busiest home chefs can enjoy a homemade touch! Are you ready to dive into a slice of bliss?
Why is this Chocolate Peanut Butter Pie a Must-Try?
Irresistible Flavor: The harmonious blend of rich chocolate and creamy peanut butter makes each bite a delightful experience.
No-Bake Convenience: This recipe is perfect for those who want a delicious dessert without the fuss of baking—great for busy days or last-minute gatherings!
Crowd-Pleasing Appeal: Whether at a birthday party or a family dinner, this pie is sure to impress and satisfy everyone’s sweet tooth.
Versatile Options: Feel free to customize your pie with different nut butters or cookie crusts like graham crackers for a personal touch.
Quick Prep Time: With just a few simple steps, this dessert can be ready to chill in no time, allowing you to focus on creating memories around the table.
Make sure to pair this treat with a side of homemade Cowboy Butter Steak or indulge in a warm Chocolate Mug Cake for a delightful dinner experience!
Chocolate Peanut Butter Pie Ingredients
• For the Crust
- Oreo Cookies – The base of the crust, providing a comforting sweetness and crunch. Can use gluten-free cookies for a gluten-free option.
- Unsalted Butter – Binds the crust together and adds richness. Melt before mixing with the cookie crumbs.
For the Filling
- Cream Cheese – Adds a creamy texture that’s essential for the filling. Can substitute with mascarpone for a lighter touch.
- Peanut Butter – The star flavor of the pie, delivering a creamy and nutty taste. Optional to use almond butter or any nut butter for variation.
- Powdered Sugar – Sweetens and stabilizes the filling beautifully. Adjust the amount for your preferred sweetness.
- Cool Whip (or whipped cream) – Lightens the filling for a fluffy texture. Heavy cream whipped to soft peaks can be a good substitute.
- Chocolate Pudding Mix – Adds flavor and thickness for the chocolate layer. Ensure it’s instant pudding for this no-bake recipe.
- Milk – Necessary to prepare the pudding mix. Any milk or dairy alternative can work just fine.
For the Topping
- Peanut Butter Cups – Optional but highly recommended for an extra burst of flavor and a decorative touch.
Step‑by‑Step Instructions for Chocolate Peanut Butter Pie
Step 1: Prepare the crust
Start by crushing 2 cups of Oreo cookies in a food processor until they resemble fine crumbs. Melt 4 tablespoons of unsalted butter in the microwave, then mix it with the cookie crumbs in a large bowl until combined. Press this mixture evenly into the bottom of a 9-inch pie dish, ensuring it’s packed tightly. Refrigerate for at least 30 minutes to firm up the crust.
Step 2: Make the filling
In a mixing bowl, beat 8 ounces of softened cream cheese with 1 cup of creamy peanut butter until the mixture is smooth and well combined. Gradually add in 1 cup of powdered sugar, mixing until fully incorporated and sweetened to your taste. Gently fold in 2 cups of Cool Whip until the filling is light and fluffy, creating a luscious texture perfect for your Chocolate Peanut Butter Pie.
Step 3: Layer the pie
Spread half of the peanut butter filling over the chilled Oreo crust, making sure to cover it evenly. In a separate bowl, prepare 1 box of instant chocolate pudding mix with 2 cups of milk according to package instructions, whisking until thickened. Carefully pour this chocolate layer over the peanut butter filling, then top with the remaining peanut butter filling. Smooth the top for an inviting finish.
Step 4: Chill
Place your assembled Chocolate Peanut Butter Pie in the refrigerator for at least 6 hours or overnight, allowing it to set properly. This chilling time ensures that the layers firm up, resulting in a perfect slice every time. Before serving, you want the pie to feel firm and be easy to cut without falling apart.
Step 5: Serve
Once chilled, it’s time to bring your Chocolate Peanut Butter Pie to the table! Decorate the top with additional swirls of peanut butter and sprinkle chopped peanut butter cups for a pop of color and flavor. Cut into slices and serve straight from the refrigerator for a refreshing, indulgent dessert. Enjoy the delighted faces of your family and friends!
What to Serve with Decadent No-Bake Chocolate Peanut Butter Pie
Pair your delightful dessert with these fantastic options that will elevate your meal and satisfy every palate.
-
Fresh Berries: Juicy strawberries or raspberries add a refreshing burst that complements the rich creaminess of the pie. Their tartness is a perfect counterbalance to the sweetness of chocolate and peanut butter.
-
Vanilla Ice Cream: A scoop of smooth vanilla ice cream provides a cool contrast, making each bite feel even more indulgent. The creamy texture enhances the overall dessert experience.
-
Chocolate Drizzle: Drizzling melted chocolate over each slice not only looks stunning but also intensifies the chocolate flavor for true chocolate lovers. A touch of flair that guests will appreciate!
-
Whipped Cream: Light and airy, a dollop of freshly whipped cream on top adds elegance and creaminess, making it feel extra special. Plus, it visually enhances your pie’s presentation.
-
Espresso or Coffee: A piping hot cup of espresso or flavored coffee harmonizes beautifully with the dessert, bringing out the chocolate’s depth and complementing the peanut butter’s nuttiness.
-
Nutty Biscotti: Crunchy biscotti, especially if almond-flavored, adds a delightful texture and a nutty twist, making them an excellent pairing for a slice of pie during dessert.
-
Chocolate Milkshake: For a fun dessert duo, a rich chocolate milkshake creates a playful vibe that will remind everyone of childhood treats. This indulgent pairing is sure to delight!
Make Ahead Options
Preparing this decadent Chocolate Peanut Butter Pie in advance is a fantastic way to save time on busy days, allowing you to enjoy its rich, creamy delight without the last-minute rush. You can make the crust and filling up to 24 hours ahead; simply prepare the crust and refrigerate it while you whip up the filling. Store the filling in an airtight container in the fridge until you’re ready to layer it on the crust. When it’s time to serve, just assemble the pie by layering the filling and chilling it for at least 6 hours or overnight for perfect slices. This method ensures every bite is just as delicious as freshly made!
Tips for the Best Chocolate Peanut Butter Pie
-
Chill Thoroughly: Ensure you refrigerate the pie for at least 6 hours. This allows it to set properly, preventing a runny filling that can ruin your dessert experience.
-
Mix Carefully: When folding in Cool Whip, be gentle. Overmixing can deflate the filling, leading to a less fluffy texture in your Chocolate Peanut Butter Pie.
-
Taste as You Go: Adjust the sweetness of the filling by modifying the powdered sugar. Everyone’s sweetness preference varies, so make it your own!
-
Use Quality Ingredients: Opt for creamy peanut butter and high-quality chocolate pudding mix. The better the ingredients, the richer your pie will taste.
-
Serve Cold: For the best experience, serve your pie chilled. This contrasts beautifully with the creamy filling and enhances the overall flavor.
Chocolate Peanut Butter Pie Variations
Explore the endless possibilities to customize your Chocolate Peanut Butter Pie and make it uniquely yours!
-
Nut Butter Swap: Use almond butter or cashew butter for a different flavor twist. Each option brings a nutty richness that’s delightful.
-
Graham Cracker Crust: Instead of Oreos, use crushed graham crackers for a classic base. This change introduces a sweet, buttery note that’s wonderfully nostalgic.
-
Vegan Version: Substitute cream cheese and Cool Whip with coconut cream and dairy-free cream cheese for a luscious vegan treat. It’s a delicious way to enjoy dessert without dairy!
-
Flavor Boost: Add a teaspoon of vanilla extract to the filling for an extra depth of flavor. This simple addition can elevate your pie experience beautifully.
-
Chocolate Ganache Topping: Drizzle melted chocolate ganache over the top for an indulgent finish. The rich chocolate pairs exquisitely with the creamy layers below.
-
Nutty Crunch: Fold in chopped nuts, like walnuts or pecans, into the peanut butter layer for added texture and surprise. This contrast can turn every slice into an uplifting experience.
-
Spicy Kick: Add a pinch of cayenne pepper or red pepper flakes to the filling for a surprising heat that balances the sweetness. It’s a bold take, but one you’ll love!
-
Mini Pies: Make bite-sized versions in muffin tins for perfect party treats. These adorable mini-pies are not only cute but also a fun way to indulge!
Feel free to serve this pie alongside a refreshing side of Lemon Garlic Butter for a balanced dessert experience or pair it with a warm, comforting Chocolate Mug Cake for those who want double the chocolate bliss!
Storage Tips for Chocolate Peanut Butter Pie
Fridge: Store leftovers in an airtight container in the refrigerator for up to 3-4 days. This keeps the pie fresh and the flavors intact.
Freezer: For longer storage, wrap slices in plastic wrap and freeze for up to 2 months. Thaw them in the refrigerator before serving to maintain texture.
Serving: Always serve your Chocolate Peanut Butter Pie cold from the fridge to enhance its creamy and rich flavors for a delightful treat.
Chocolate Peanut Butter Pie Recipe FAQs
How do I choose ripe ingredients for this pie?
Absolutely! For the best flavor, use fresh, high-quality creamy peanut butter without added sugars or oils. Look for cream cheese that’s smooth and softened to room temperature, as this ensures a creamy filling. If using dairy milk for the pudding, opt for whole or reduced-fat to add richness, but any milk or dairy alternative works just as well.
What is the best way to store my leftover Chocolate Peanut Butter Pie?
Store any leftovers in an airtight container in the refrigerator for up to 3-4 days. This will help preserve the flavors and keep the filling fresh. Make sure to tightly seal your container; I often use a layer of plastic wrap over the pie to keep it from absorbing any odors from the fridge.
Can I freeze Chocolate Peanut Butter Pie?
You bet! To freeze slices, wrap them individually in plastic wrap, then place them in a freezer-safe bag or container. This keeps them fresh for up to 2 months. When you’re ready to enjoy a slice, simply transfer it to the refrigerator to thaw overnight. Enjoy the deliciousness all over again!
Why did my filling turn out runny?
If your filling is runny, it may need more chilling time to set. Ensure you refrigerate the pie for at least 6 hours or overnight. If you face this issue after taking it out of the fridge, you can try gently re-mixing it and chilling again, or simply enjoy it as a chocolate peanut butter parfait!
Can I make substitutions due to allergies or dietary preferences?
Very! To accommodate various dietary needs, you can use gluten-free Oreo cookies for the crust and choose dairy-free cream cheese and Cool Whip alternatives. If you’re allergic to nuts, consider using sun butter in place of peanut butter. Always check ingredient labels for any hidden allergens.
How can I enhance the flavors in my pie?
You can infuse even more deliciousness into your Chocolate Peanut Butter Pie by adding a teaspoon of vanilla extract to the filling or incorporating additional toppings like crushed nuts, chocolate syrup, or a sprinkle of sea salt to balance the sweetness. The more, the merrier!
Irresistible Chocolate Peanut Butter Pie You’ll Love to Make
Ingredients
Equipment
Method
- Start by crushing 2 cups of Oreo cookies in a food processor until they resemble fine crumbs.
- Melt 4 tablespoons of unsalted butter in the microwave, then mix it with the cookie crumbs in a large bowl until combined.
- Press this mixture evenly into the bottom of a 9-inch pie dish, ensuring it's packed tightly.
- Refrigerate for at least 30 minutes to firm up the crust.
- In a mixing bowl, beat 8 ounces of softened cream cheese with 1 cup of creamy peanut butter until the mixture is smooth and well combined.
- Gradually add in 1 cup of powdered sugar, mixing until fully incorporated.
- Gently fold in 2 cups of Cool Whip until the filling is light and fluffy.
- Spread half of the peanut butter filling over the chilled Oreo crust.
- In a separate bowl, prepare 1 box of instant chocolate pudding mix with 2 cups of milk according to package instructions, whisking until thickened.
- Carefully pour this chocolate layer over the peanut butter filling, then top with the remaining peanut butter filling.
- Smooth the top for an inviting finish.
- Place your assembled Chocolate Peanut Butter Pie in the refrigerator for at least 6 hours or overnight.
- Decorate the top with additional swirls of peanut butter and sprinkle chopped peanut butter cups before serving.
- Cut into slices and serve straight from the refrigerator.
Leave a Reply