
As I stood in the kitchen, the aroma of sizzling chicken filled the air, transporting me to the cozy comfort of a local diner. That’s the magic of these Chicken Caesar Sandwiches—I can whip them up in under 30 minutes, making them the perfect quick meal for busy days. With crispy, golden chicken nestled between warm, garlicky bread and a fresh romaine salad drizzled with creamy dressing, these sandwiches are not only satisfying but also a healthier twist on classic fast food. You can fully customize them to please every palate, whether by swapping ingredients or adding your favorite toppings. Curious about how to create this scrumptious delight? Let’s dive into the recipe!

Why Love Chicken Caesar Sandwiches?
Quick and Easy: This recipe saves you time, letting you enjoy a satisfying meal in just 30 minutes. Perfect for those busy days when you need a delicious dinner fast!
Flavor Explosion: Each bite offers a perfect blend of crispy chicken, fresh romaine, and zesty Caesar dressing, creating a delightful taste that will have your taste buds dancing.
Customizable Delight: Make it your own! Swap out romaine for kale or add crispy bacon for an extra kick. The options are endless!
Crowd Pleaser: Whether it’s a family dinner or a casual gathering, these sandwiches are guaranteed to impress and leave everyone asking for seconds. Pair with some crunchy chips or sweet potato fries for a complete feast.
Gourmet at Home: Enjoy a taste of diner-style sandwiches right in your kitchen, giving you a gourmet experience without the restaurant price tag. You might also love these Chopped Chicken Bacon or Garlic Parmesan Chicken options for a delightful twist!
Chicken Caesar Sandwiches Ingredients
For the Chicken
• Chicken Breasts – Use boneless, skinless chicken for a quick and convenient protein option.
• Egg and Milk Mixture – This helps bind the breadcrumbs for a golden, crispy coating; buttermilk is a great substitution for a richer taste.
• Garlic Powder, Salt, Pepper – Essential seasonings that elevate the flavors; fresh garlic can provide a stronger punch if preferred.
• Breadcrumbs & Panko – These create that crave-worthy crunchy texture, with Panko adding extra crispiness; gluten-free breadcrumbs are a perfect swap for gluten-sensitive diets.
• Vegetable Oil – Necessary for frying and getting that perfect crispy chicken; canola or peanut oil works wonderfully due to their higher smoke points.
For the Garlic Butter
• Salted Butter – Forms the base for the garlic butter, infusing rich flavor; unsalted butter can be used to control seasoning levels.
• Minced Garlic & Fresh Parsley – These add a burst of flavor to your garlic butter; dried parsley can be a good substitute in a pinch.
• Parmesan Cheese – Key for that classic Caesar flavor; swap with Pecorino Romano for a different twist.
For the Dressing
• Mayonnaise – Adds creaminess to both the dressing and garlic butter; try Greek yogurt for a lighter alternative.
• Sour Cream or Greek Yogurt – Forms the base of the dressing, providing tanginess; cream cheese can be used for a thicker consistency.
• Lemon Juice, Dijon Mustard, Anchovy Paste, Worcestershire Sauce – Each ingredient enhances the dressing’s flavor; for a vegetarian option, simply skip the anchovy.
For Assembly
• Romaine Lettuce – The crunchy base of your sandwich; feel free to swap in arugula or mixed greens for variety.
• Hoagies or Baguette – Holds everything together beautifully; gluten-free bread options are available for those needing them.
Just with these ingredients, you’re on your way to crafting delicious Chicken Caesar Sandwiches that will make any meal memorable!
Step‑by‑Step Instructions for Chicken Caesar Sandwiches
Step 1: Prepare the Chicken
Start by slicing boneless, skinless chicken breasts into thin cutlets. Season them generously with garlic powder, salt, and pepper. In a shallow bowl, whisk together an egg and milk mixture to help the breadcrumbs adhere. Dip each chicken cutlet into the egg mixture, allowing any excess to drip off, then coat them thoroughly with breadcrumbs, ensuring an even, crisp layer.
Step 2: Fry the Chicken
Heat about ½ inch of vegetable oil in a large skillet over medium-high heat until it reaches 350°F. Carefully add the breaded chicken cutlets to the hot oil, frying them in batches for about 5 minutes per side, or until they turn golden brown and crispy. Use tongs to flip them halfway through for even cooking. Once done, transfer the chicken to a towel-lined plate to drain excess oil.
Step 3: Make the Garlic Butter
While the chicken is frying, prepare the garlic butter by melting salted butter in a small bowl. Stir in minced garlic, freshly chopped parsley, and grated Parmesan cheese until well combined. This flavorful mixture will not only add richness to your sandwich but also give the bread an incredibly inviting aroma, so don’t leave it sitting too long!
Step 4: Toast the Bread
Preheat your oven to 450°F or turn on the broiler. Cut your hoagies or baguette in half, then generously spread the garlic butter mixture on the cut sides. Place them on a baking sheet and toast in the oven for about 3-4 minutes, or until they become golden and crispy. Keep a close eye on them to prevent burning while they toast to perfection.
Step 5: Prepare the Dressing
In a separate bowl, whisk together mayonnaise, sour cream or Greek yogurt, lemon juice, Dijon mustard, Worcestershire sauce, and anchovy paste. Add minced garlic and season to taste with salt and pepper. This creamy dressing will tie all elements together in your Chicken Caesar Sandwiches, providing a fresh and tangy flavor boost that complements the crispy chicken beautifully.
Step 6: Assemble the Sandwich
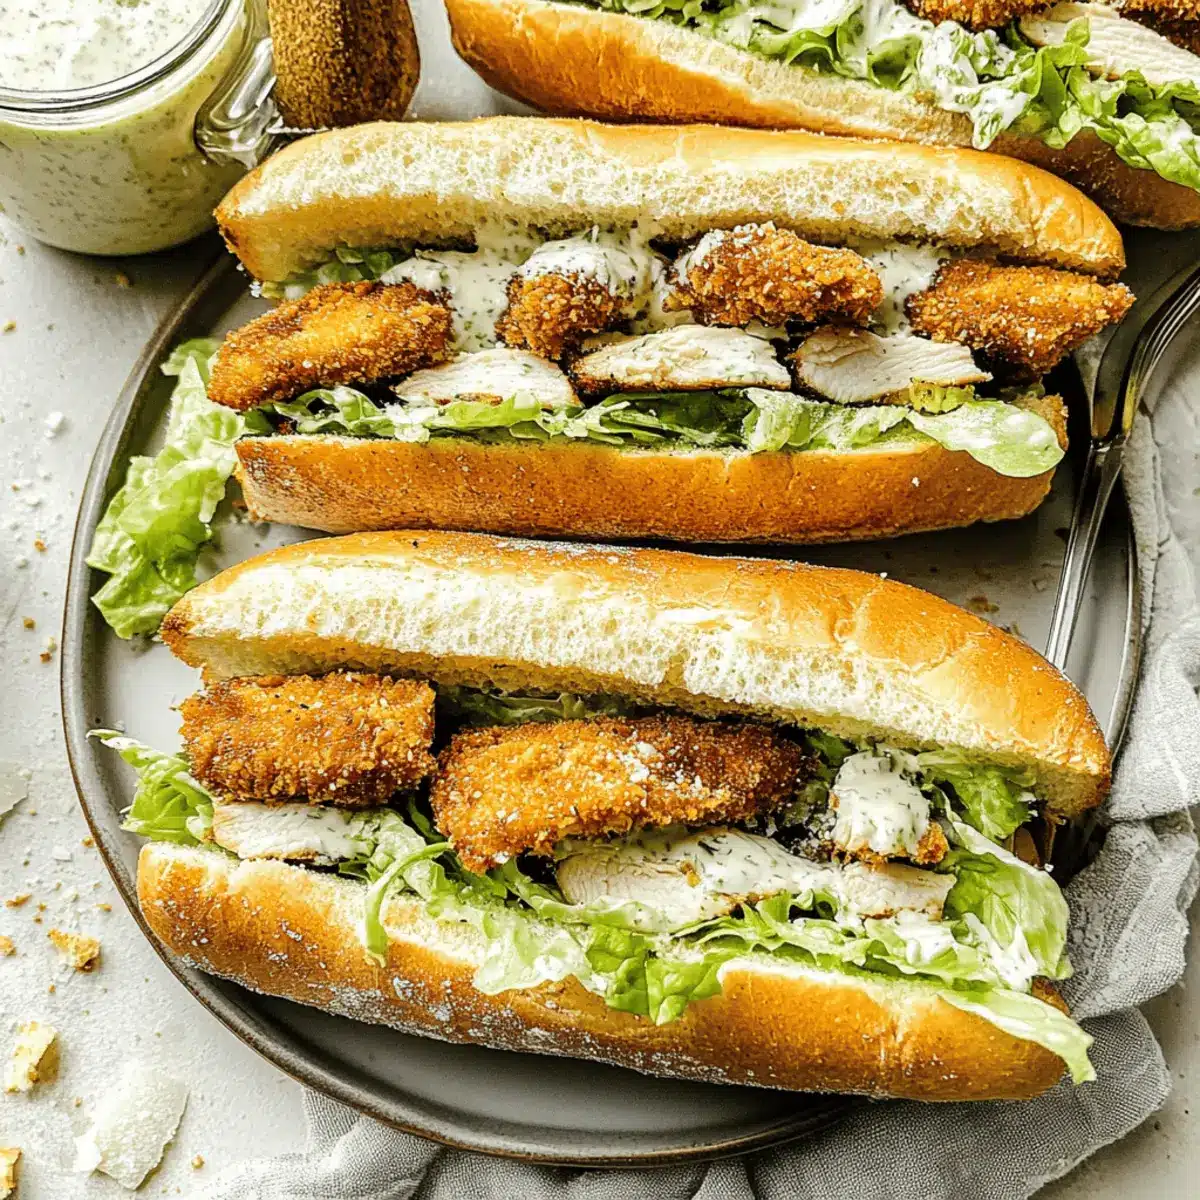
Once everything is ready, it’s assembly time! Start by layering the crispy fried chicken onto one half of the toasted garlic bread. Next, add a generous handful of romaine lettuce dressed with the creamy Caesar dressing, ensuring every leaf is coated. Sprinkle some extra Parmesan cheese on top before positioning the other half of the toasted bread to create a delicious and satisfying Chicken Caesar Sandwich. Serve immediately to savor that delightful crunch!

What to Serve with Chicken Caesar Sandwiches
Dive into a meal experience that’s bursting with flavor and textures, made to elevate your delicious sandwich!
-
Crispy Potato Chips: The delightful crunch of chips provides a satisfying contrast to the creamy Caesar flavors of the sandwich, creating a perfect snackable side.
-
Sweet Potato Fries: These add a touch of sweetness and extra nutrition, balancing the savory richness of the chicken beautifully.
-
Caesar Salad: Keep the flavors aligned with a fresh Caesar salad; the crisp greens and tangy dressing complement the sandwich without weighing you down.
-
Garlic Bread: For extra indulgence, serve with slices of garlic bread. The buttery, garlicky goodness ties in beautifully with the flavors of your sandwich, perfect for dipping!
-
Coleslaw: The crunch of coleslaw adds an exciting textural contrast and a zesty kick, freshening up each bite of your delectable sandwich.
-
Iced Tea or Lemonade: Pair with a refreshing iced tea or lemonade to balance the richness of the meal with a cool and crisp beverage, enhancing the entire dining experience.
-
Fruit Salad: A light fruit salad can cleanse the palate and add a refreshing touch to your meal, making it a delightful way to include something sweet and healthy.
-
Chocolate Chip Cookies: End on a sweet note with warm chocolate chip cookies; their comfort and nostalgia make for a perfect dessert to wrap up your meal.
Make Ahead Options
For those busy weeknights, these Chicken Caesar Sandwiches are perfect for meal prep! You can prepare the garlic butter and dressing up to 3 days in advance, storing them in airtight containers in the refrigerator to keep their flavors fresh. Additionally, breading the chicken can be done up to 24 hours ahead; just keep the pieces covered in the fridge to maintain their crispiness. When it’s time to serve, simply fry the chicken, toast the garlic butter bread, and assemble the sandwiches. With these make-ahead tips, you’ll enjoy a delicious meal with minimal effort, leaving you more time to unwind!
Expert Tips for Chicken Caesar Sandwiches
• Crisp Chicken Trick: Fry chicken immediately after breading to achieve optimal crispiness. Letting it sit will lead to sogginess.
• Oil Temperature: Use a thermometer to check that your frying oil is at 350°F. This ensures golden, crunchy chicken without overcooking.
• Ideal Assembly: Assemble sandwiches just before serving to prevent the bread from becoming soggy. This maintains that inviting texture.
• Storage Solutions: If you have leftovers, store chicken in the fridge for up to 3 days. Keep salad and bread separate to preserve crunch.
• Dress it Up: Experiment with toppings! Bacon or avocado can elevate your Chicken Caesar Sandwiches to the next level of deliciousness.
Chicken Caesar Sandwiches Variations
Feel free to customize your Chicken Caesar Sandwiches to match your taste buds and dietary needs!
-
Grilled Chicken: Swap fried chicken for grilled chicken fillets for a lighter, smoky flavor that’s just as delicious.
-
Greens Swap: Use arugula or baby kale instead of romaine for an exciting flavor twist and added nutrients. These leafy greens provide a peppery note that complements the creamy dressing beautifully.
-
Bacon Boost: Add crispy bacon strips for an irresistible richness and crunch. The savory bacon elevates the sandwich, making it a heartier option and perfect for indulgent lunches.
-
Avocado Addition: Incorporate slices of creamy avocado for a richer texture and healthy fats. This adds a wonderful creaminess that pairs perfectly with the tangy dressing.
-
Spicy Kick: Introduce sliced jalapeños or a drizzle of hot sauce to your sandwich for an added layer of heat. For those who love a spicy bite, this variation brings a fun twist.
-
Vegan Version: Use plant-based chicken alternatives and vegan mayo to create a delicious meat-free sandwich full of flavor and texture. It’s a great option to enjoy the same delicious taste while catering to dietary preferences.
-
Cheese Alternatives: Swap Parmesan for feta or goat cheese for a different flavor dimension. The tangy notes of these cheeses provide a lovely contrast to the creamy dressing.
-
International Flair: Add some Italian seasoning or a sprinkle of paprika for a flavor boost. Experimenting with different herbs can transform your classic Chicken Caesar into a gourmet delight.
No matter how you choose to customize, these variations ensure your Chicken Caesar Sandwiches are always a hit. If you’re interested in more sandwich ideas, you might enjoy these Chicken Caesar Pasta or delicious BBQ Chicken Mac recipes!
How to Store and Freeze Chicken Caesar Sandwiches
Fridge: Store any leftover Chicken Caesar Sandwiches in an airtight container for up to 3 days. Keep the salad and bread separate to maintain crispiness.
Freezer: If freezing, wrap assembled sandwiches individually in plastic wrap and then place them in a freezer-safe bag. They can be frozen for up to 2 months—thaw in the fridge overnight before reheating.
Reheating: To regain the crispy texture, reheat chicken in a toaster oven or air fryer at 350°F for about 5-7 minutes. Avoid microwaving, as this can make the bread soggy.
Assembly Tip: If you have leftover ingredients, store them separately and assemble a fresh sandwich when ready to enjoy—this keeps everything tasting delicious!

Chicken Caesar Sandwiches Recipe FAQs
What type of chicken is best for this recipe?
Absolutely! Boneless, skinless chicken breasts are the ideal choice for Chicken Caesar Sandwiches. They cook quickly and evenly, allowing the breading to cling perfectly for that delicious crispy texture. If you happen to have chicken thighs, those can also work well, providing a bit more flavor and juiciness.
How should I store any leftovers?
To keep your Chicken Caesar Sandwiches fresh, store any leftovers in an airtight container in the fridge for up to 3 days. It’s best to keep the salad and bread separate when storing, as this prevents the bread from getting soggy. When you’re ready to enjoy, simply reheat the chicken in a toaster oven or air fryer for that crispy finish!
Can I freeze Chicken Caesar Sandwiches?
Very much! If you’d like to freeze your assembled sandwiches, wrap each one individually in plastic wrap and then place them in a freezer-safe bag to protect them from freezer burn. They can be frozen for up to 2 months. Just remember to thaw in the fridge overnight before reheating to enjoy later!
What should I do if my chicken isn’t crispy?
If you find that your chicken isn’t as crispy as you’d like, it’s often due to the oil temperature. Make sure your frying oil is heated to 350°F before adding the chicken. If it’s too cool, the chicken will absorb more oil without getting that perfect crunch. Using a thermometer is a great way to check before you start frying!
What vegan alternatives can I use in this recipe?
If you’re looking for a vegan option, you can easily substitute chicken with crispy tofu or chickpea patties. For the dressing, use a combination of vegan mayonnaise and silken tofu to mimic that creamy consistency. Simply adjust the seasoning and ingredients to your taste, making a delightful plant-based version of Chicken Caesar Sandwiches!
Can my pet have any of these ingredients?
It’s best to avoid giving your furry friends any of the sandwich components, particularly seasoned chicken and garlic, which can be harmful to pets. If you want to share, consider offering plain, unseasoned chicken breast as a treat! Always check with your vet before introducing new foods to their diet.
Savory Chicken Caesar Sandwiches in Under 30 Minutes
Ingredients
Equipment
Method
- Slice boneless, skinless chicken breasts into thin cutlets. Season with garlic powder, salt, and pepper. Whisk egg and milk mixture in a shallow bowl, then dip chicken cutlets and coat with breadcrumbs.
- Heat vegetable oil in a skillet over medium-high heat to 350°F. Fry breaded chicken cutlets for about 5 minutes per side until golden brown. Transfer to a towel-lined plate to drain excess oil.
- Prepare garlic butter by melting butter in a small bowl. Stir in minced garlic, parsley, and Parmesan cheese until combined.
- Preheat oven to 450°F. Cut hoagies or baguette in half, spread garlic butter on cut sides, and toast in the oven for about 3-4 minutes until golden.
- Whisk together mayonnaise, sour cream, lemon juice, Dijon mustard, Worcestershire sauce, and anchovy paste in a bowl. Add minced garlic and season with salt and pepper.
- Layer crispy fried chicken onto one half of toasted garlic bread. Add romaine lettuce dressed with Caesar dressing, sprinkle Parmesan cheese, and top with the other half of toasted bread. Serve immediately.
Leave a Reply