
There I was, at a bustling farmer’s market, captivated by the sight of vibrant berries lined up like jewels. That moment sparked my imagination of creating an exquisite dessert that celebrates those fresh flavors—a vision that turned into this delightful No-Bake Chocolate Berry Tart. Naturally gluten-free, vegan, and requiring no oven, this easy dessert comes together in a flash while still delivering a fancy presentation that’s perfect for special occasions like Valentine’s Day. With its rich, creamy chocolate filling nestled in a crunchy cocoa crust, this tart is not only a show-stopper but also a guilt-free indulgence. Who knew such elegance could be so simple to achieve? Let’s dive into the recipe and see how we can bring this masterpiece to life in your kitchen!

Why is This Tart a Must-Try?
Irresistible Flavors: With its creamy chocolate filling and bursting fresh berries, each bite offers a taste sensation that’s both decadent and refreshing.
Effortless Elegance: Perfect for impressing guests, this no-bake dessert looks stunning without the fuss of baking. Just assemble and chill!
Versatile Options: Feel free to mix up the berries or try different nut butters in the filling, making it easy to adapt for seasonal fruits or personal preferences.
Healthy Indulgence: Made with gluten-free and vegan ingredients, this tart offers a guilt-free treat that aligns with many dietary needs, proving that healthy can be delicious!
Quick and Easy: From start to finish, you’ll whip this up in a flash, just like my Chocolate Mug Cake when you’re short on time but craving something sweet!
No-Bake Chocolate Berry Tart Ingredients
For the Crust
• Oats – Certified gluten-free oats are essential for avoiding cross-contamination.
• Cocoa Powder – Provides that deep chocolate flavor; carob powder can be used as an alternative.
• Maple Syrup – Acts as a natural sweetener; you can swap it for agave syrup for a different sweetness profile.
• Coconut Oil – Binds the crust; if you’re looking for oil-free, nut butter is a great alternative.
For the Filling
• Canned Coconut Milk – Choose the canned version for a rich and creamy texture; this is key to achieving the best filling consistency.
• Cocoa Powder – Adding a little extra to the filling will intensify that chocolate experience; remember to keep it within your no-bake chocolate berry tart for maximum flavor.
• Maple Syrup – Sweetens your filling just right; agave syrup can take its place if preferred.
• Coconut Oil – Thickens the filling; vegan butter can be used if you’re looking for a non-coconut flavor.
For the Topping
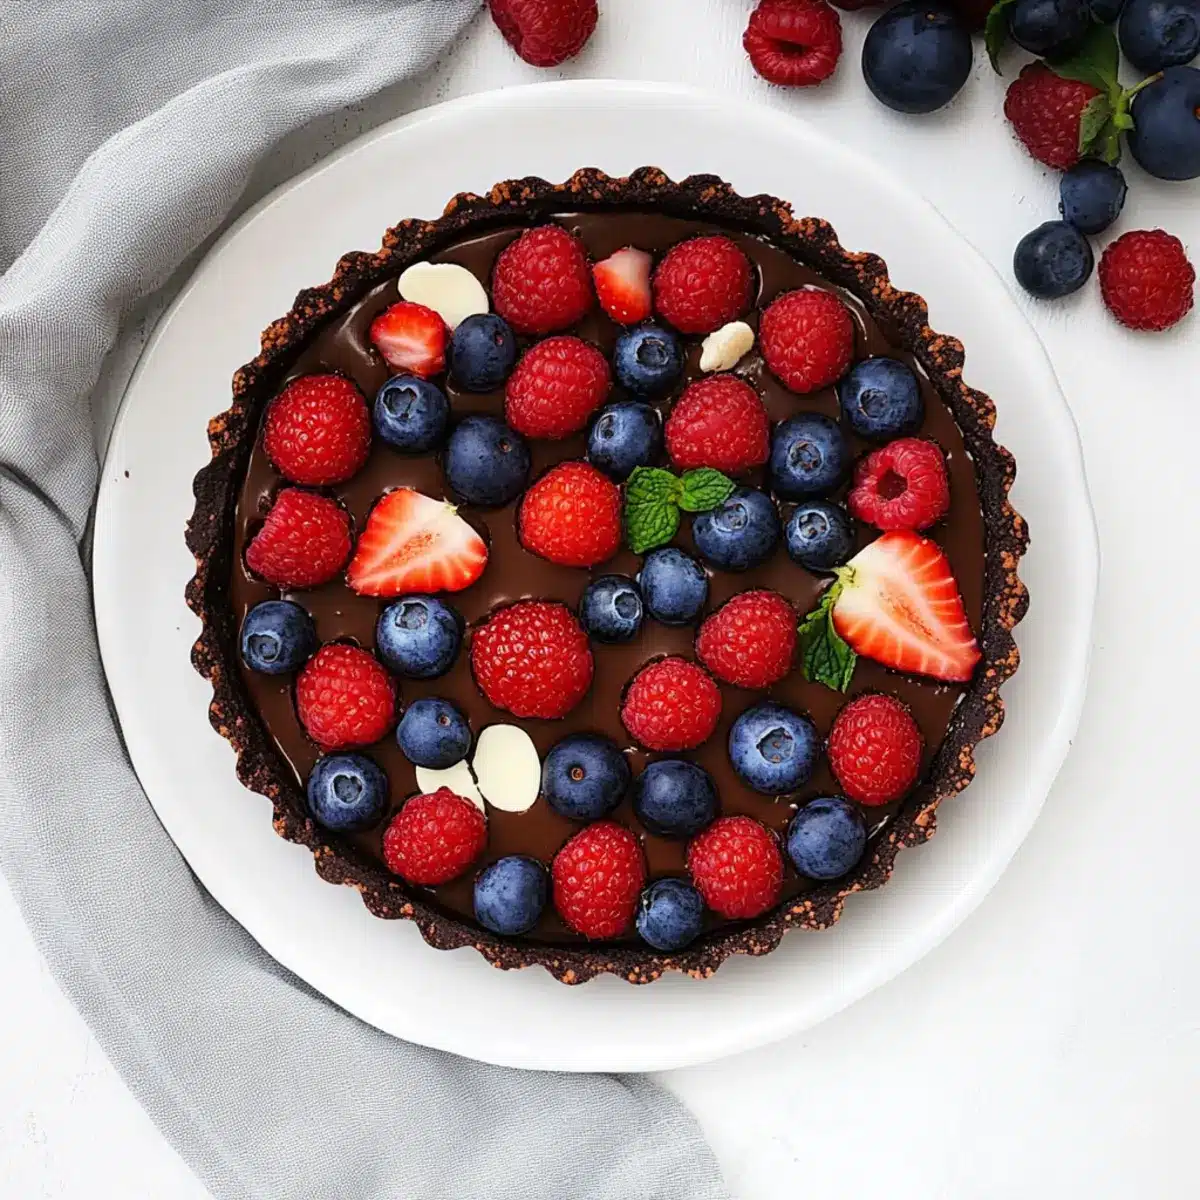
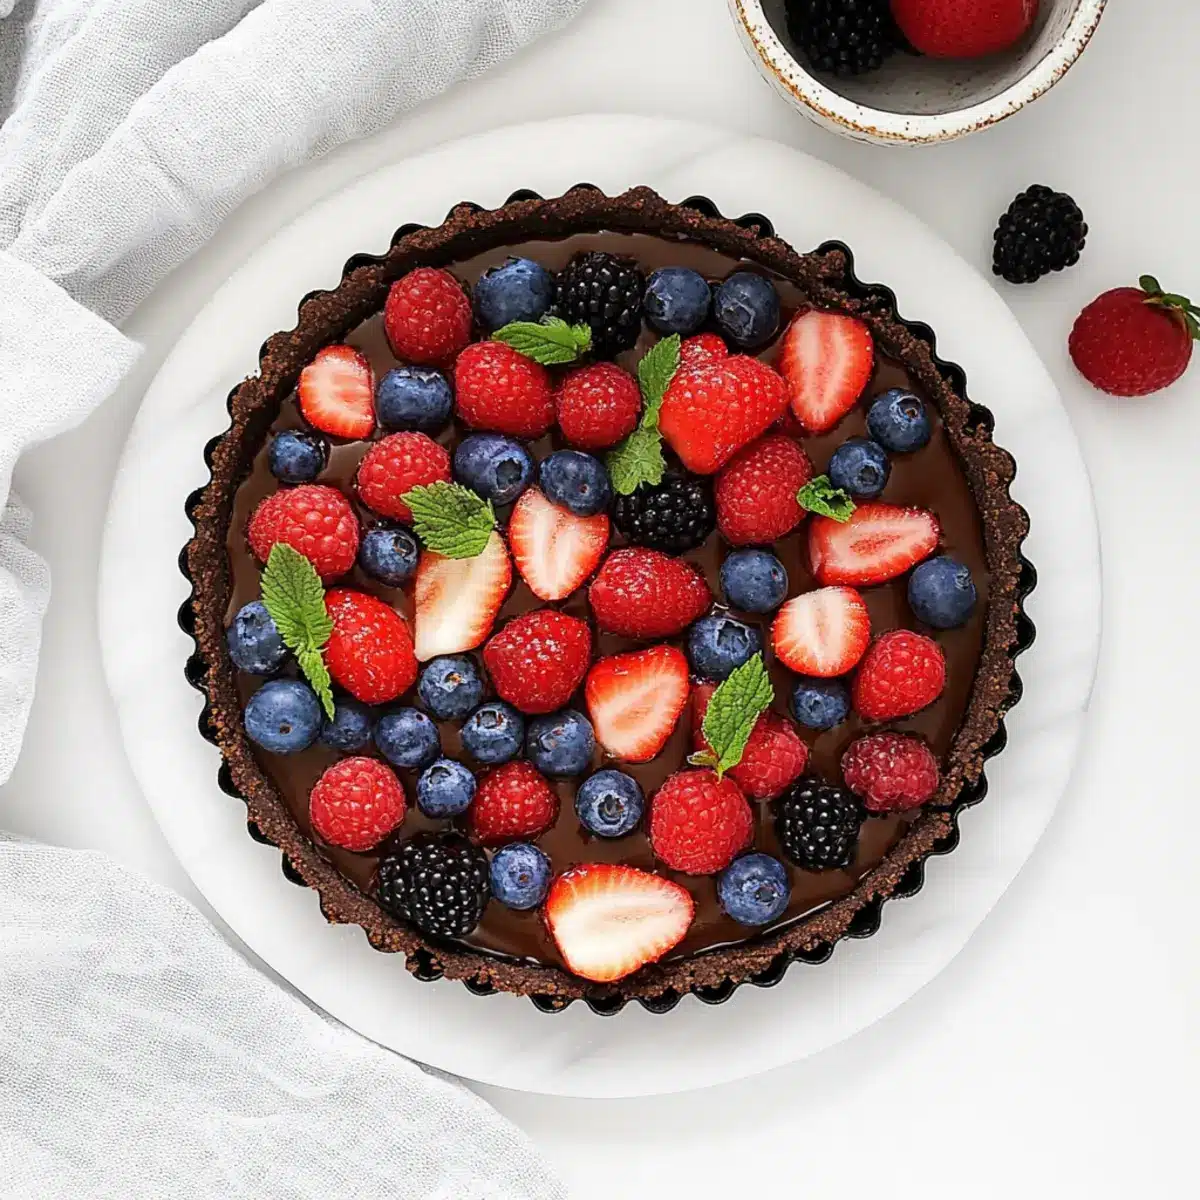
• Fresh Berries (e.g., strawberries, raspberries) – These add freshness and flair; frozen berries can be used but may make the tart soggy.
Step‑by‑Step Instructions for No-Bake Chocolate Berry Tart
Step 1: Prepare the Crust
In a food processor, blend 1 cup of certified gluten-free oats and 1/4 cup of cocoa powder until finely ground. Then, add 1/4 cup of melted coconut oil and 2 tablespoons of maple syrup, blending until the mixture is combined and resembles wet sand. Press this mixture firmly into the bottom and up the sides of a tart pan, creating an even layer.
Step 2: Make the Filling
In the same food processor, combine 1 can of full-fat coconut milk, 1/4 cup of cocoa powder, 1/4 cup of maple syrup, and 2 tablespoons of melted coconut oil. Blend this mix until extremely smooth and creamy, about 1–2 minutes. This velvety filling will enrich your No-Bake Chocolate Berry Tart, so pour it over the prepared crust and spread evenly with a spatula.
Step 3: Chill
Place the tart in the refrigerator and chill for at least 4 hours, or until the filling has set completely. This cooling step is crucial for achieving that perfect firm texture; the filling should be slightly firm to the touch and hold its shape when cut. While it chills, you can prepare your fresh berries for the topping.
Step 4: Add Berries
Once the tart is fully set, carefully remove it from the fridge. Just before serving, arrange a mix of fresh berries—like strawberries and raspberries—on top of the filling. This not only adds a burst of color but also freshness to your No-Bake Chocolate Berry Tart. Serve immediately to enjoy the contrast of creamy chocolate and juicy berries.

Make Ahead Options
This No-Bake Chocolate Berry Tart is perfect for busy home cooks looking to save time! You can prepare the crust and filling up to 24 hours in advance. To do this, simply follow the first two steps of the recipe and chill the tart in the refrigerator until set. However, it’s crucial to add the fresh berries just before serving to prevent them from becoming soggy. If your tart has already chilled for several hours, you can keep it fresh by covering it tightly with plastic wrap. When you’re ready to enjoy, simply top it with berries and serve—delivering a stunning dessert with minimal effort!
What to Serve with No-Bake Chocolate Berry Tart
Elevate your dessert experience by pairing this indulgent tart with delightful accompaniments that enhance its unique flavors.
-
Whipped Coconut Cream: Light and airy, this vegan cream adds a luscious texture that beautifully balances the tart’s richness. A dollop on top makes every bite feel luxurious.
-
Fresh Mint Leaves: Bright and aromatic, mint adds a refreshing contrast to the sweet chocolate and berries. The vibrant green also enhances the presentation, inviting you in for a taste.
-
Crispy Almond Biscotti: Crunchy and slightly sweet, these Italian cookies make a delightful pairing. Their texture offers a satisfying crunch that complements the creamy filling.
-
Chocolate Espresso Martini: For the adults, this cocktail brings a rich coffee flavor that pairs perfectly with the cocoa notes in the tart. It’s a sophisticated way to enhance your dessert experience.
-
Chilled Fruit Salad: A colorful medley of seasonal fruits adds a refreshing, juicy element. The natural sweetness complements the tart without overwhelming it.
-
Dark Chocolate Shavings: Sprinkle some shavings on top for a gourmet touch. The bittersweet chocolate intensifies the dessert experience, delighting chocolate lovers.
-
Savory Sweet Potato Biscuits: Unexpected but delicious, these biscuits provide a savory element that contrasts beautifully with the sweet tart, balancing flavors for a unique bite.
-
Elderflower Sparkling Water: This lightly floral beverage refreshes the palate, making it a perfect, elegant drink to accompany dessert without overpowering the flavors.
-
Almond Milk Hot Chocolate: Cozy and comforting, this warm drink can be an unexpected but delightful pairing, especially on a chilly evening. It creates a lovely contrast to the chilled tart.
No-Bake Chocolate Berry Tart Variations
Feel free to play around with this delightful tart—your taste buds will thank you!
-
Nut-Free: Swap the crust for a base made of gluten-free graham crackers or use almond flour if you aren’t avoiding nuts. This change will give you a unique flavor and texture.
-
Fruity Twist: Try using tropical fruits like mango or kiwi as toppings instead of berries. Each vibrant slice will lead you on a fresh, faraway getaway with every bite.
-
Chocolate Lovers: Add a splash of espresso or a teaspoon of instant coffee to the filling for a rich mocha flavor. This will elevate your chocolate experience to a luscious new level.
-
Spicy Kick: Mix in a pinch of cayenne or chili powder in the filling for a surprising warmth that contrasts beautifully with the sweetness. Just be careful, a little goes a long way!
-
Nut Butter Delight: Fold in your choice of nut butter (like almond or peanut butter) into the filling for added creaminess and flavor. The result is a satisfying and rich bite.
-
Seasonal Flavors: As seasons change, so should your tart! Use pumpkin puree in the fall or crushed mint leaves for a fresh twist during the summer. The possibilities are endless!
-
Health Boost: Experiment with protein powder in the filling. It’s an easy way to add nutrients without compromising on flavor. You can also check out these delicious 4-Ingredient Chocolate Oat Cookies as a great pair with the tart.
-
Dairy-Free Chocolate Drizzle: Finish with a drizzle of melted dairy-free chocolate over the top for an extra touch of sweetness. It not only enhances flavor but also makes for a beautiful presentation with a glossy sheen!
With these mouth-watering variations, your No-Bake Chocolate Berry Tart can become uniquely yours, each serving a slice of heaven!
Tips for the Best No-Bake Chocolate Berry Tart
-
Quality Ingredients: Use high-quality, organic cocoa powder and pure maple syrup to enhance the flavors in your no-bake chocolate berry tart.
-
Proper Chilling: Don’t skip the chilling step! Ensuring that the tart cools for at least 4 hours solidifies the creamy filling and brings out the best texture.
-
Fresh Berries Only: For the prettiest presentation and best flavor, opt for fresh berries right before serving. Frozen berries can make the tart soggy.
-
Customize Your Crust: Experiment with different bases, like crushed nuts or almond flour, for a unique twist on the traditional oat crust in your no-bake chocolate berry tart.
-
Avoid Overmixing: When blending the filling, mix just until smooth to avoid incorporating too much air, which can affect the texture once set.
Storage Tips for No-Bake Chocolate Berry Tart
Fridge: Store leftover tart in an airtight container for up to 4-5 days. It’s best enjoyed fresh, so consider making it right before serving for maximum flavor.
Assemble Without Berries: If you plan to store the tart, assemble it without the fresh berries. Add them just before serving to prevent sogginess and maintain their vibrant appearance.
Freezer: This tart is not recommended for freezing once topped with berries, as they may release juice upon thawing. However, the crust and filling can be frozen separately for up to 1 month when wrapped tightly.
Thawing: If you freeze the crust and filling, thaw them in the fridge overnight before assembling. Always top with fresh berries right before serving for the best taste and texture!
No-Bake Chocolate Berry Tart Recipe FAQs
What kind of oats should I use for the tart crust?
Absolutely! Make sure to use certified gluten-free oats to avoid any cross-contamination if you’re catering to gluten-free diets. They provide a sturdy base for the crust, ensuring it holds together beautifully while remaining safe for those with gluten sensitivities.
How should I store leftover No-Bake Chocolate Berry Tart?
You can store the leftover tart in an airtight container in the refrigerator for up to 4-5 days. To preserve the flavor and texture, I recommend adding fresh berries just before serving. This way, your tart remains delightful and doesn’t get soggy!
Can I freeze the No-Bake Chocolate Berry Tart?
Yes, but with a little caution! The filling and crust can be frozen separately for up to 1 month. Wrap them tightly in plastic wrap or store in airtight containers. When you’re ready to enjoy, simply thaw them in the fridge overnight, then assemble the tart and top it with fresh berries just before serving for the best presentation.
What if my filling isn’t setting properly?
Very! If the filling is too runny, make sure you blended all the ingredients long enough and allowed it to chill in the refrigerator for at least 4 hours. If you still find it too soft, you might try adding a bit more cocoa powder; this can help thicken it up a bit. Remember, patience is key for that perfect texture!
Are there any allergy considerations to keep in mind?
Definitely! This recipe is vegan and gluten-free, making it an excellent choice for many dietary needs. However, pay attention to any nut allergies as some variations may include nut butter in the filling or crust. Always check labels for any hidden allergens if you’re serving guests with specific dietary considerations.
No-Bake Chocolate Berry Tart That's a Slice of Heaven
Ingredients
Equipment
Method
- In a food processor, blend 1 cup of certified gluten-free oats and 1/4 cup of cocoa powder until finely ground. Then, add 1/4 cup of melted coconut oil and 2 tablespoons of maple syrup, blending until the mixture resembles wet sand. Press this into a tart pan.
- In the same food processor, combine 1 can of full-fat coconut milk, 1/4 cup of cocoa powder, 1/4 cup of maple syrup, and 2 tablespoons of melted coconut oil. Blend this mix until smooth and creamy, about 1–2 minutes. Pour over the prepared crust.
- Place the tart in the refrigerator and chill for at least 4 hours or until the filling has set completely.
- Once set, carefully remove the tart from the fridge. Before serving, arrange a mix of fresh berries on top.
Leave a Reply