
As I pulled a warm, aromatic Chili Garlic Chicken Pizza from the oven, the enticing scent enveloped my kitchen, igniting a sense of excitement that instantly transported me to my favorite local pizzeria. This recipe is not just a pizza; it’s a flavor-packed masterpiece that marries spicy and savory elements in a way that even the most devoted takeout enthusiasts will appreciate. What’s more, it’s incredibly adaptable, allowing you to customize spice levels and add toppings that cater to your crowd’s palate. Perfect for a cozy weeknight dinner or an entertaining get-together with friends, this homemade pizza is bound to become a family favorite. Curious about how easy it is to whip up this crowd-pleaser in your own kitchen? Let’s dive into the recipe!
Why Will You Love This Pizza?
Flavor Explosion: Each bite of this Chili Garlic Chicken Pizza is a delightful mix of spicy and savory, making it perfect for those who crave something bold and exciting.
Customizable: Adjust the heat by modifying the chili levels or adding your favorite toppings. You can even explore variations like a vegetarian style with roasted veggies or tofu.
Quick and Easy: With straightforward steps, you get restaurant-quality pizza fast, perfect for busy weeknights or unexpected guests.
Crowd-Pleaser: Impress your friends and family! This homemade pizza will surely steal the spotlight during gatherings, leaving everyone asking for seconds.
Perfect Texture: From the crispy crust to the gooey melted cheese, this pizza combines contrasting textures that make every bite satisfying. Whether you’re a seasoned chef or new to cooking, you’ll enjoy making this spicy masterpiece!
Chili Garlic Chicken Pizza Ingredients
For the Dough
- All-purpose flour – Structure for the pizza crust; substitute with gluten-free flour for a gluten-free option.
- Sugar – Helps activate the yeast; can be replaced with honey for a natural sweetener.
- Salt – Enhances flavor and strengthens the dough.
- Active dry yeast – Leavens the dough; instant yeast can be used without proofing.
- Warm water – Hydrates the dry ingredients and activates the yeast; ideal temperature is between 105-115°F (40-46°C).
- Olive oil – Provides moisture and richness to both the dough and marinade.
For the Chicken Marinade
- Boneless, skinless chicken breasts – Main protein source, adds texture; use tofu or veggies for a vegetarian option.
- Garlic – Essential for flavor in both the marinade and pizza.
- Red chilies – Adds heat; adjust quantity to control spice level; jalapeños can be used for a milder option.
- Soy sauce – Provides umami and saltiness; tamari can be used for a gluten-free version.
- Honey – Adds sweetness and balance to the marinade; agave syrup can be substituted.
- Rice vinegar – Adds acidity to the marinade; can swap with apple cider vinegar.
- Sesame oil – Offers a nutty flavor; omit for a nut-free option.
- Red pepper flakes – Optional for extra heat; adjust according to preference.
- Salt and black pepper – Basic seasoning for the chicken.
For the Pizza Assembly
- Chili garlic sauce – Main pizza sauce; use homemade or store-bought for convenience.
- Shredded mozzarella cheese – Primary cheese for creaminess; substitute with vegan cheese for a dairy-free option.
- Shredded provolone cheese – Optional for additional richness.
- Chopped fresh cilantro – Fresh garnish to enhance flavor.
- Thinly sliced green onions – Adds freshness and color to the final dish.
- Sesame seeds – Optional garnish for added texture.
Step‑by‑Step Instructions for Chili Garlic Chicken Pizza
Step 1: Activate Yeast
In a small bowl, dissolve the sugar and active dry yeast in warm water at 105-115°F (40-46°C). Allow the mixture to sit for 5-10 minutes until it becomes frothy, indicating that the yeast is activated and ready to work its magic in your dough for the Chili Garlic Chicken Pizza.
Step 2: Combine Dry Ingredients
In a large mixing bowl, whisk together the all-purpose flour and salt. This will ensure that your dough has a solid structure before you mix in the wet ingredients. Prepare for the next step while the yeast activates, as it’s crucial for a successful pizza crust.
Step 3: Make Dough
Once the yeast is frothy, pour the yeast mixture and olive oil into the bowl of dry ingredients. Mix everything together until a rough dough forms. This initial mix will be the basis for your Chili Garlic Chicken Pizza crust, so don’t rush—allow the ingredients to come together smoothly.
Step 4: Knead Dough
On a floured surface, turn out the dough and knead it for about 8-10 minutes. Your goal is to develop the gluten, resulting in a pliable dough that’s elastic and smooth. As you knead, feel the dough transform—it will become less sticky and more cohesive.
Step 5: First Rise
Lightly grease a large bowl and place your kneaded dough inside, covering it with a clean kitchen towel. Let it rise in a warm spot for 1 to 1.5 hours, or until the dough has doubled in size. This is where the real magic happens, as yeast ferments and creates air bubbles for a fluffy crust.
Step 6: Punch Down
Once the dough has risen, gently punch it down to release the air. This step is crucial for your Chili Garlic Chicken Pizza crust, as it helps to maintain the dough’s texture and prepares it for shaping. Once punched down, you’re ready to move on!
Step 7: Prepare Chicken
While the dough rises, take the boneless, skinless chicken breasts and cut them into bite-sized cubes. Set the chicken aside as you prepare the bold marinade that will infuse it with spicy, savory flavors, elevating your pizza to new heights.
Step 8: Make Marinade
In a medium bowl, whisk together olive oil, minced garlic, chopped red chilies, soy sauce, honey, rice vinegar, sesame oil, and a pinch of salt and black pepper. This sizzling marinade is essential for your Chili Garlic Chicken Pizza, as it flavors the chicken beautifully and adds depth to your dish.
Step 9: Marinate Chicken
Add the cubed chicken to the marinade, ensuring each piece is well-coated. Cover and refrigerate for at least 30 minutes, allowing the chicken to absorb all the fantastic flavors. In the meantime, take this opportunity to prepare your other ingredients for assembly.
Step 10: Cook Chicken
Heat a skillet over medium heat and add the marinated chicken. Sauté for about 8-10 minutes or until fully cooked, reaching an internal temperature of 165°F (74°C). The sizzling sound and rich aroma of the chicken indicate it’s time to take it off the heat for your Chili Garlic Chicken Pizza.
Step 11: Preheat Oven
As the chicken cooks, preheat your oven to 450°F (232°C). If you have a pizza stone, place it inside to heat up. A hot stone ensures that your pizza crust will bake evenly and develop a lovely golden color, crucial for a perfect Chili Garlic Chicken Pizza.
Step 12: Shape Pizza Dough
After the dough has risen and your oven is preheated, turn the dough out onto a floured surface. Roll it out to your desired thickness and shape, whether it’s classic round or thick crust. The dough should be smooth and easy to work with after the rising process.
Step 13: Transfer Dough
Carefully transfer the rolled-out dough onto a floured pizza peel or a baking sheet. This step is essential for moving your Chili Garlic Chicken Pizza to the oven easily, ensuring the base remains intact while you add the toppings.
Step 14: Add Sauce
Spread a generous layer of chili garlic sauce over the dough, leaving a border for the crust. Ensure an even distribution, as this savory sauce ties your pizza together, giving it that bold flavor profile your taste buds will love.
Step 15: Add Cheese
Sprinkle shredded mozzarella cheese evenly over the sauce, followed by optional provolone for added creaminess. The cheese will melt beautifully during baking, creating that gooey texture that makes every bite of your Chili Garlic Chicken Pizza totally irresistible.
Step 16: Top with Chicken
Distribute the sautéed chicken pieces evenly over the layer of cheese. This is where your pizza gets its identity—every slice will pack a punch of flavor from the perfectly marinated chicken, elevating your Chili Garlic Chicken Pizza to supreme levels of deliciousness.
Step 17: Bake Pizza
Carefully slide the pizza into your hot oven (or onto the pizza stone) and bake for 12-15 minutes. Watch for the crust to turn golden and the cheese to bubble—it’s the visual cue that your Chili Garlic Chicken Pizza is nearing perfection.
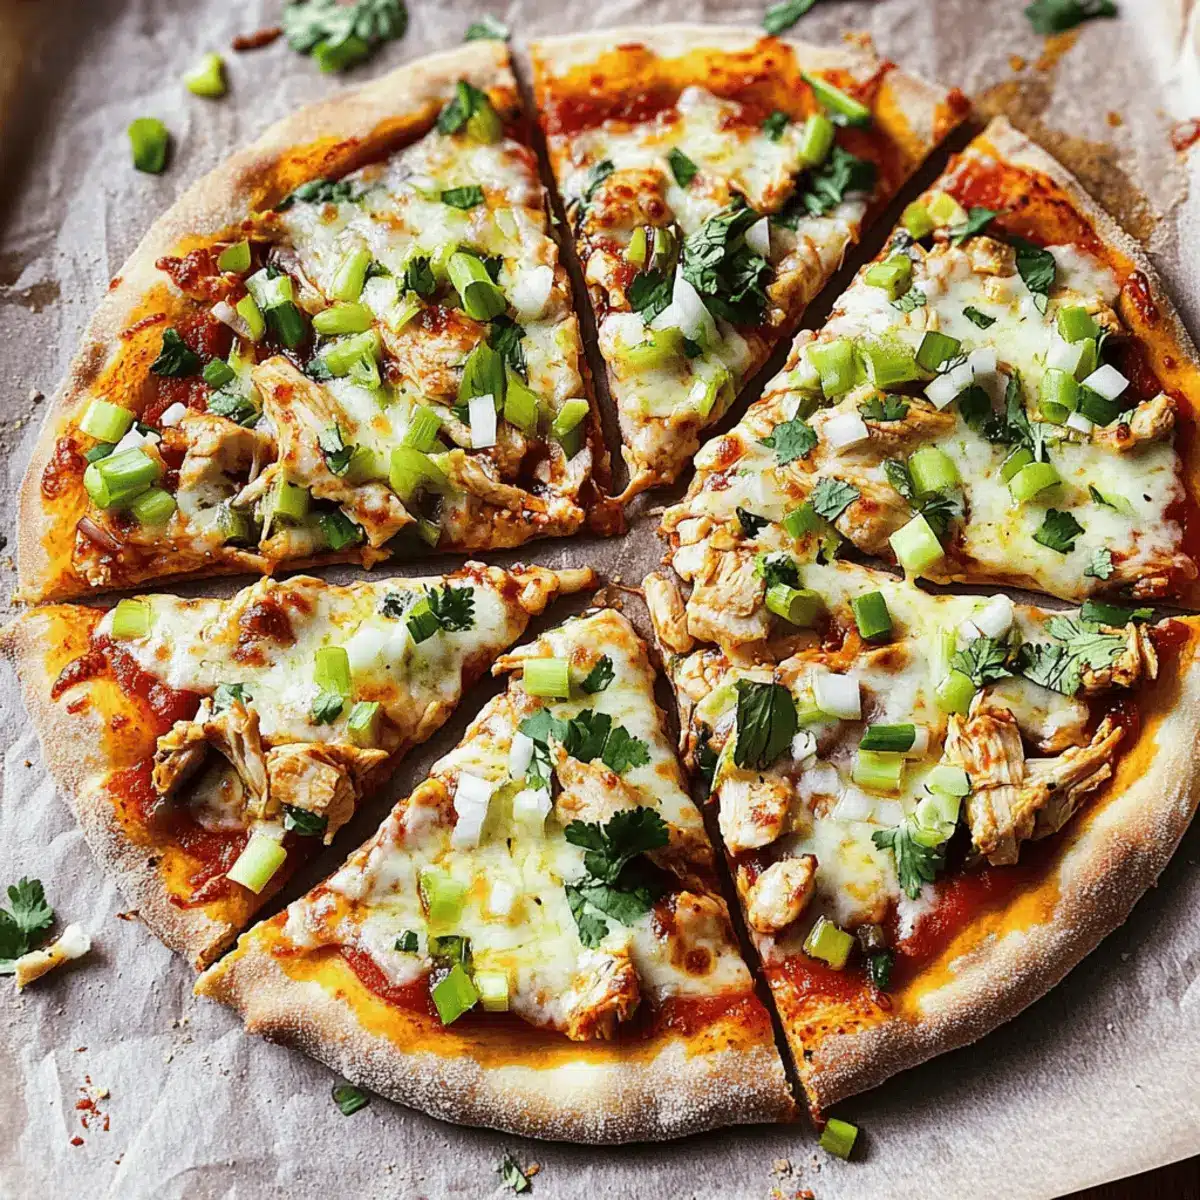
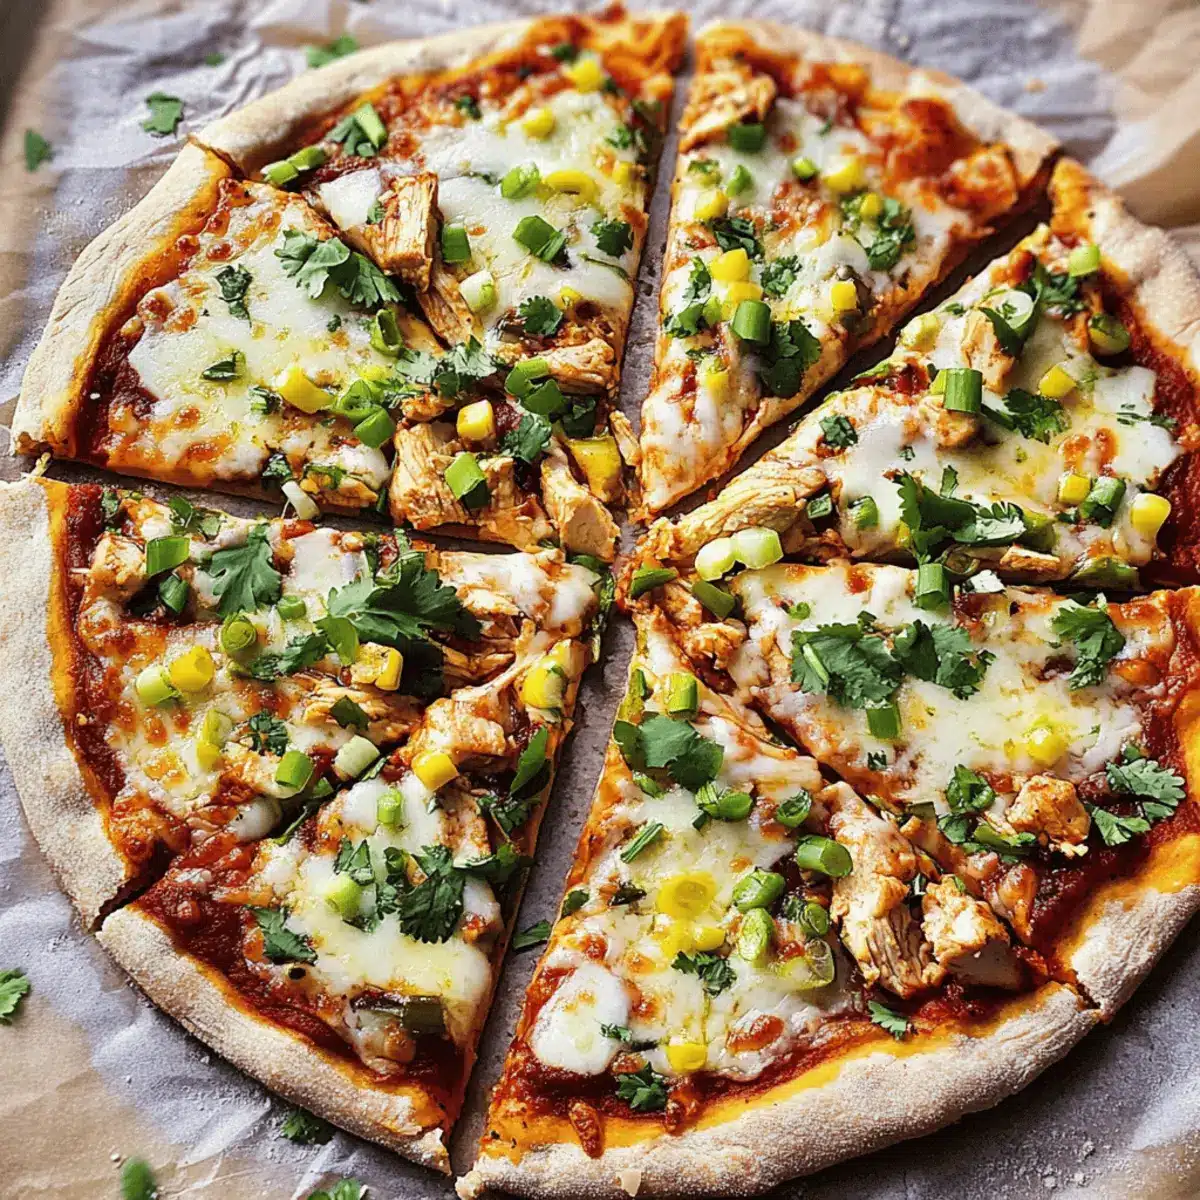
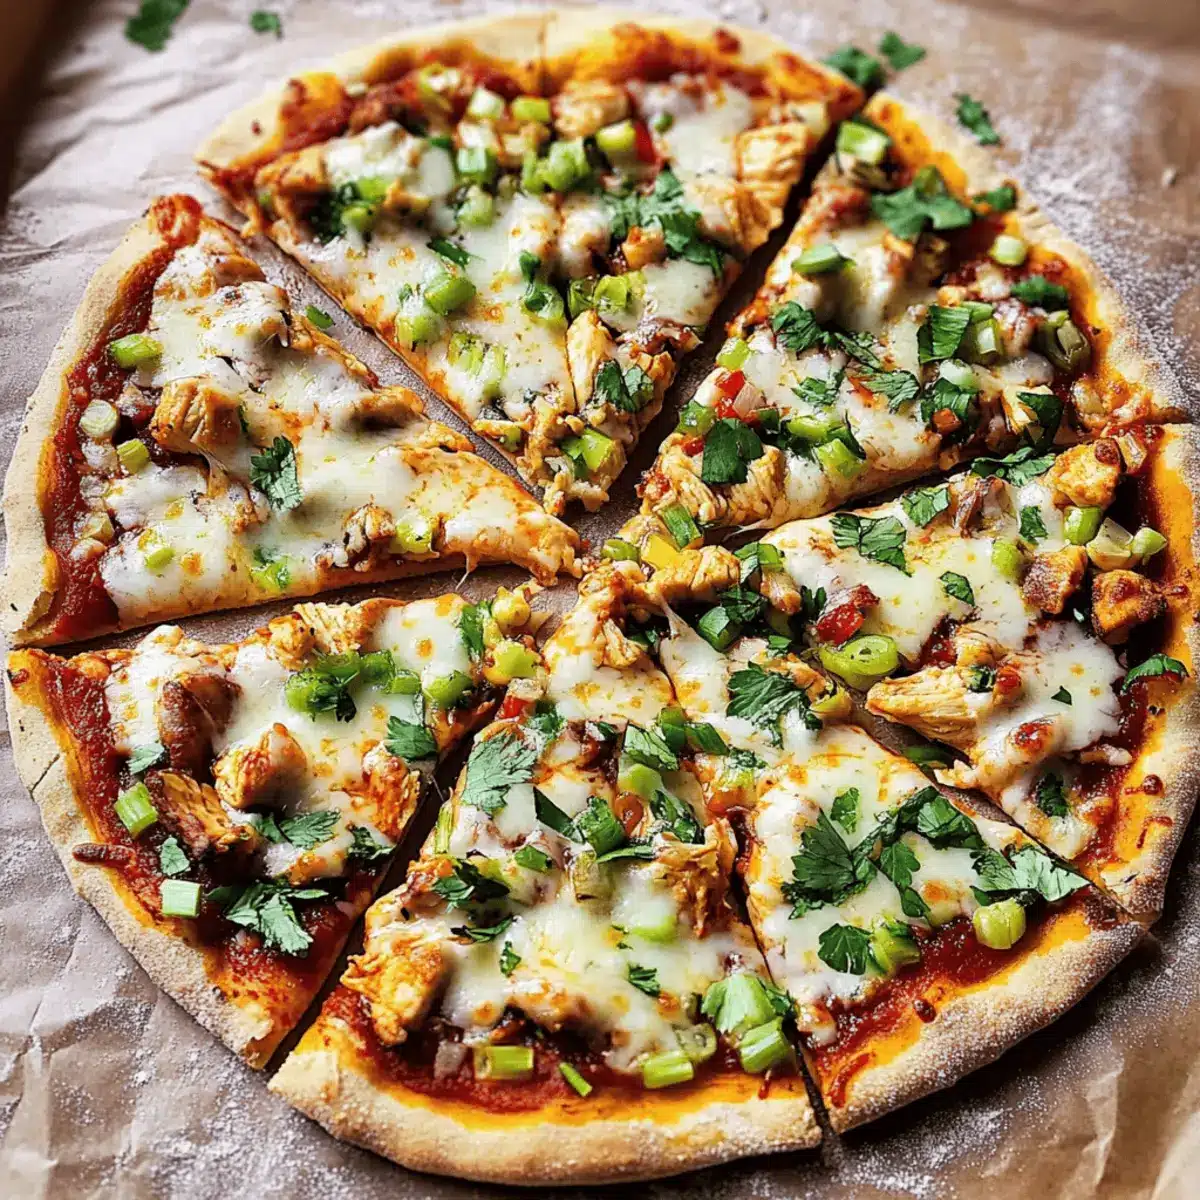
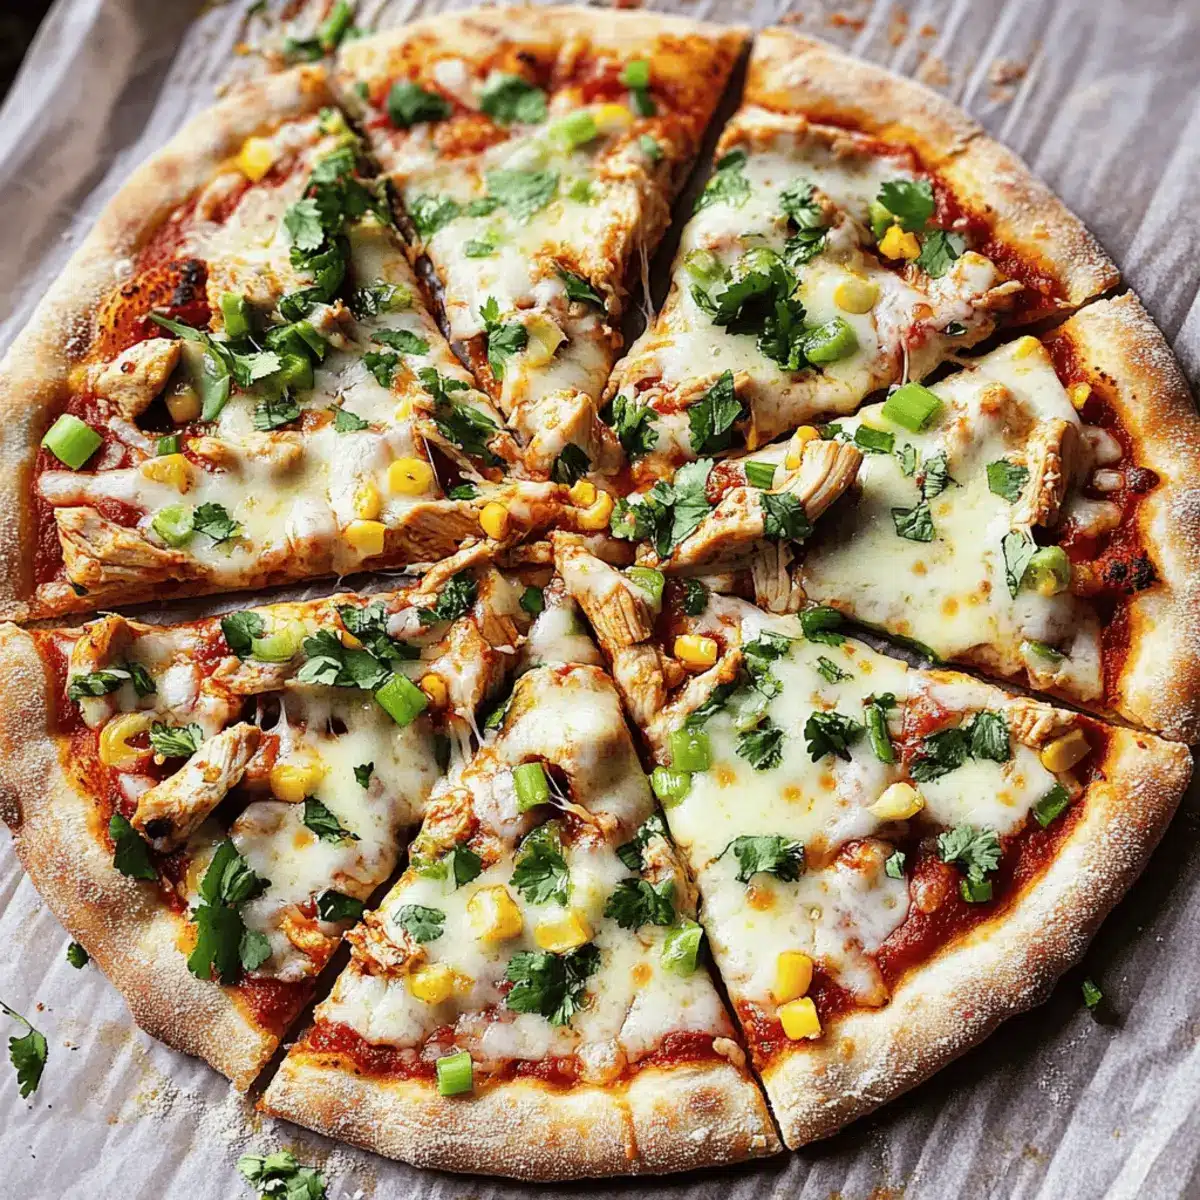
Step 18: Garnish & Serve
Once baked, remove the pizza from the oven and let it cool slightly before garnishing with chopped fresh cilantro, thinly sliced green onions, and a sprinkle of sesame seeds. Slice it up and serve warm, reveling in the deliciousness you’ve created in your kitchen!
Expert Tips for Chili Garlic Chicken Pizza
- Perfect Dough Texture: Knead your dough until it’s elastic to achieve the best texture for your Chili Garlic Chicken Pizza. A well-kneaded dough ensures a crispy crust!
- Marinade Duration: Allow the chicken to marinate for at least 30 minutes; this intensifies flavor. You can marinate longer for even richer taste, just refrigerate!
- Watch Your Oven: Keep an eye on the pizza while it bakes. Ovens can vary; bake until the crust is golden brown and cheese is bubbly to prevent overcooking.
- Custom Heat Levels: Adjust the number of red chilies in the marinade based on your spice preference. Start with fewer if you’re unsure, and build up!
- Use a Pizza Stone: For the best results, use a preheated pizza stone. It helps achieve that restaurant-quality crispy crust by evenly distributing heat.
What to Serve With Chili Garlic Chicken Pizza
Looking to elevate your Chili Garlic Chicken Pizza experience? These delectable sides and drinks will perfectly complement every spicy bite and create the ultimate dining experience.
-
Crispy Garlic Bread: The buttery, garlicky goodness creates a satisfying crunch and mirrors the rich flavors of your pizza.
-
Zesty Cucumber Salad: This refreshing salad adds a cool crunch that balances the heat, ensuring your meal feels light yet satisfying. Add a tangy dressing for extra zing!
-
Caesar Salad: Crunchy romaine and creamy dressing provide a classic side that ties beautifully into the cheesy, savory elements of the pizza. Plus, it’s a crowd favorite!
-
Roasted Vegetables: Sweet, caramelized veggies like bell peppers and zucchini offer earthy notes, enhancing the overall flavor profile while adding nutritious contrast.
-
Sliced Jalapeños: For those who crave additional heat, serving fresh jalapeños on the side allows guests to fine-tune their spice level to perfection.
-
Sparkling Lemonade: Refreshing and slightly tart, this drink beautifully complements the spicy flavors of the pizza, making for a wonderful pairing choice.
-
Chocolate Lava Cake: For dessert, a gooey chocolate lava cake adds a sweet contrast to the meal’s zest, providing a luxurious finish to a spicy adventure!
-
Craft Beer: Pairing this flavorful pizza with a hoppy craft beer can enhance the dining experience, highlighting both the spice and savory depth of the dish.
Chili Garlic Chicken Pizza Variations
Get ready to unleash your creativity and customize this delightful pizza experience with tempting twists and flavors that will tantalize your taste buds!
- Dairy-Free: Substitute mozzarella and provolone with vegan cheese for a cruelty-free option that maintains creaminess and taste.
- Vegetarian Delight: Use marinated tofu or a medley of roasted veggies instead of chicken. Bell peppers, mushrooms, and zucchini create a flavorful, vibrant topping.
- Spice Level Up: Top your pizza with sliced jalapeños or drizzle with sriracha for an extra kick after baking. This adds layers of heat that spice enthusiasts will adore!
- Sweet and Savory: Add pineapple chunks for a sweet contrast to the spicy garlic chicken. This Hawaiian twist will surprise and satisfy every palate.
- Gourmet Touch: Experiment with an array of gourmet cheeses like feta, gorgonzola, or goat cheese to add richness and a complex flavor profile.
- Crust Variations: For a health-conscious twist, try a cauliflower crust instead of traditional dough. It’s lower in carbs and adds a delightful flavor.
- Pulled Pork Option: Swap out the chicken for pulled pork marinated in a similar chili garlic sauce. This satisfies meat lovers with a smoky flavor profile.
- Herby Boost: Toss fresh basil or arugula on top after baking for a fragrant herbal layer. This brightens the dish and adds a fresh finish.
Don’t forget, if you love a garlic-inspired flavor profile, you might enjoy pairing it with Garlic White Chicken or Garlic Parmesan Chicken! Whether you’re feeling adventurous or keeping it classic, customizing this pizza is all about exploring what works for your taste buds!
Make Ahead Options
These Chili Garlic Chicken Pizza components are perfect for meal prep, making your weeknight dinners a breeze! You can prepare the pizza dough and store it in the fridge for up to 3 days or freeze it for up to 3 months. The marinated chicken can also be prepped ahead; just ensure it’s sealed tightly in the fridge for up to 24 hours before cooking to maintain its flavor. When you’re ready to bake, simply roll out the dough, add your sauce and cheese, top with the cooked chicken, and bake as directed. By prepping these elements ahead, you’ll enjoy restaurant-quality results with minimal effort!
How to Store and Freeze Chili Garlic Chicken Pizza
Room Temperature: Keep any leftover pizza at room temperature for up to 2 hours. If it’s a warm day, it’s best to refrigerate sooner to avoid spoilage.
Fridge: Store leftovers in an airtight container in the refrigerator for up to 3 days. To maintain the best flavor, it’s best to reheat the pizza before eating.
Freezer: For longer storage, wrap individual slices tightly in plastic wrap or aluminum foil and place them in a freezer-safe bag. Chili Garlic Chicken Pizza can be frozen for up to 2 months.
Reheating: To enjoy your pizza after storing, reheat slices in the oven at 350°F (175°C) for about 10-15 minutes until heated through and crispy.
Chili Garlic Chicken Pizza Recipe FAQs
How do I choose the right ingredients for the pizza?
Absolutely! When selecting ingredients, make sure your chicken is fresh and free of any dark spots or off smells. For the red chilies, opt for vibrant and firm ones. You want a good crunch in your veggies, like bell peppers or onions if you add them too. Fresh herbs should be bright in color – dull leaves can indicate age.
How should I store leftover chili garlic chicken pizza?
Very simply! Wrap any leftover slices tightly in plastic wrap or place them in an airtight container. The pizza can be kept in the fridge for up to 3 days. For best results, reheat slices in the oven at 350°F (175°C) to retain the crust’s crunch and the cheese’s creamy texture.
Can I freeze my chili garlic chicken pizza?
Absolutely! For freezing, wrap individual slices in plastic wrap or aluminum foil and store them in a freezer-safe bag. Your chili garlic chicken pizza can remain frozen for up to 2 months without losing too much quality. Just defrost in the fridge overnight before reheating in the oven for best results.
What should I do if my dough doesn’t rise properly?
If your dough isn’t rising, it could be due to inactive yeast. Always check the expiry date of your yeast! If you suspect it’s stale, mix yeast with warm water and sugar before using to test its activation. Remember to let it sit until foamy for about 5-10 minutes. Also, ensure the water temperature is between 105-115°F (40-46°C); too hot can kill the yeast.
Are there any dietary considerations I should keep in mind?
Definitely! If you have picky eaters or allergies in the family, consider using gluten-free flour for the crust and vegan cheese for a dairy-free version. Adjust the amount of red chilies for spice sensitivity, especially for kids or those who prefer milder flavors. Always inquire about potential allergens like soy sauce, which contains gluten unless specified as tamari.
How can I achieve a crispy crust with my chili garlic chicken pizza?
For that perfect crust, using a pizza stone is key! Preheat it inside your oven at 450°F (232°C). Roll out the dough to the desired thickness, then carefully transfer it onto the hot stone. Bake for 12-15 minutes until the crust is golden brown and the cheese is bubbly. A quick tip: let your pizza cool for a few minutes before slicing to help it maintain its structure!
Chili Garlic Chicken Pizza: A Spicy Twist on Comfort Food
Ingredients
Equipment
Method
- In a small bowl, dissolve the sugar and active dry yeast in warm water at 105-115°F (40-46°C). Allow the mixture to sit for 5-10 minutes until it becomes frothy.
- In a large mixing bowl, whisk together the all-purpose flour and salt.
- Once the yeast is frothy, pour the yeast mixture and olive oil into the bowl of dry ingredients. Mix together until a rough dough forms.
- On a floured surface, turn out the dough and knead it for about 8-10 minutes.
- Lightly grease a large bowl and place your kneaded dough inside, covering it with a kitchen towel. Let it rise in a warm spot for 1 to 1.5 hours.
- Once the dough has risen, gently punch it down to release the air.
- Cut the boneless, skinless chicken breasts into bite-sized cubes.
- In a medium bowl, whisk together olive oil, minced garlic, chopped red chilies, soy sauce, honey, rice vinegar, sesame oil, and a pinch of salt and black pepper.
- Add the cubed chicken to the marinade, ensuring each piece is well-coated. Cover and refrigerate for at least 30 minutes.
- Heat a skillet over medium heat and add the marinated chicken. Sauté for 8-10 minutes or until fully cooked.
- Preheat your oven to 450°F (232°C). If you have a pizza stone, place it inside to heat up.
- Turn the dough out onto a floured surface. Roll it out to your desired thickness and shape.
- Carefully transfer the rolled-out dough onto a floured pizza peel or a baking sheet.
- Spread a generous layer of chili garlic sauce over the dough.
- Sprinkle shredded mozzarella cheese evenly over the sauce, followed by optional provolone.
- Distribute the sautéed chicken pieces evenly over the layer of cheese.
- Carefully slide the pizza into your hot oven and bake for 12-15 minutes.
- Once baked, remove the pizza from the oven and let it cool slightly. Garnish with chopped fresh cilantro, thinly sliced green onions, and a sprinkle of sesame seeds.
Leave a Reply