
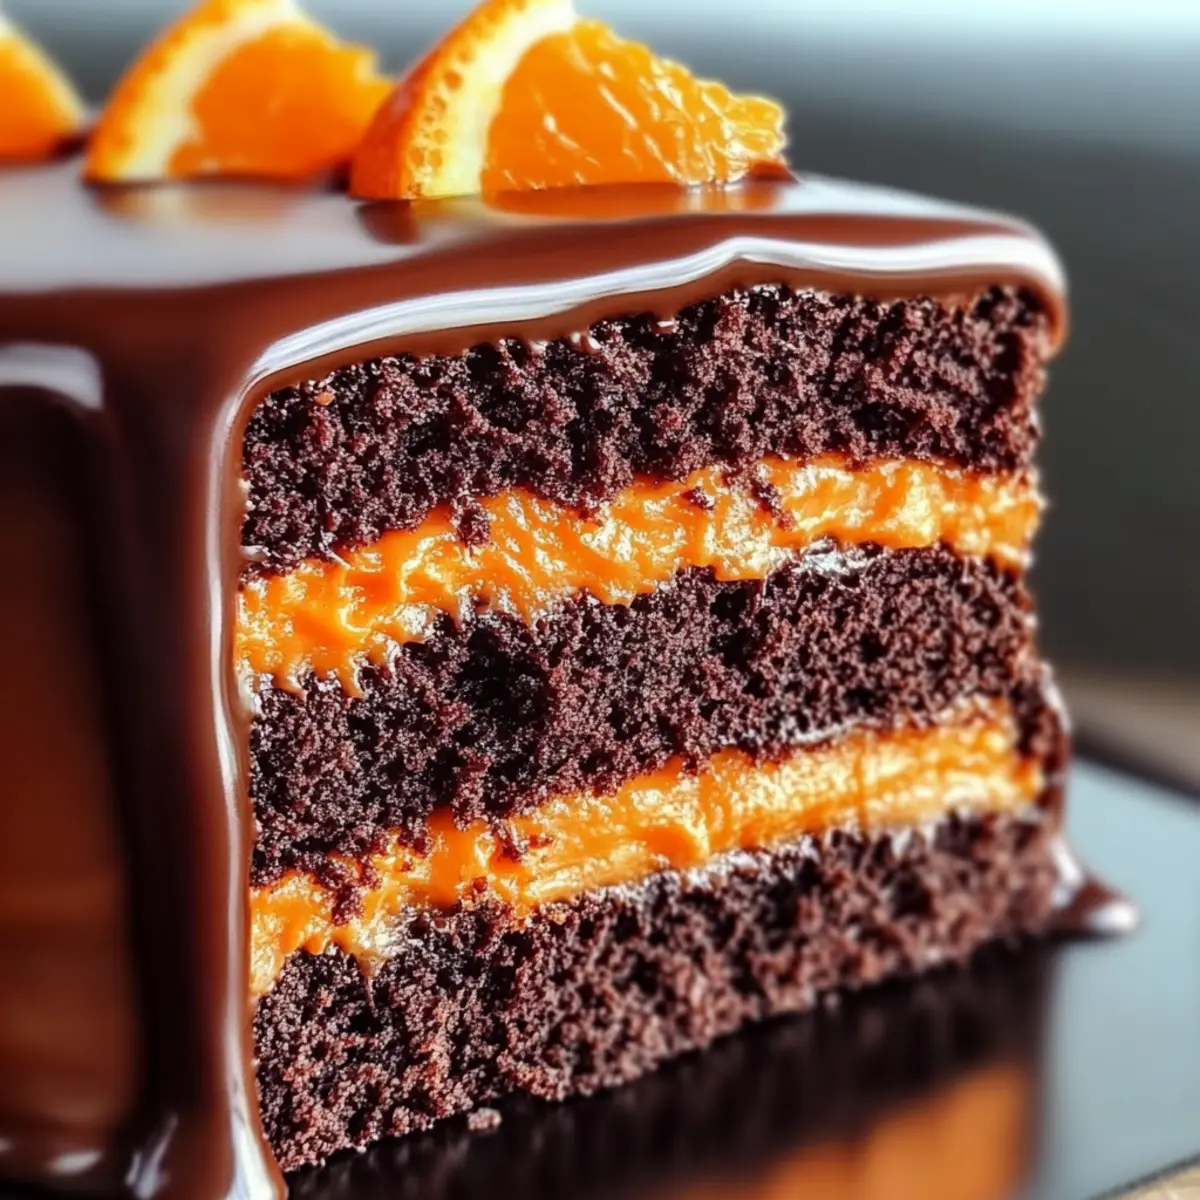
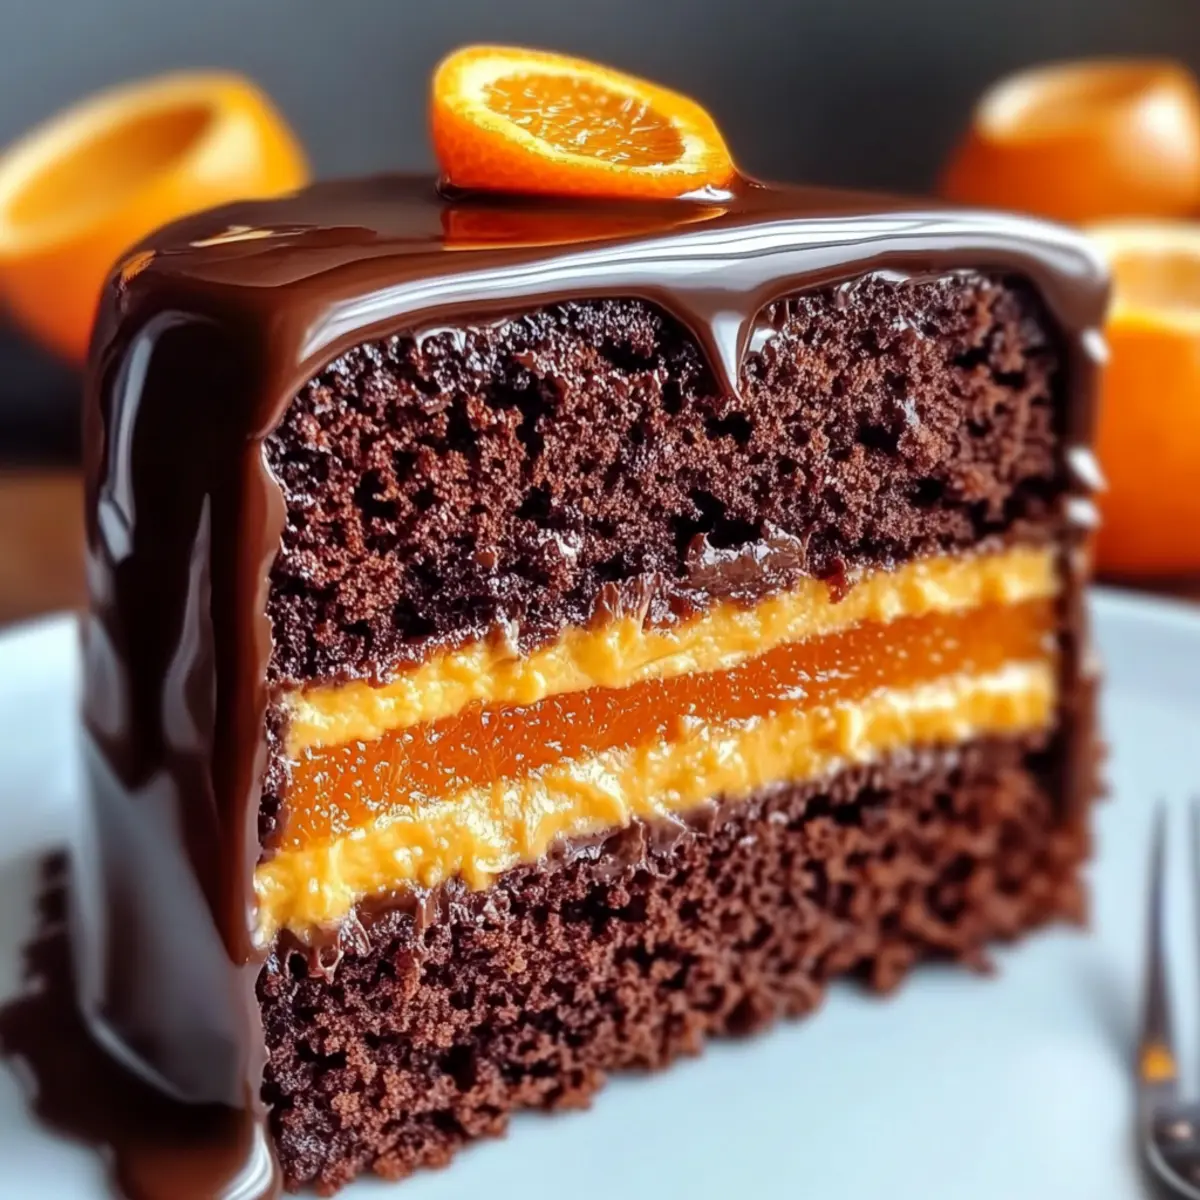
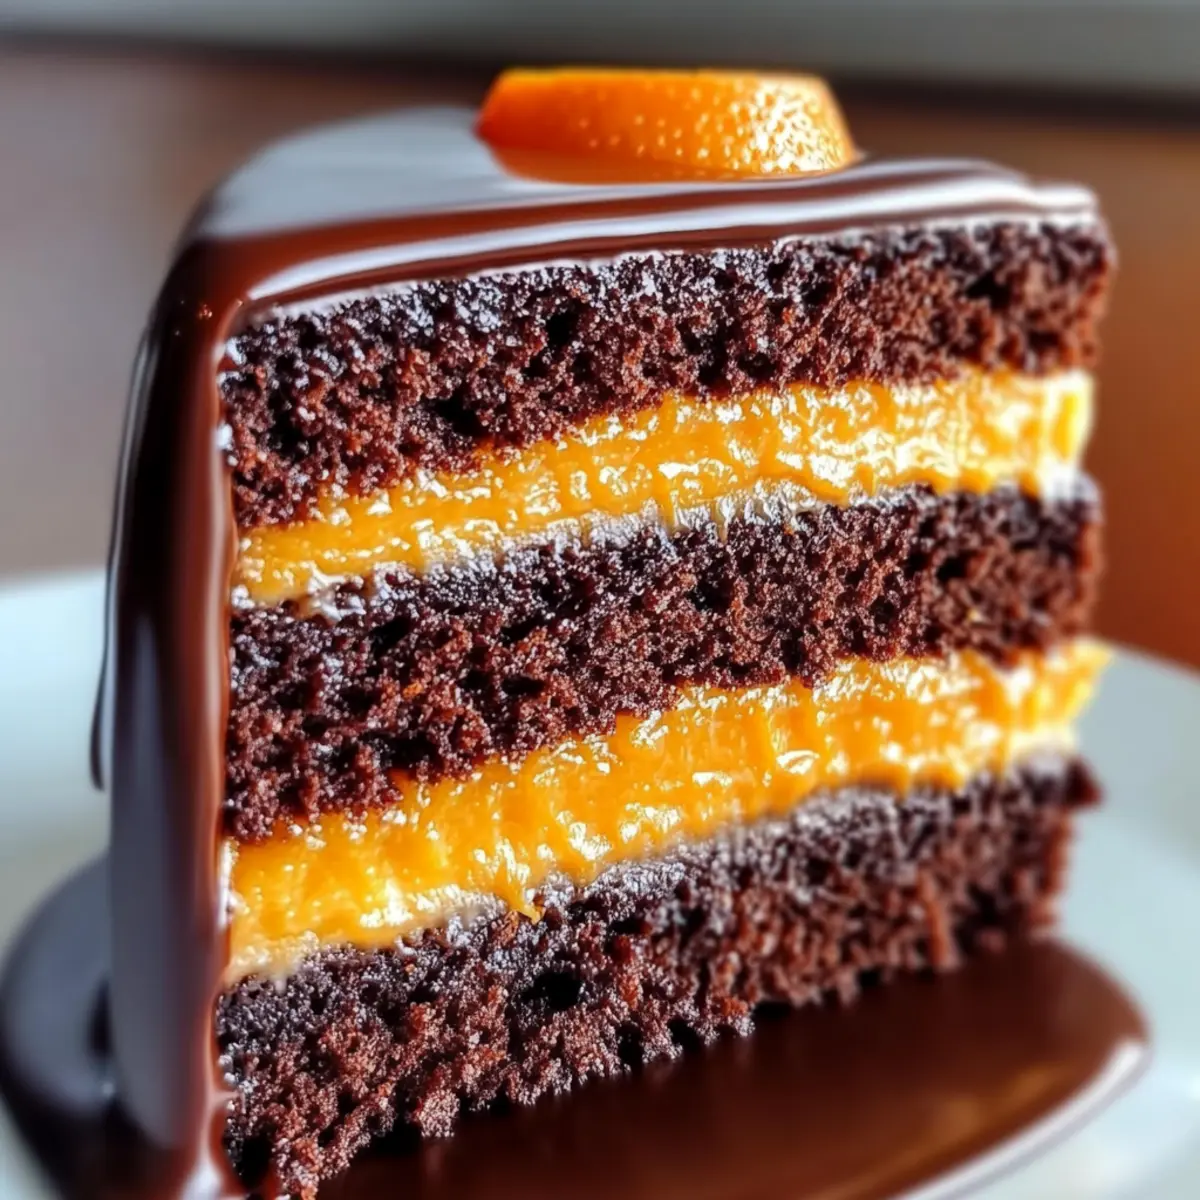
As I stood in my kitchen, the sweet aroma of freshly zested oranges mingled with rich chocolate, instantly transforming my surroundings into a pastry haven. It was time to unveil my Chocolate Orange Layer Cake, a delightful fusion of flavors that has the power to elevate any ordinary day into a celebration. This scrumptious dessert is not only a treat for the taste buds but also a feast for the eyes, showcasing layers of moist chocolate cake complemented by a creamy orange filling and a glossy ganache finish. What I love most is how surprisingly easy this recipe is to whip up; whether you’re a seasoned baker or just starting your culinary journey, you’ll find joy in every step. Perfect for impressing guests or indulging yourself, this cake is sure to become a beloved favorite. Are you ready to bring a bit of sweetness into your life? Let’s dive into the recipe!
Why is this cake a must-try?
Irresistible flavor combination: The harmonious blend of rich chocolate and bright orange creates an explosion of taste that will leave your guests begging for more.
Visually stunning: This cake’s layered presentation topped with glossy ganache is a showstopper for any occasion, making it perfect for parties or gatherings.
Easy to make: Even if you’re just starting your baking adventure, this Chocolate Orange Layer Cake is surprisingly straightforward, ensuring a great success every time.
Versatile options: Feel free to explore variations, such as a zingy lemon chocolate twist or a hint of raspberry flavor, keeping things fresh and exciting.
Delightful indulgence: Perfect for celebrating special moments or simply treating yourself, this cake combines elegance with comfort, satisfying all cravings beautifully.
Storage friendly: Easily store leftovers and enjoy this delectable slice of happiness for days to come; it tastes even better the next day!
Chocolate Orange Layer Cake Ingredients
• Every great baking masterpiece begins with high-quality ingredients.
For the Cake
- All-Purpose Flour – Provides structure to the cake; can use a gluten-free blend for a gluten-free option.
- Unsweetened Cocoa Powder – Adds rich chocolate flavor; Dutch-process cocoa can deepen both color and flavor.
- Granulated Sugar – Sweetens the cake; no substitutions recommended for best results.
- Baking Powder & Baking Soda – Leavening agents that help the cake rise; ensure they are fresh for proper rising.
- Salt – Enhances flavor; no substitutions.
- Large Eggs – Binds and moistens the ingredients; substitute with flax eggs for a vegan version.
- Whole Milk – Adds moisture and richness; any plant-based milk will work for a dairy-free option.
- Vegetable Oil – Keeps the cake moist; melted coconut oil can also be used.
- Vanilla Extract – Adds depth of flavor; no substitutions needed.
- Hot Coffee – Intensifies the chocolate flavor; hot water can be used, but flavor will be reduced.
For the Orange Filling
- Granulated Sugar (for the filling) – Sweetens the orange cream; no substitutions recommended.
- Cornstarch – Thickens the orange cream; no substitute with similar thickening power.
- Egg Yolks – Provides richness for the filling; a commercial egg replacer can work for a vegan option.
- Freshly Squeezed Orange Juice – Adds tang and flavor; substitute with lemon juice for a different twist.
- Orange Zest – Enhances the orange flavor; no substitutions here.
- Butter – Adds richness to the filling; vegan butter can be used for a dairy-free option.
For the Ganache
- Heavy Cream – Base for the ganache, providing creaminess; substitute with coconut cream for a dairy-free version.
- Dark Chocolate – Main flavor in the ganache; milk chocolate can be used for a sweeter taste.
Indulge in this delightful Chocolate Orange Layer Cake that promises to be a crowd-pleaser!
Step‑by‑Step Instructions for Chocolate Orange Layer Cake
Step 1: Preheat and Prepare Pans
Begin by preheating your oven to 350°F (175°C). While the oven heats, grease and line three 8-inch round cake pans with parchment paper to prevent sticking. This ensures your chocolate orange layer cake releases smoothly after baking, giving it that perfect presentation.
Step 2: Mix Dry Ingredients
In a large mixing bowl, combine all-purpose flour, unsweetened cocoa powder, granulated sugar, baking powder, baking soda, and salt. Whisk these dry ingredients together until they are well blended, creating a uniform mixture that will provide structure and flavor to your cake.
Step 3: Combine Wet Ingredients
Add large eggs, whole milk, vegetable oil, and vanilla extract to the bowl of dry ingredients. Mix everything together using a hand or stand mixer on medium speed until the batter is smooth and fully incorporated, which should take about 2-3 minutes. This will provide the moist texture for the chocolate orange layer cake.
Step 4: Add Coffee
Carefully stir in the hot coffee to your batter until just mixed. The coffee enhances the chocolate flavor while keeping the batter thin, which will help create a rich and moist cake. Ensure not to overmix at this stage, as we want to maintain the airiness of the batter.
Step 5: Bake the Cake
Evenly divide the batter among the three prepared pans. Bake in the preheated oven for 25-30 minutes, or until a toothpick inserted in the center comes out clean. The cakes should rise beautifully and spring back when lightly touched. Once baked, allow them to cool in the pans for 10 minutes before transferring to a wire rack to cool completely.
Step 6: Prepare the Orange Filling
In a medium saucepan, whisk together granulated sugar, cornstarch, and egg yolks. Gradually add freshly squeezed orange juice while stirring constantly. Place the saucepan over medium heat and cook until the mixture thickens, about 5-7 minutes. Once thickened, remove it from heat and stir in orange zest and butter until melted. Allow this filling to cool completely before using.
Step 7: Make Ganache
To create the glossy ganache, heat heavy cream in a small saucepan until steaming but not boiling. Remove it from the heat and pour it over finely chopped dark chocolate in a bowl. Let it sit for about 5 minutes to melt, then stir until smooth and shiny. Set aside to cool slightly before drizzling on the cake.
Step 8: Assemble Cake Layers
Place the first chocolate cake layer on a serving plate. Generously spread a layer of the cooled orange filling on top. Add the second cake layer, repeating the process until all layers are stacked. Top with the final cake layer, ensuring everything is evenly aligned for a stunning finish.
Step 9: Pour Ganache and Garnish
Pour the smooth ganache over the top of the assembled chocolate orange layer cake, allowing it to cascade gently down the sides for an appealing drip effect. For a beautiful finish, garnish with fresh orange slices or candied peel as a touch of elegance to complement the flavors.

Expert Tips for Chocolate Orange Layer Cake
-
Room Temperature Ingredients: Ensure all ingredients are at room temperature to promote even mixing and optimal rise for your Chocolate Orange Layer Cake.
-
Gentle Mixing: Avoid overmixing the batter; mix just until combined for a light and airy texture. Overmixing can lead to a dense cake.
-
Cool Completely: Make sure the cake layers are completely cool before assembling; this prevents the ganache from melting and ensures a stable structure.
-
Perfect Ganache: Allow the cream to sit atop the chocolate before stirring; this ensures a glossy finish, elevating the cake’s presentation.
-
Use Fresh Ingredients: Always use fresh baking powder and baking soda to ensure proper leavening and prevent a flat cake.
-
Creative Variations: Don’t hesitate to experiment with flavors; consider adding a hint of raspberry or using lemon juice for a refreshing twist in your filling.
What to Serve with Chocolate Orange Layer Cake
Imagine indulging in a slice of this vibrant cake, each bite enhanced by delightful pairings that elevate your dessert experience.
-
Fresh Berries: Juicy strawberries or raspberries cut through the richness, adding a refreshing pop of flavor that complements the chocolate and orange beautifully.
-
Whipped Cream: A dollop of sweet, airy whipped cream brings a lightness to every forkful, balancing the dense layers of cake and ganache.
-
Vanilla Ice Cream: Serving a scoop alongside is a classic choice, as the creamy texture and subtle sweetness truly enhance the decadent chocolate flavors.
-
Coffee: A steaming cup of freshly brewed coffee acts as an excellent companion, amplifying the chocolate notes and providing a comforting backdrop.
-
Nutty Biscotti: Crunchy biscotti provides a textural contrast and a delightful nutty flavor that pairs perfectly with both the chocolate cake and the smooth ganache.
-
Chocolate-Covered Oranges: These sweet bite-sized treats echo the cake’s flavors and make for a charming presentation, while also adding a playful touch to your dessert spread.
-
Sparkling Rosé: A glass of chilled sparkling rosé elevates any dessert occasion, its fruity undertones mingling wonderfully with the citrus notes of the cake.
-
Mint Chocolate Tea: For a warm beverage, opt for a mint-infused chocolate tea, offering refreshing notes that cleanse the palate while enhancing the cake’s rich flavors.
Make Ahead Options
This Chocolate Orange Layer Cake with Ganache is perfect for meal prep, allowing you to spend less time in the kitchen on busy days! You can bake the cake layers up to 24 hours in advance; simply cool them completely and wrap each layer tightly in plastic wrap to maintain moisture and freshness. The orange filling can be prepared up to 3 days beforehand and stored in the refrigerator to let the flavors meld. When you’re ready to serve, just assemble the cake and finish with the ganache. It’s just as delicious and saves precious time while still delivering spectacular results!
How to Store and Freeze Chocolate Orange Layer Cake
Fridge: Store leftover cake in an airtight container for up to 3-4 days to maintain its moist texture and delicious flavor.
Freezer: Wrap individual slices or the whole cake tightly in plastic wrap, then foil, and freeze for up to three months. This way, you can enjoy your Chocolate Orange Layer Cake whenever cravings strike!
Thawing: To thaw, simply transfer the wrapped cake to the fridge and allow it to defrost overnight before serving. This helps retain its rich flavors and textures.
Reheating: If you prefer a warm treat, gently microwave a slice for 10-15 seconds on low power, ensuring it warms without drying out. Enjoy!
Chocolate Orange Layer Cake Variations
Feel free to explore these delightful twists and substitutions to make this cake your own masterpiece!
-
Dairy-Free: Swap whole milk and butter for plant-based milk and vegan butter to create a cake that’s just as creamy and moist.
Dairy-free doesn’t mean you have to compromise on flavor. Enjoy this delectable alternative that everyone can savor! -
Gluten-Free: Use a gluten-free flour blend instead of all-purpose flour to cater to gluten sensitivities.
This transformation ensures that everyone at your table can indulge without worry, blending flavor and consideration perfectly. -
Lemon Twist: Replace orange juice with lemon juice for a refreshing lemon chocolate layer cake.
This tangy variation offers a bright surprise, perfectly complementing the richness of the chocolate—your taste buds will thank you! -
Fruit Fusion: Mix in raspberry puree with the orange filling for a fruity explosion.
This delightful blend elevates the flavor profile, stunningly showcasing fresh fruit’s natural sweetness alongside rich chocolate. -
Nutty Crunch: Fold toasted chopped walnuts or pecans into the cake batter for a delightful texture twist.
Adding a crunchy element brings a fun contrast to the soft layers, making each bite more exciting and satisfying. -
Coffee Lovers: Increase the coffee in the batter for an espresso-flavored cake.
This powerful boost amplifies the chocolate deeply, creating a sumptuous dessert that’s perfect for energizing your day. -
Spicy Kick: Add a pinch of cayenne pepper to the chocolate batter for a subtle heat.
This surprise twist enhances the chocolate’s richness while offering an unexpected warmth that lingers delightfully. -
Frozen Layer Cake: Freeze the layers separately, then stack and frost them later for a stress-free dessert any day!
This option allows you to prepare in advance, ensuring a stunning last-minute indulgence.
For more tasty inspiration, try pairing this with a lovely Coffee Cake Cinnamon for your brunch or enjoy a slice alongside a cozy Chocolate Mug Cake on a lazy evening!
Chocolate Orange Layer Cake Recipe FAQs
What type of oranges should I use for this cake?
I recommend using fresh, ripe navel oranges for the best flavor in your Chocolate Orange Layer Cake. They provide a sweet yet tangy zest that perfectly complements the rich chocolate. Look for oranges that feel firm and heavy for their size, and avoid those with dark spots or blemishes.
How should I store leftover Chocolate Orange Layer Cake?
Simply place any leftover cake in an airtight container in the refrigerator, where it will stay fresh for about 3-4 days. For longer storage, you can wrap slices or the whole cake tightly in plastic wrap and then foil before placing it in the freezer. It will keep well for up to three months.
Can I freeze the Chocolate Orange Layer Cake?
Absolutely! To freeze, ensure the cake is completely cooled. Then, wrap each layer or individual slices in plastic wrap followed by aluminum foil. This protects it from freezer burn. When you’re ready to enjoy a piece, simply transfer it to the fridge to thaw overnight before serving.
What can I do if my ganache is too thick?
If your ganache is thicker than desired, gently reheat it by placing it over a double boiler or in the microwave in short intervals (10 seconds at a time), stirring in between until you reach your desired consistency. If it’s too thin initially, allow it to cool longer before drizzling; it will thicken as it sets.
Are there any dietary considerations for pet-friendly options?
While this Chocolate Orange Layer Cake is vegetarian, it’s important to remember that chocolate and certain sweeteners can be toxic to pets, particularly dogs. If you plan on sharing a treat with your furry friend, stick to pet-safe desserts without chocolate, and save this indulgence just for yourself!
Can I make this cake in advance?
Yes! You can bake and assemble the Chocolate Orange Layer Cake a day before your event. Let it sit overnight in the refrigerator to allow the flavors to meld beautifully, ensuring each slice is even more delicious at serving time. Just be sure to keep the container airtight to maintain freshness!
Irresistible Chocolate Orange Layer Cake for Ultimate Indulgence
Ingredients
Equipment
Method
- Preheat your oven to 350°F (175°C) and prepare three 8-inch round cake pans by greasing and lining with parchment paper.
- In a large mixing bowl, combine all-purpose flour, unsweetened cocoa powder, granulated sugar, baking powder, baking soda, and salt. Whisk until well blended.
- Add large eggs, whole milk, vegetable oil, and vanilla extract to the dry ingredients. Mix until smooth.
- Gently stir in hot coffee until just mixed.
- Divide the batter among the prepared pans and bake for 25-30 minutes. Cool in pans for 10 minutes, then transfer to wire racks.
- In a medium saucepan, whisk together granulated sugar, cornstarch, and egg yolks. Gradually add the orange juice, stirring constantly.
- Cook over medium heat until thickened, about 5-7 minutes. Remove from heat and stir in orange zest and butter.
- Heat heavy cream in a saucepan until steaming. Pour over chopped dark chocolate and let sit for 5 minutes before stirring until smooth.
- Place the first cake layer on a plate and spread cooled orange filling on top. Add the second layer and repeat.
- Top with the final cake layer. Pour ganache over the cake, letting it cascade down the sides.
- Garnish with fresh orange slices or candied peel.
Leave a Reply