
As autumn leaves crunch beneath our feet and the air fills with whispers of Halloween, it’s time to conjure up something magical in the kitchen. Enter the No-Bake Halloween Lush Dessert—a delightful layering of creamy cheesecake and vibrant pudding that’s as festive as it is easy to make. With just a handful of simple ingredients, this treat not only comes together quickly but also provides a stunning centerpiece for any Halloween gathering, sure to leave your guests in awe. Plus, it offers the joy of no-bake preparation, making it the perfect solution for a last-minute sweet craving or a fun kitchen activity with the kids. Curious to see how each layer unfolds into a colorful, edible masterpiece? Let’s dive into this spooky culinary creation!
Why is Halloween Lush Dessert a Must-Try?
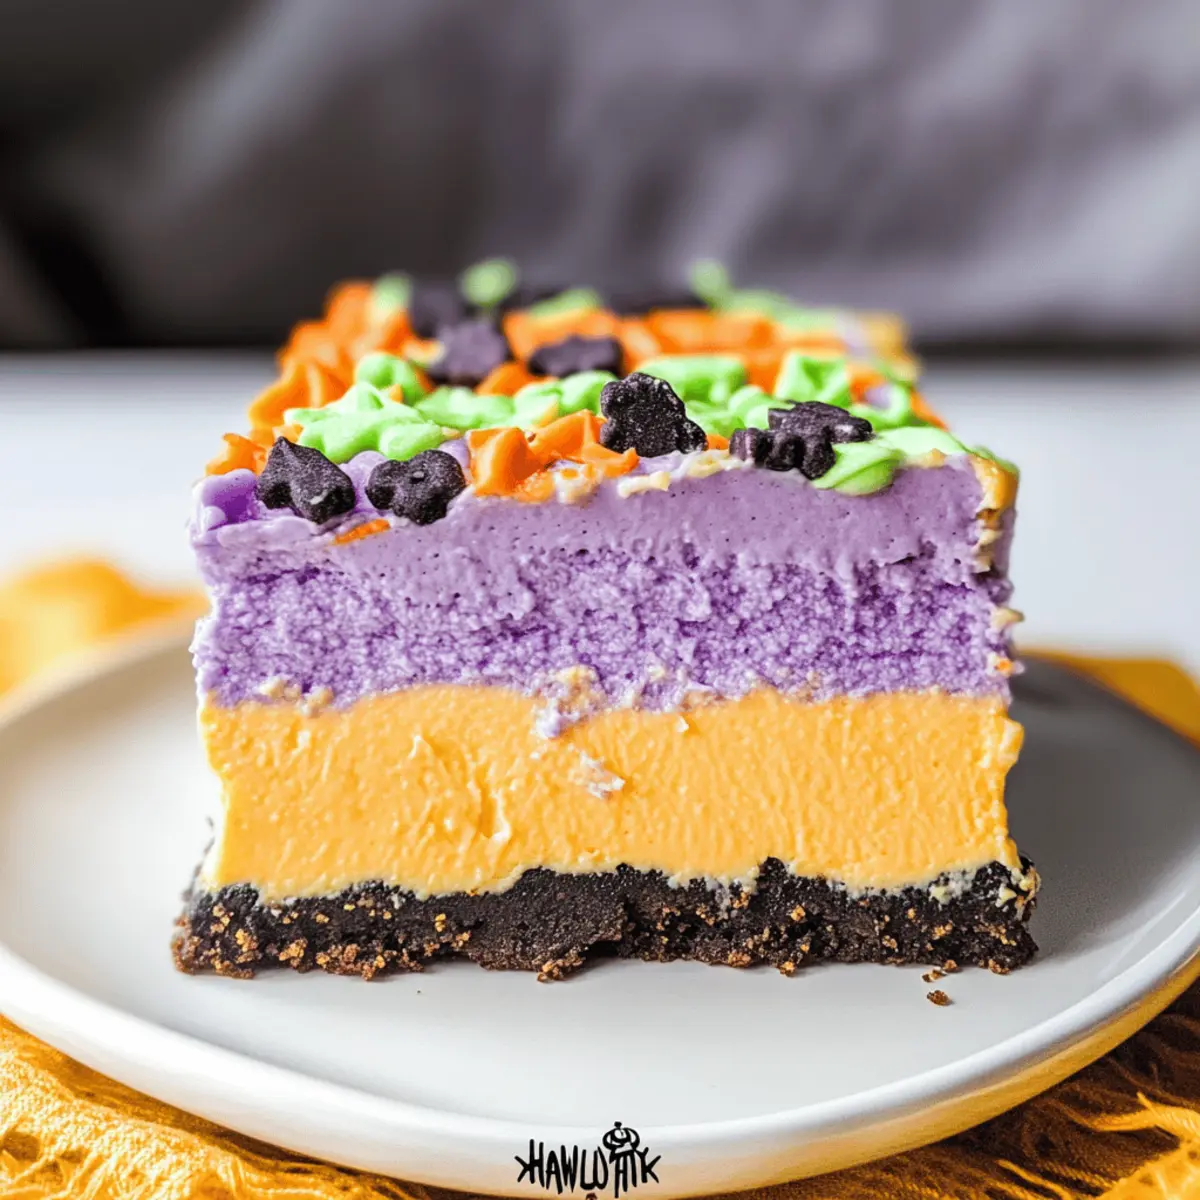
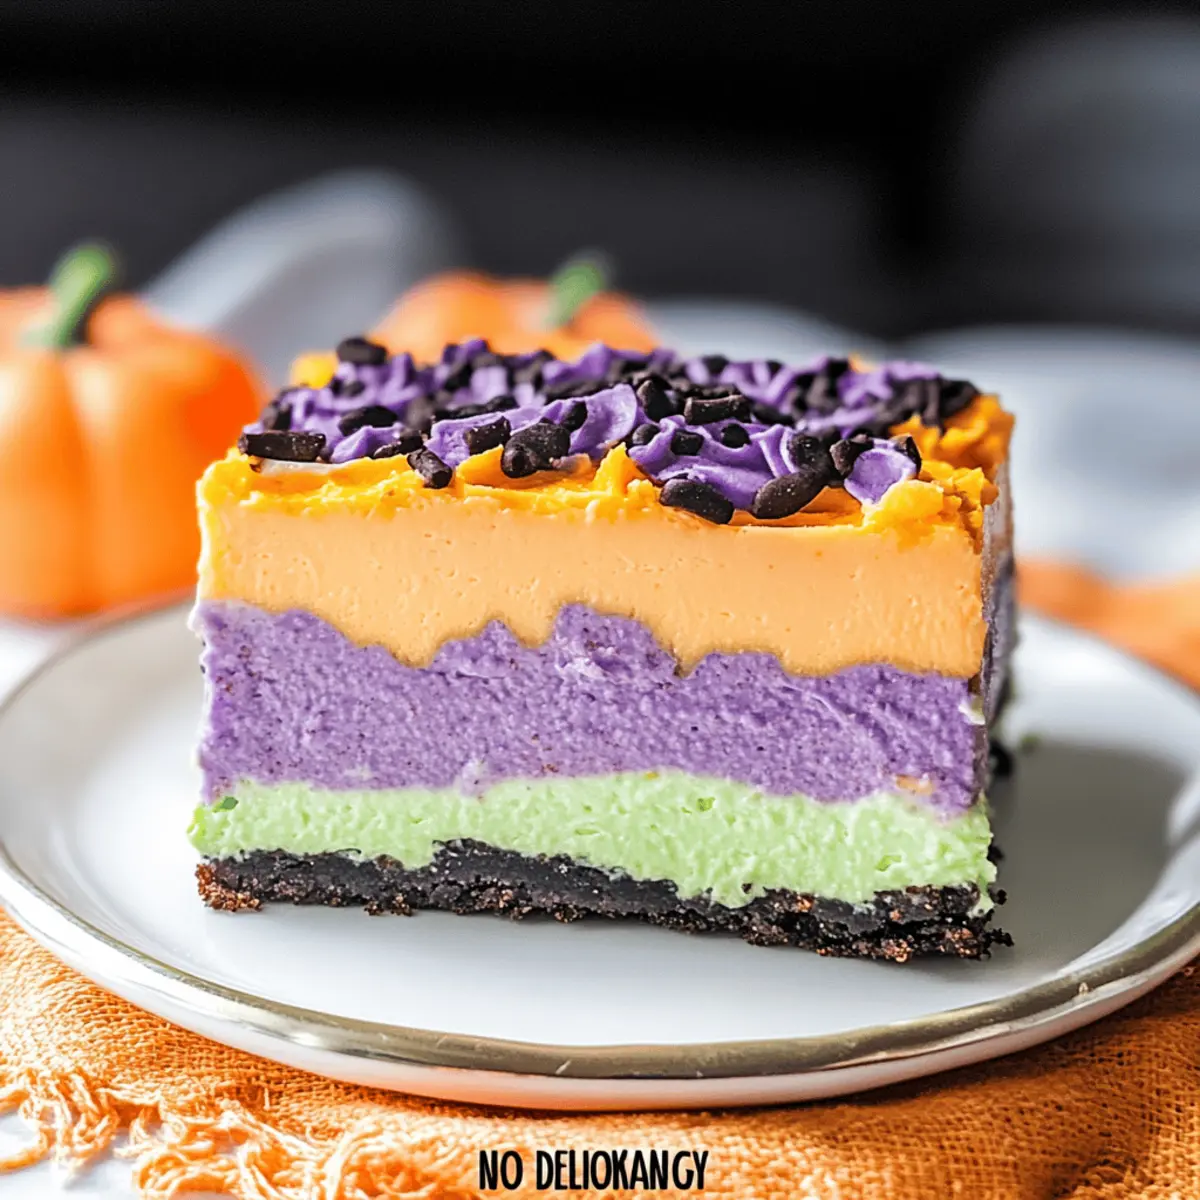
Delightfully Festive: This No-Bake Halloween Lush Dessert is visually stunning with its layers of vibrant colors, making it a perfect fit for any autumn celebration.
Easy Preparation: With its simple assembly process, even novice cooks can whip up this impressive treat without fuss, ideal for busy families or last-minute party planners.
Creamy & Crunchy: The blend of fluffy cream cheese and crunchy cookie base creates a satisfying contrast in every bite that your guests will love.
Customizable Flavors: Feel free to get creative with your crust or gelatin flavors, like a ginger snap crust or mixed berry jello, to make it your own. Check out my Peach Pie Cruffins for more dessert inspiration!
Crowd Pleaser: Everyone from kids to adults will adore this dessert, making it a guaranteed hit at Halloween parties and potlucks.
Halloween Lush Recipe Ingredients
For the Crust
• Chocolate Sandwich Cookies – Forms a crunchy base, perfect for complementing the creamy layers.
• Butter – Binds the crumbs together; make sure it’s melted for easy mixing.
For the Filling
• Orange Gelatin – Adds a splash of color and fruity flavor; feel free to substitute with your favorite flavor.
• Vanilla Instant Pudding – Creates a decadent, creamy filling; swapping for chocolate will deepen the taste.
• Cold Milk – Hydrates the pudding mix; non-dairy milk works for a vegan alternative.
• Cream Cheese – Provides richness and creaminess; a non-dairy cream cheese alternative is great for vegan diets.
• Powdered Sugar – Sweetens the filling; adjust to your sweetness preference, or use a sugar substitute.
• Whipped Topping – Lightens the texture; coconut whipped cream can be used for a dairy-free version.
For Decoration
• Green & Purple Food Coloring – Adds festive flair; natural colorings are a lovely alternative if you prefer.
• Halloween Sprinkles – Enhance the spooky look; replace with candy corn or other fun toppings for added charm.
Step‑by‑Step Instructions for Halloween Lush Recipe
Step 1: Crush the Cookies
Begin your Halloween Lush Dessert by crushing 20 chocolate sandwich cookies in a food processor until they turn into fine crumbs, about 30 seconds. Pour the crumbs into a mixing bowl, where they will await their buttery partner. This crunchy base guarantees a delightful texture, setting the tone for the layers to come.
Step 2: Make the Crust
In the same bowl, pour in 4 tablespoons of melted butter, ensuring it’s warm but not hot. Mix well until the crumbs are evenly moistened and appear like damp sand. Press this crust mixture firmly into the bottom of a 9×13 glass baking dish using your hands or the bottom of a measuring cup. The crust should feel compact, forming a solid foundation for the creamy layers above.
Step 3: Prepare the Gelatin
Next, dissolve 3 ounces of orange gelatin in 1 cup of boiling water. Stir continuously for about 2 minutes until the gelatin completely dissolves, creating a vibrant mixture. Allow it to cool slightly for around 10 minutes while you prepare the pudding mixture, ensuring it’s not hot when mixed later.
Step 4: Mix the Pudding
In a medium bowl, whisk together 2 cups of cold milk and a 3.4-ounce package of vanilla instant pudding mix. Blend the mixture thoroughly until it thickens, which will take about 2-3 minutes. Once thick, gently fold in the cooled orange gelatin until smooth and fully incorporated, creating a colorful and flavorful filling.
Step 5: Whip the Cream Cheese
In a large mixing bowl, use an electric mixer to beat together 8 ounces of softened cream cheese with 1 cup of powdered sugar for about 2 minutes, until creamy and smooth. This step ensures your filling has the right texture and sweetness. Once combined, carefully fold in 2 cups of whipped topping along with purple food coloring to achieve the desired shade, creating a fun, festive layer.
Step 6: Layer the Cream Cheese Mixture
Once the cream cheese mixture is ready, spread it evenly over the cooled cookie crust using a spatula. This cream layer should be smooth and evenly distributed, creating a base for the pudding layer. The richness of the cream cheese will provide a lovely contrast to the upcoming colorful pudding layer.
Step 7: Add the Pudding Layer
Now, gently pour the orange gelatin and pudding mixture over the cream cheese layer, spreading it evenly to ensure no cream is visible underneath. The vibrant orange will create a fun, Halloween-inspired contrast. Carefully smooth the top with a spatula, making sure all layers are visible and looking inviting.
Step 8: Top with Whipped Topping
For the final layer, mix an additional 2 cups of whipped topping with green food coloring until well-blended and vibrant. Spread this green topping over the jello layer, creating a whimsical look that highlights the festive nature of your Halloween Lush Dessert. Make sure to cover the orange layer completely for a colorful display.
Step 9: Decorate and Chill
Sprinkle Halloween-themed sprinkles generously on top of your dessert for that finishing touch! Cover the dish with plastic wrap and refrigerate your Halloween Lush Dessert for at least 4 hours, or until fully set. This chilling time not only firms up the layers but enhances the flavors, making each bite a delicious treat come serving time.

How to Store and Freeze Halloween Lush Dessert
Fridge: Store any leftovers in an airtight container in the refrigerator for up to 3-4 days. This will keep the layers fresh and tasty for your next sweet craving!
Freezer: Avoid freezing the Halloween Lush Dessert, as freezing can alter the creamy texture, leaving it less appealing when thawed.
Reheating: This dessert is best served chilled directly from the fridge. No reheating is necessary—just slice and enjoy!
Serving Suggestion: If you have guests over, you can prepare this dessert a day ahead and store it in the fridge for a hassle-free serving experience.
Make Ahead Options
These No-Bake Halloween Lush Desserts are perfect for meal prep enthusiasts looking to save time during the busy Halloween season! You can prepare the cookie crust and cream cheese layers up to 24 hours in advance; store them separately to maintain their texture. Just make sure to cover each component tightly with plastic wrap to prevent them from drying out. When you’re ready to serve, simply layer the pudding and green topping (which can also be prepped ahead if stored in the fridge) just before your gathering. This way, you’ll have an eye-catching dessert that’s just as delicious and festive, leaving you more time to enjoy the festivities!
Halloween Lush Recipe Variations
Get ready to make this no-bake treat uniquely yours with these fun and festive twists!
-
Graham Cracker Crust: Swap chocolate sandwich cookies for crushed graham crackers for a classic flavor that’ll transport you to summer picnics.
This change brings a hint of nostalgia and works beautifully with the creamy layers. -
Gingersnap Crust: For a bold kick, try a gingersnap crust instead. The spicy notes from the cookies add a delightful contrast to the sweetness.
-
Alternative Gelatin Flavors: Experiment with other flavored gelatins like lime or mixed berry. Each flavor brings a new aesthetic and taste to your creation.
-
Chocolate Pudding Swap: Exchange vanilla instant pudding for chocolate instant pudding to deepen the flavor, making every bite irresistibly rich.
-
Non-Dairy Options: Use non-dairy milk and cream cheese alternatives to convert this dessert into a vegan-friendly delight. Your guests won’t even notice the difference!
-
Coconut Whipped Cream: Replace regular whipped topping with coconut whipped cream for a tropical twist that adds a light, creamy texture.
-
Natural Coloring: For a more natural approach, opt for natural food colorings derived from beet juice or spirulina; they enhance the dessert without artificial ingredients.
Each of these variations can elevate your Halloween Lush Dessert to new heights, creating an experience loved by all. If you’re seeking more sweet temptations, don’t miss my Banana Split Dump and Coffee Cake recipes for more festive treats.
What to Serve with Halloween Lush Dessert
Indulging in a Halloween Lush Dessert is delightful, but what could elevate your celebration even further?
- Spooky Fruit Salad: Fresh, colorful fruits bring a refreshing contrast to the dessert’s richness, and their vibrant colors mirror the Halloween theme.
- Crispy Caramel Apples: These sweet, sticky treats offer a crunchy texture that pairs perfectly with the creamy layers of the lush dessert, inviting guests to savor both.
For a cozy atmosphere, consider serving with warm mulled cider—its warming spices will intoxicate the senses while balancing the dessert’s sweetness.
-
Ghostly Mini Cupcakes: Light and fluffy cupcakes with a ghost design bring fun to the table, ensuring a playful dessert spread everyone will love.
-
Chocolate-Dipped Pretzels: The salty crunch complements the sweetness, making each bite of the dessert even more indulgent while adding a delightful texture contrast.
-
Pumpkin Spice Latte: This seasonal favorite adds a warm, spiced note, enhancing the flavors of the dessert and wrapping your guests in autumn’s cozy embrace.
-
Cookie Crumble Topping: Crumble some chocolate or gingersnap cookies over each slice of the lush dessert for an added crunch with every creamy bite, perfect for texture enthusiasts!
Expert Tips for Halloween Lush Recipe
• Dissolve Gelatin Properly: Make sure the gelatin is fully dissolved; any lumps can impact the dessert’s creamy texture.
• Chill Time is Key: Refrigerate the dessert for at least 4 hours to ensure the layers set correctly; this is crucial for slicing.
• Avoid Freezing: Keep this lush dessert in the fridge, as freezing alters the texture and may make it less enjoyable.
• Mix Cream Cheese Well: Beat the cream cheese and powdered sugar until completely smooth for an ideal filling consistency and flavor.
• Decorate with Care: Add Halloween sprinkles after the dessert has chilled; this keeps them vibrant and prevents them from blending into the layers.
Feel free to experiment with different gelatin flavors while keeping the essence of the Halloween Lush Recipe intact!
Halloween Lush Recipe FAQs
What type of chocolate cookies should I use for the crust?
For the crust, I recommend using chocolate sandwich cookies, like Oreos, for their rich flavor. If you want to switch it up, graham cracker or gingersnap crumbs can also make a delightful base with a unique taste twist!
How long can I store leftovers?
You can store any leftover Halloween Lush Dessert in an airtight container in the refrigerator for up to 3-4 days. Just make sure it’s tightly sealed to retain its delicious flavors and texture!
Can I freeze the Halloween Lush Dessert?
It’s best to avoid freezing this dessert as it can change the texture of the cream layers, leaving them less enjoyable once thawed. To keep the delicious layers intact, store it in the fridge instead and enjoy it fresh!
What should I do if my gelatin isn’t dissolving properly?
If your gelatin isn’t dissolving well, make sure the boiling water is at a rapid boil before stirring in the gelatin. Stir continuously until completely dissolved, which typically takes about 2 minutes. If lumps persist, you can strain the mixture to remove them before adding it to the pudding.
Are there any dietary considerations for this recipe?
Absolutely! For a vegan version, use non-dairy cream cheese, coconut whipped cream, and non-dairy milk. Additionally, ensure your gelatin is plant-based. For those with allergies, always check ingredient labels, especially on the whipped topping and cookies, for allergens like gluten or dairy.

Halloween Lush Recipe: Creamy & Festive No-Bake Delight
Ingredients
Equipment
Method
- Crush the chocolate sandwich cookies in a food processor until they turn into fine crumbs, about 30 seconds.
- Pour the cookie crumbs into a mixing bowl and add the melted butter. Mix well until the crumbs are evenly moistened.
- Press the crust mixture firmly into the bottom of a 9x13 glass baking dish.
- Dissolve the orange gelatin in boiling water and let it cool slightly.
- Whisk together cold milk and the vanilla pudding mix in a medium bowl until thickened.
- Fold in the cooled orange gelatin until smooth.
- Beat together softened cream cheese and powdered sugar until creamy. Fold in whipped topping and purple food coloring.
- Spread the cream cheese mixture evenly over the cooled cookie crust.
- Pour the orange gelatin and pudding mixture over the cream cheese layer.
- Mix additional whipped topping with green food coloring and spread it over the jello layer.
- Sprinkle Halloween sprinkles on top and refrigerate for at least 4 hours.
Leave a Reply