
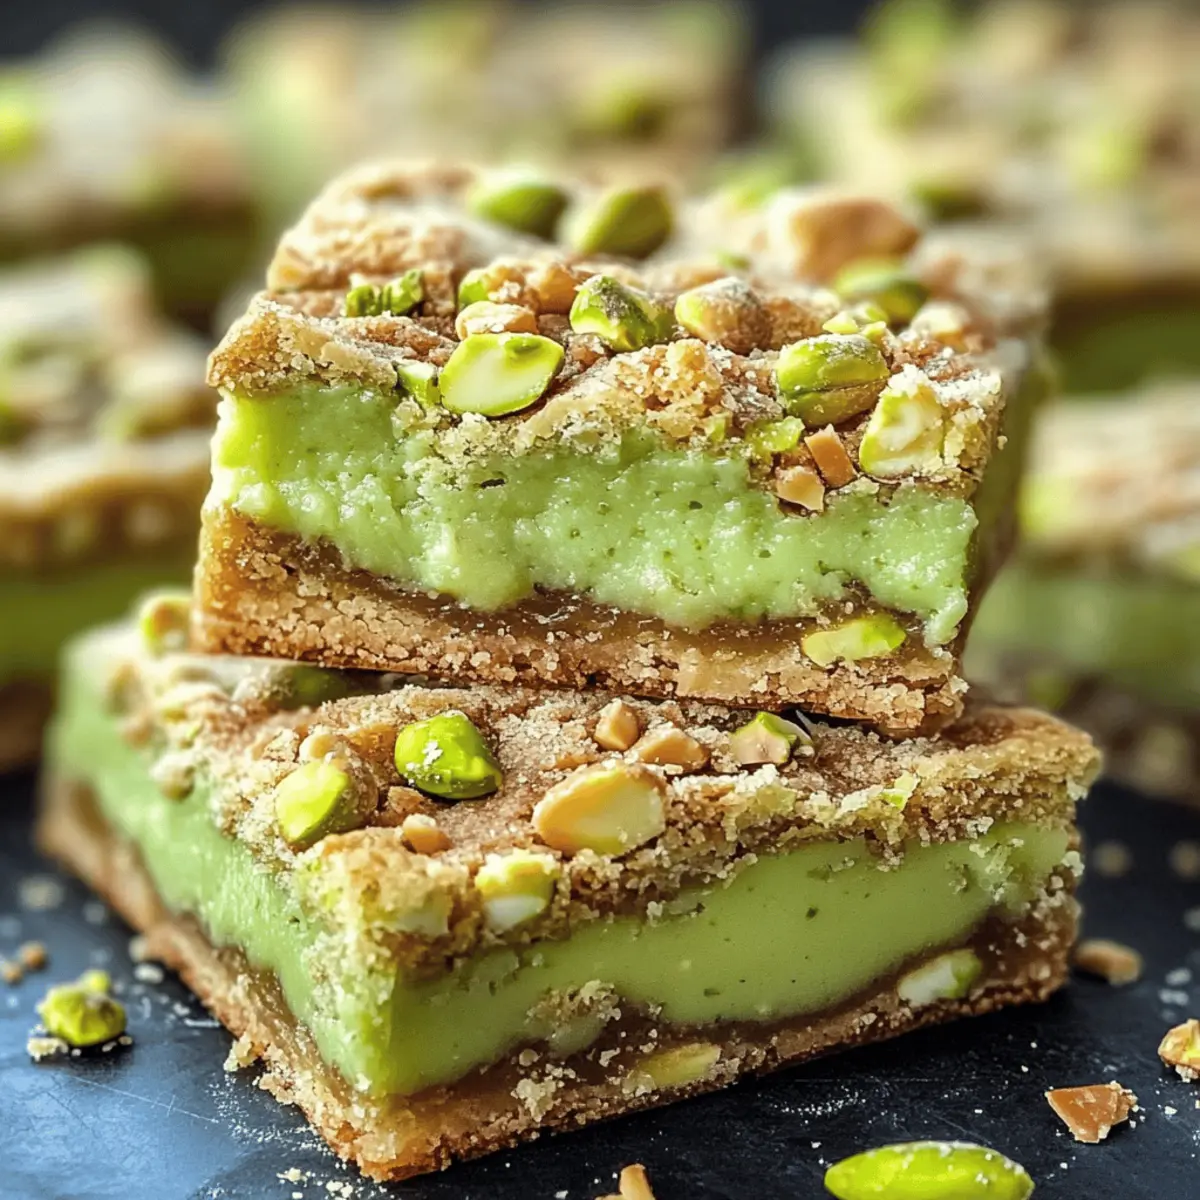
As I stood in my kitchen, the rich, nutty aroma of pistachios filled the air, instantly transporting me to a cozy café on a sun-drenched afternoon. That’s when I decided to whip up these delightful Pistachio Dream Cookie Bars. This easy recipe requires just a handful of ingredients, making it perfect for both new bakers and seasoned pros—especially when you need a sweet treat without the fuss! These bars not only boast a wonderfully chewy texture but also capture the irresistible flavor of pistachio pudding, creating a dessert that will brighten any day. Plus, they’re vegetarian and can be made gluten-free with the right mix. Curious about how to bring this exact delight into your own home? Let’s dive in!

Why are Pistachio Dream Cookie Bars irresistible?
Irresistible Flavors: The combination of pistachio pudding and cookie mix creates a nutty, sweet satisfaction that lingers.
Quick & Easy: With just a handful of ingredients, this recipe can be made swiftly, perfect for busy weeknights or unexpected guests.
Chewy Perfection: Each bar offers a delightful chewy texture that everyone will love, making them a hit at gatherings and potlucks.
Versatile Options: Want to mix things up? Toss in some chocolate chips or top with cream cheese frosting for an extra layer of flavor—just like my delectable Cinnamon Roll Cookies!
Gluten-Free Friendly: Use a gluten-free cookie mix to cater to dietary needs while still enjoying this dreamy dessert.
You won’t be able to resist sharing (or keeping them all to yourself) these delightful treats!
Pistachio Dream Cookie Bars Ingredients
For the Dough
- ½ cup unsalted butter – Provides richness and moisture for a chewy texture; margarine can be used for a dairy-free option.
- 2 large eggs – Binds the mixture and adds moisture; use flax eggs as a substitute for a vegan version.
- 3.4 oz pistachio instant pudding mix – Infuses the bars with nutty flavor and enhances moisture; try substituting with vanilla or chocolate pudding for variety.
- 1 package sugar cookie mix – Forms the base structure and sweetness; opt for a gluten-free sugar cookie mix to enjoy Pistachio Dream Cookie Bars with a gluten-friendly twist.
Enjoy making these irresistible bars that will leave everyone craving more!
Step‑by‑Step Instructions for Pistachio Dream Cookie Bars
Step 1: Preheat the Oven
Begin by preheating your oven to 375°F (190°C). This essential step ensures that your Pistachio Dream Cookie Bars bake evenly and develop a lovely golden edge. While the oven warms, gather all your ingredients to streamline the process, setting the stage for a delightful baking experience.
Step 2: Mix the Wet Ingredients
In a large mixing bowl, cream together ½ cup of softened unsalted butter, 2 large eggs, and 3.4 oz of pistachio instant pudding mix. Use an electric mixer on medium speed for about 2-3 minutes until the mixture is smooth and creamy. This will create a rich base that infuses the bars with nutty flavor and moisture.
Step 3: Combine the Dry Ingredients
Gradually add in 1 package of sugar cookie mix, stirring gently with a wooden spoon or spatula. Mix until just combined, ensuring not to overwork the dough, which could lead to tough bars. The dough should be sticky yet cohesive, full of flavor and ready to be spread into the pan.
Step 4: Prepare the Baking Sheet
Grease a 10 x 15-inch baking sheet with cooking spray or line it with parchment paper for easy removal. Press the sticky dough into the prepared pan evenly, making sure to spread it out to the corners. This will ensure all pieces are evenly baked and deliciously chewy.
Step 5: Bake the Bars
Place the pan in your preheated oven and bake for 18-22 minutes. You’ll know your Pistachio Dream Cookie Bars are done when the edges are lightly golden, and the center is set. For added assurance, insert a toothpick into the center; it should come out clean or with just a few crumbs.
Step 6: Cool and Slice
Once baked, remove the pan from the oven and allow it to cool completely in the pan on a wire rack. This cooling step is crucial to achieving the perfect chewy texture. After cooling for about 30 minutes, cut the bars into squares or rectangles, and let them cool further so they don’t crumble when served.

Pistachio Dream Cookie Bars Variations
Feel free to make this delightful recipe your own by exploring these fun twists and substitutions!
-
Nutty Boost: Add chopped pistachios or almonds on top before baking for an extra crunch and visual appeal.
-
Chocolate Lovers: Mix in ½ cup of chocolate chips for a delicious contrast to the nuttiness. The combination of chocolate and pistachio is simply heavenly.
-
Coconut Twist: Include shredded coconut in the dough for a tropical flair that enhances the chewy texture beautifully.
-
Cream Cheese Frosting: Top your cooled bars with a light cream cheese frosting for a rich and tangy finish that’s truly irresistible.
-
Vegan Option: Replace the eggs with flax eggs and use dairy-free butter to create a vegan-friendly version that everyone can enjoy.
-
Flavor Substitution: Feeling adventurous? Swap the pistachio pudding mix with vanilla or chocolate to create a new flavor profile! Just like my tasty Lemon Zucchini Bars, you can switch up the flavor with just one ingredient.
-
Peanut Butter Delight: Fold in a couple of tablespoons of creamy peanut butter to enhance that nutty flavor with a rich twist.
-
Add a Kick: Incorporate a pinch of sea salt or crushed red pepper flakes for a surprising flavor boost that balances the sweetness.
Get creative with your Pistachio Dream Cookie Bars and share the joy of flavorful baking!
Expert Tips for Pistachio Dream Cookie Bars
-
Butter Temperature Matters: Make sure your butter is softened but not melted; this helps create the perfect creamy mixture for your bars.
-
Mix with Care: Stir the dough just until combined; overmixing can lead to tough Pistachio Dream Cookie Bars, defeating their chewy goodness.
-
Toothpick Test: For checking doneness, insert a toothpick in the center. It should come out clean or with a few moist crumbs for that ideal texture.
-
Cool Before Cutting: Allow the bars to cool completely in the pan; this avoids crumbling and ensures clean, beautiful slices.
What to Serve with Pistachio Dream Cookie Bars
Elevate your dessert experience by pairing these delightful treats with complementary flavors and textures that will create a memorable meal.
- Vanilla Ice Cream: A scoop of creamy vanilla ice cream provides a cool contrast to the warm, chewy cookie bars, making each bite a heavenly combination.
- Fresh Berries: Add a burst of freshness with strawberries or raspberries. Their tartness balances the sweetness of the bars beautifully.
- Chocolate Drizzle: A simple drizzle of melted chocolate over the top adds a luxurious finish, enhancing the nutty flavor of the pistachios.
- Mint Tea: Serve with a warm cup of mint tea for a refreshing drink that complements the nutty sweetness of the bars. It’s the perfect after-dinner drink!
- Nuts and Dried Fruit Platter: Create a rustic platter with roasted nuts and dried fruits for a satisfying crunch and chew, echoing the flavors in your cookie bars.
- Coconut Whipped Cream: A dollop of coconut whipped cream offers a light, airy contrast, enhancing the indulgent experience without overwhelming the palate.
- Chocolate Milkshake: Dive into nostalgia with a rich chocolate milkshake, perfect for both kids and adults, and pairs wonderfully with the pistachio sweetness.
- Coffee or Espresso: A steaming cup of coffee or espresso cuts through the sweetness, providing a rich, bold flavor that complements the dessert.
- Caramel Sauce: Drizzling caramel sauce over the bars allows for an additional layer of flavor, adding sweetness and a delightful gooey texture.
These pairings will surely elevate your Pistachio Dream Cookie Bars into a complete dessert party, making every bite a celebration!
How to Store and Freeze Pistachio Dream Cookie Bars
Room Temperature: Keep the cookie bars in an airtight container at room temperature for up to 3-4 days for optimal freshness.
Fridge: If you prefer, refrigerate the bars in a sealed container for up to a week; this helps maintain their chewy texture.
Freezer: For longer storage, wrap the bars individually in plastic wrap and place them in a freezer bag; they can be frozen for up to 3 months.
Reheating: To enjoy them warm, reheat in the microwave for about 15-20 seconds or place in the oven at 350°F for a few minutes until warmed through.
Make Ahead Options
These Pistachio Dream Cookie Bars are perfect for meal prep enthusiasts looking to save time during busy weeks! You can mix the dough up to 24 hours in advance, just keep it tightly covered in the refrigerator to maintain freshness. Additionally, the fully baked bars can be stored in an airtight container at room temperature for 3-4 days, or you can refrigerate them for up to a week. To enjoy after prepping, simply slice and serve directly, or warm them briefly in the microwave to enhance their chewy goodness. This makes your dessert planning hassle-free, ensuring that each bite remains just as delicious as when freshly made!
Pistachio Dream Cookie Bars Recipe FAQs
What is the best way to select ripe pistachios?
When choosing pistachios, look for nuts that are firm, plump, and have intact shells. Avoid those with dark spots or cracked shells, as these may indicate spoilage. If using pistachio pudding mix, ensure it is fresh, as expired mixes can affect the flavor of your Pistachio Dream Cookie Bars.
How long can I store Pistachio Dream Cookie Bars?
You can store your Pistachio Dream Cookie Bars in an airtight container at room temperature for about 3-4 days. If you wish to keep them longer, they can be refrigerated for up to a week without losing their delicious chewiness, making them an easy treat to enjoy anytime!
Can I freeze Pistachio Dream Cookie Bars?
Absolutely! To freeze, cut the bars into squares and wrap each piece individually in plastic wrap. Place them in a freezer bag or an airtight container. They can be frozen for up to 3 months. To enjoy, simply reheat them in the microwave for 15-20 seconds or warm in the oven at 350°F for a few minutes until perfect!
What should I do if my cookie bars turn out too dry?
If your Pistachio Dream Cookie Bars come out dry, it could be due to overbaking or using too much flour. To prevent this, always check doneness a couple of minutes before the recommended baking time. Remember, it’s fine if a toothpick comes out with a few moist crumbs. If they’re too dry, try adding a drizzle of melted butter or a scoop of whipped cream on top when serving!
Are Pistachio Dream Cookie Bars safe for people with nut allergies?
Unfortunately, they are not. As the name suggests, the main ingredient is pistachio pudding, which can cause allergic reactions in those sensitive to nuts. If you want a nut-free option, consider substituting the pistachio pudding mix with vanilla or chocolate pudding, keeping it safe for those with nut allergies while still delighting in a sweet treat.
How can I make these bars gluten-free?
To make your Pistachio Dream Cookie Bars gluten-free, simply substitute the regular sugar cookie mix with a gluten-free alternative. Many brands offer great tasting gluten-free mixes that will work just as wonderfully without sacrificing taste or texture. Enjoy baking!

Pistachio Dream Cookie Bars for Chewy Nutty Bliss
Ingredients
Equipment
Method
- Preheat your oven to 375°F (190°C).
- Cream together the butter, eggs, and pudding mix in a mixing bowl.
- Gradually add the sugar cookie mix, stirring gently until just combined.
- Grease a baking sheet or line it with parchment paper, then press the dough into the pan.
- Bake for 18-22 minutes until the edges are lightly golden and center is set.
- Cool completely in the pan, then cut into squares or rectangles.
Leave a Reply