
As I rummaged through my pantry looking for a quick way to satisfy my sweet tooth, I stumbled upon a jar of creamy peanut butter, and a light bulb moment sparked a delicious creation. Enter Healthy Peanut Butter Buster Bars—a guilt-free dessert that captures the comforting joy of childhood treats while packing a protein punch with over 15 grams per bar! These delightful bites not only cater to your sweet cravings but also boast a quick, no-bake prep method that makes them ideal for busy days. With just a few simple ingredients, you can whip up a batch of these nutritious bars, perfect for a snack, dessert, or post-workout treat. Who knew staying healthy could be so satisfying? Curious how to make your kitchen smell like a peanut butter dream? Let’s dive in!
Why are these Buster Bars a game changer?
Healthy, Creamy Indulgence: With only a handful of ingredients, these Buster Bars offer a guilt-free way to satisfy your sweet cravings without sacrificing nutrition.
Quick Prep: No baking needed! You can whip them up in mere minutes, making them a perfect choice for busy weeknights.
High-Protein Power: Each bar contains over 15 grams of protein, turning these treats into a nourishing snack.
Versatile Alternatives: Feel free to customize! Swap peanut butter for almond or sunflower seed butter, or use various sweeteners to suit your dietary preferences.
Perfectly Balanced: Enjoy the delightful crunch of chocolate chips paired with the creamy texture, reminiscent of a classic ice cream bar. Pair them with Summer Peach Bars for a colorful dessert spread that’s sure to impress!
Buster Bars Ingredients
For the Base
• Yogurt – Choose Greek yogurt or a vegan alternative for a creamy texture that replaces traditional ice cream.
• Peanut Butter – Adds rich flavor and protein; almond or sunflower seed butter can be excellent substitutes for nut allergies.
For Sweetness
• Sweetener – Use honey, maple syrup, or a sugar-free option like stevia to taste; adjust based on yogurt’s sweetness.
For the Coating
• Chocolate Chips – Select dairy-free or sugar-free options based on your diet; they create a delicious outer shell.
• Coconut Oil (optional) – Adds smoothness to melted chocolate; omit if you prefer a thicker coating.
For Topping
• Chopped Peanuts (optional) – Sprinkle on top for an added crunch; they complement the creamy Buster Bars beautifully.
Step‑by‑Step Instructions for Healthy Peanut Butter Buster Bars
Step 1: Whip the Base
In a medium bowl, combine your choice of yogurt and peanut butter, about 1 cup each, using a hand mixer or whisk until the mixture is smooth and creamy. This should take about 3-5 minutes. Aim for a thick consistency that pours easily. If desired, add a sweetener to taste—honey or maple syrup work well—stirring until fully incorporated for a delightful flavor.
Step 2: Add Chocolate Chips
Once the base is ready, gently fold in about ½ cup of mini chocolate chips for an extra touch of sweetness and texture. Use a spatula to mix them in, ensuring they are evenly distributed throughout the peanut butter mixture for those scrumptious bursts of chocolate in your Healthy Peanut Butter Buster Bars.
Step 3: Shape the Bars
Line a baking tray with parchment paper for easy cleanup. Spoon the creamy peanut butter mixture into dollops on the tray, spacing them out to allow room for flattening. Aim for roughly 2-3 tablespoons per dollop. This step should take about 5 minutes, so you can create bars of your preferred size!
Step 4: Insert Sticks and Flatten
Take popsicle sticks or small spoons and gently insert one into each dollop. Press down slightly to flatten them, creating a bar shape. This process should take no longer than 5 minutes. The bars should look smooth and even, ready for their delicious coating once frozen.
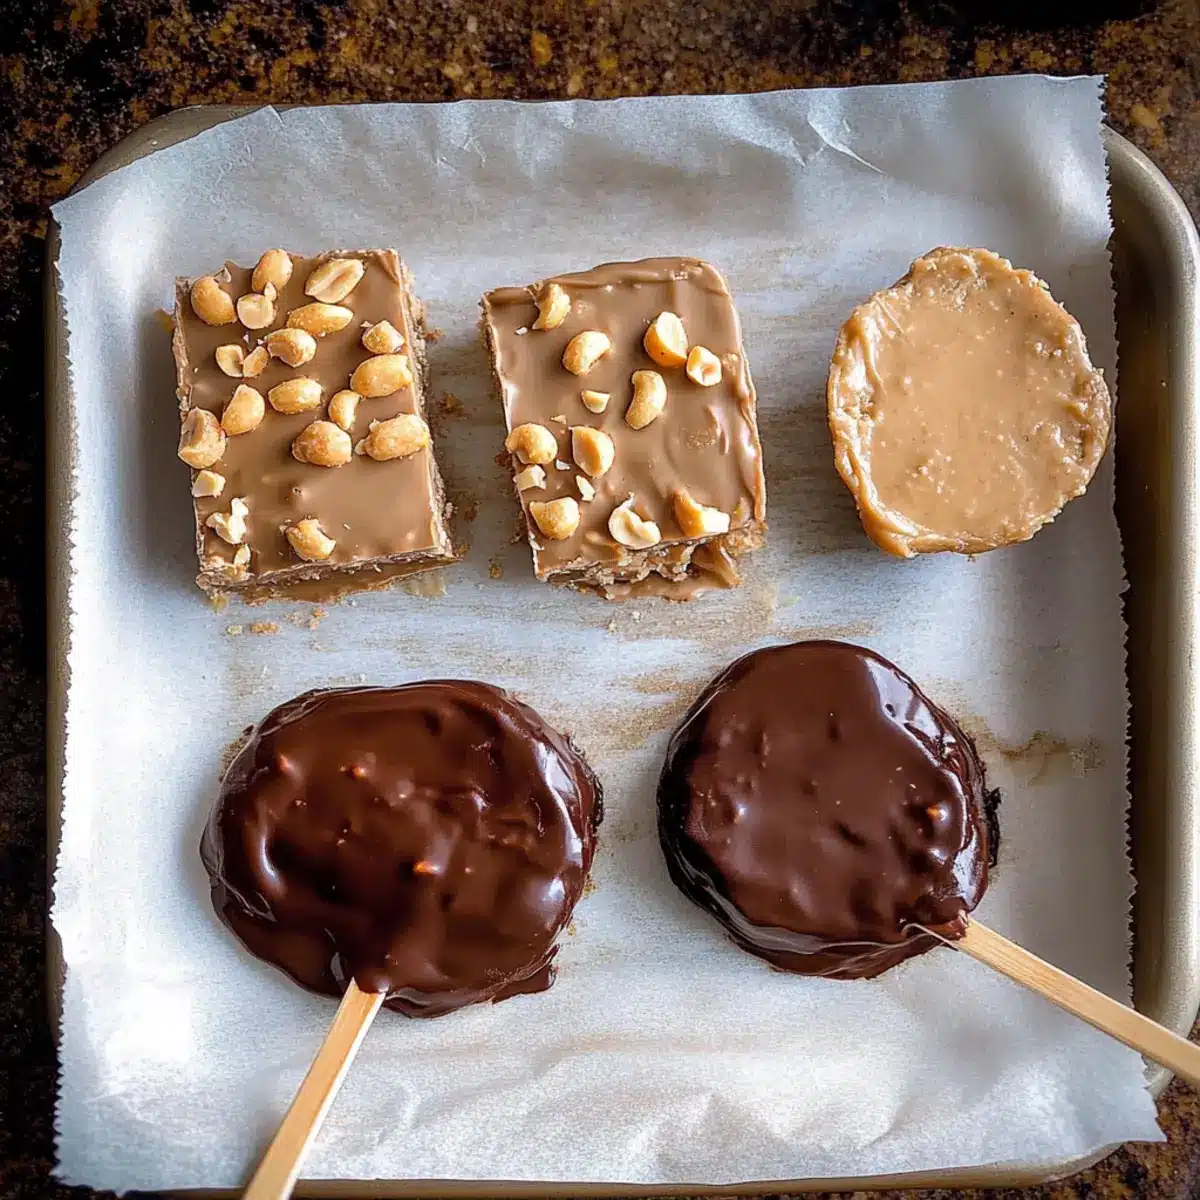
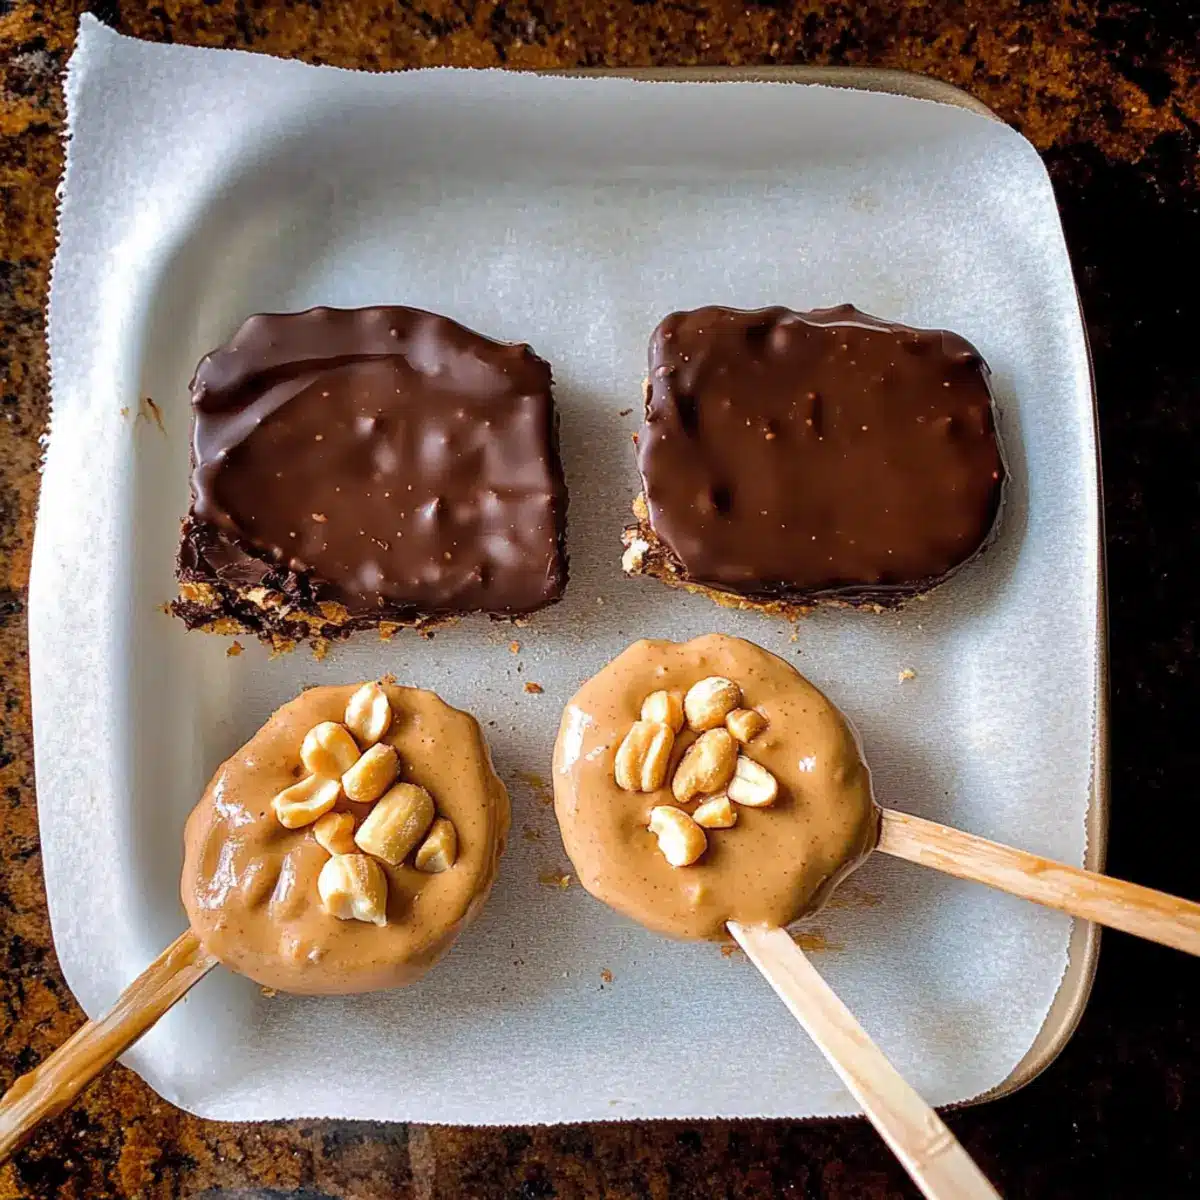
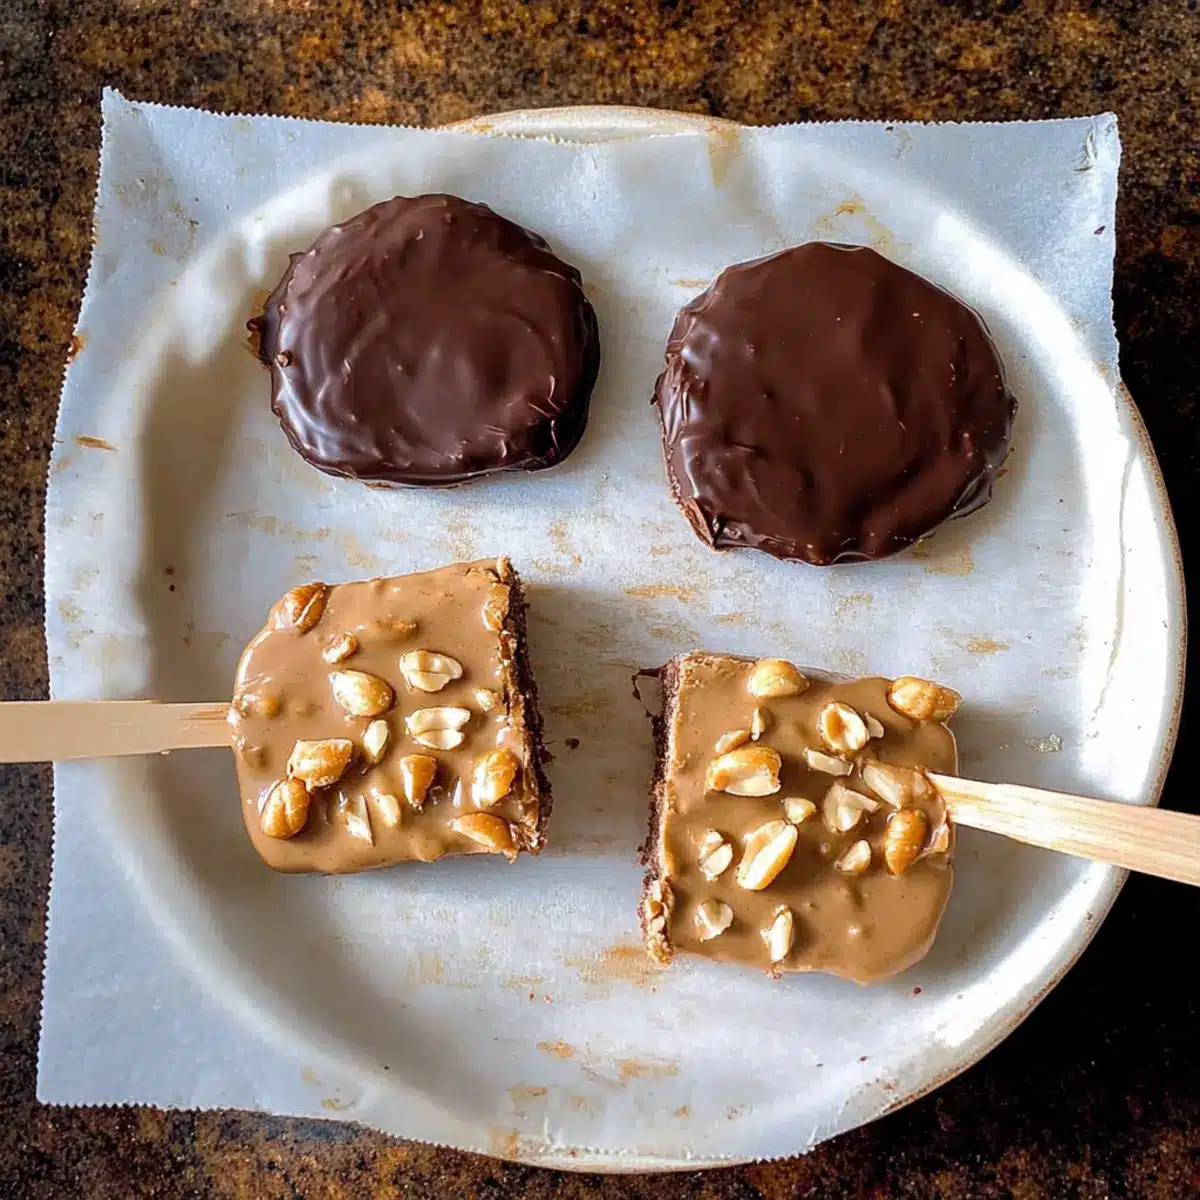
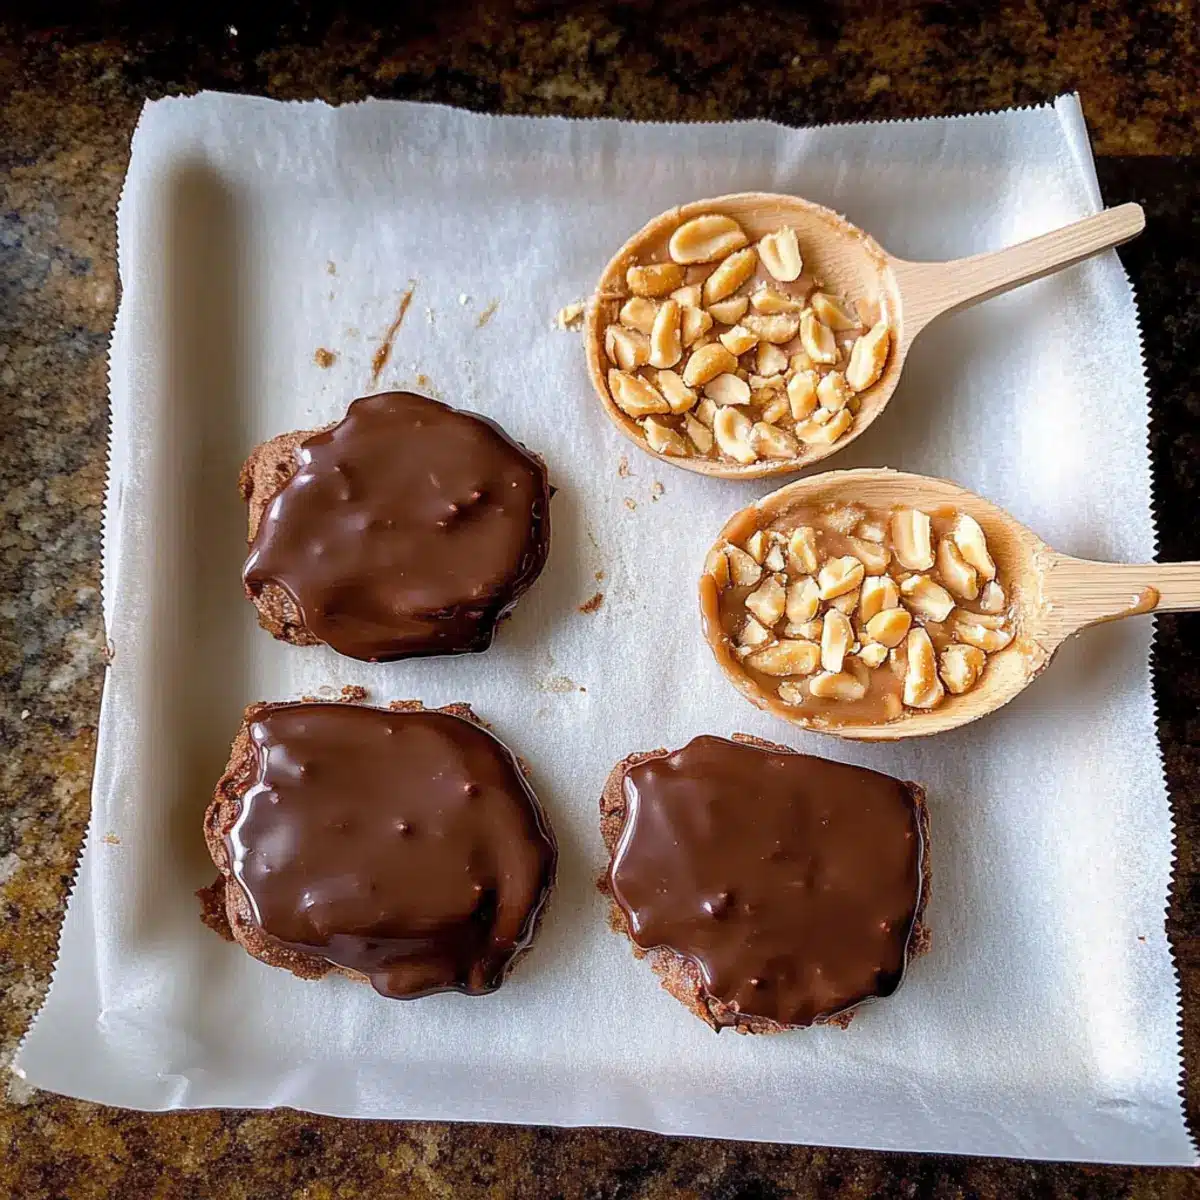
Step 5: Add Crunch (Optional)
For an added crunchy texture, sprinkle chopped peanuts on top of each bar. This optional step only takes a couple of minutes and enhances the experience of your Healthy Peanut Butter Buster Bars. Ensure the toppings stick well into the mixture for maximum crunch in every bite.
Step 6: Freeze the Base
Place the tray in the freezer and let the bars firm up for about 1-2 hours. Check them after the first hour; they should feel solid to the touch. Freezing your bars well ensures a perfect texture, making them easy to dip in chocolate later without melting into a mess.
Step 7: Melt the Chocolate
While waiting, melt approximately 1 cup of chocolate chips using a microwave or double boiler. If using a microwave, heat in 30-second intervals, stirring in between until smooth and melted. If desired, stir in a teaspoon of coconut oil for a smoother consistency. This will create a delicious coating for your Healthy Peanut Butter Buster Bars.
Step 8: Coat the Bars
Once the bars are firm, remove them from the freezer. Dip each bar into the melted chocolate, ensuring they are fully coated. Return them to the parchment-lined tray after dipping, ensuring that any excess chocolate drips off. This step is key to achieving that indulgent chocolate shell.
Step 9: Freeze Again
Return the tray to the freezer for another 30 minutes to set the chocolate coating. The bars should be completely firm and ready to enjoy. Keep an eye on the time, as this step is critical in ensuring that each Healthy Peanut Butter Buster Bar is perfectly chilled and deliciously satisfying.
Make Ahead Options
These Healthy Peanut Butter Buster Bars are ideal for meal prep, allowing you to whip them up ahead of time for a hassle-free treat! You can prepare the base mixture and freeze it for up to 24 hours before serving. Simply mix the yogurt and peanut butter, fold in the chocolate chips, and shape the bars, then freeze them. For best results, ensure they are well-wrapped in parchment paper to maintain their creamy texture. When you’re ready to indulge, dip the frozen bars in melted chocolate and place them back in the freezer for 30 minutes to set. With this prep strategy, you can enjoy delicious, guilt-free bars without the last-minute rush!
How to Store and Freeze Buster Bars
Fridge: Keep your Buster Bars in an airtight container in the fridge for up to 3 days. This makes it easy to grab one whenever a sweet craving hits!
Freezer: For longer storage, place them in a covered container in the freezer for up to one month. Be sure to separate layers with parchment paper to avoid sticking.
Reheating: If you prefer a softer texture, let the Buster Bars sit at room temperature for a few minutes after removing them from the freezer before enjoying.
What to Serve with Healthy Peanut Butter Buster Bars
Transform your dessert experience by crafting the perfect meal around these creamy, dreamy bars.
-
Fresh Berries: The bright acidity of strawberries or raspberries beautifully balances the rich flavors of the bars, offering a refreshing contrast.
-
Coconut Milk Ice Cream: A scoop of coconut milk ice cream on the side adds a smooth, tropical twist that pairs seamlessly with the bars’ textures. The creaminess of the ice cream enhances each bite, creating a blissfully indulgent experience.
-
Crunchy Granola: Sprinkle some crunchy granola on top for an additional textural element. The nutty flavors complement the peanut butter perfectly and add satisfying crunch to each bite.
-
Nutty Trail Mix: A small bowl of nutty trail mix serves as a delightful sidekick. This adds a dash of protein and healthy fats, enhancing the overall snacking experience.
-
Chilled Almond Milk: Enjoy these bars alongside a glass of chilled almond milk. Its lightness pairs beautifully, making every bite of the peanut butter bars even more enjoyable.
-
Dark Chocolate Drizzle: Drizzling a bit of melted dark chocolate over fresh bananas creates a decadent side dish that elevates the dessert even more. This double chocolate sensation is a sweet finish anyone would love!
Expert Tips for Perfect Buster Bars
• Yogurt Consistency: Ensure yogurt is well-whipped for a smooth and creamy base in your Buster Bars; this avoids any lumps before freezing.
• Trick for Easy Removal: Use parchment paper for lining the tray—it simplifies the removal process, preventing any sticking to the bottom.
• Chocolate Coating Smoothness: Add a teaspoon of coconut oil to the melted chocolate; it helps achieve a smoother coating while ensuring a thick texture.
• Adjust Sweetness Wisely: If using sweetened yogurt, taste the mixture before adding extra sweeteners to avoid over-sweetening your Buster Bars.
• Freezing Time is Key: Allow the bars to freeze thoroughly; this helps maintain their shape during the chocolate-dipping process, leading to perfect results.
Buster Bars Variations & Substitutions
Feel free to let your creativity shine and customize these Buster Bars with delightful twists!
- Vegan-Friendly: Substitute Greek yogurt for coconut yogurt to create a dairy-free version that still packs a creamy punch.
- Keto-Friendly: Use sugar-free sweeteners like erythritol or monk fruit instead of honey for a low-carb delight.
- Nut-Free: Replace peanut butter with sunflower seed butter for a nut-free option that’s just as creamy and delicious.
- Flavor Explosion: Experiment with flavored yogurts, such as vanilla or chocolate, to give a different taste profile during every bite.
- Texture Magic: Add crushed graham crackers or oats to the mixture for extra crunch, elevating your Buster Bars both visually and texturally.
- Choco-Mint Dream: Incorporate a few drops of peppermint extract in the chocolate coating for a refreshing minty twist.
- Fruit Fusion: Fold in diced fresh or freeze-dried fruit like strawberries or bananas to add a fruity burst of flavor.
- Serving Suggestion: Pair your Buster Bars with Lemon Zucchini Bars for a sweet and refreshing dessert platter that your guests will love!
Healthy Peanut Butter Buster Bars Recipe FAQs
What type of yogurt should I use?
You can use Greek yogurt for a thicker, creamier base, or opt for regular yogurt if you prefer. If you’re looking for a vegan option, coconut yogurt or almond milk yogurt works beautifully! The key is to choose a yogurt that suits your taste and dietary preferences.
How long can I store the Healthy Peanut Butter Buster Bars?
These bars are best enjoyed fresh but can be stored in an airtight container in the fridge for up to 3 days. For longer-lasting indulgence, keep them in the freezer for up to one month. Just make sure to layer them with parchment paper to prevent sticking!
Can I freeze the Buster Bars? How?
Absolutely! To freeze, place your Buster Bars on a tray and ensure they’re spaced apart. Once they’re firm (about 1-2 hours in the freezer), transfer them to a covered container, layering with parchment paper to prevent sticking. They’ll stay delicious for up to a month!
What if my bars are melting while I dip them in chocolate?
If your bars are melting, it’s essential they’re properly frozen before dipping—at least 1-2 hours is ideal. If you find them getting too soft, pop them back in the freezer for a few minutes to firm up again. This step ensures a smooth chocolate coating without losing shape.
Are these Buster Bars suitable for people with nut allergies?
Yes! You can easily make these bars nut-free by swapping peanut butter for sunflower seed butter. This alternative not only maintains the delightful flavor but also keeps the bars delicious while catering to those with nut allergies.
Can I customize the sweetener in the Buster Bars?
Certainly! You can use honey, maple syrup, or a sugar-free option like stevia based on your taste preference. If you’re using sweetened yogurt, be sure to taste first so you can adjust the additional sweetener accordingly—this ensures balanced sweetness!
Healthy Buster Bars That Satisfy Your Sweet Tooth Guilt-Free
Ingredients
Equipment
Method
- In a medium bowl, combine yogurt and peanut butter until smooth and creamy, about 3-5 minutes. Add sweetener to taste.
- Gently fold in mini chocolate chips until evenly distributed throughout the mixture.
- Line a baking tray with parchment paper and spoon the mixture into dollops, spacing them out for flattening.
- Insert sticks into each dollop and gently press to flatten them into bar shapes.
- Optional: Sprinkle chopped peanuts on top for extra crunch.
- Freeze the tray for 1-2 hours until bars are firm.
- Melt chocolate chips in the microwave or double boiler. If using a microwave, heat in 30-second intervals, stirring until smooth. Stir in coconut oil if desired.
- Dip each bar into the melted chocolate, ensuring they are fully coated, then return to the parchment-lined tray.
- Freeze again for 30 minutes to set the chocolate coating.
Leave a Reply