
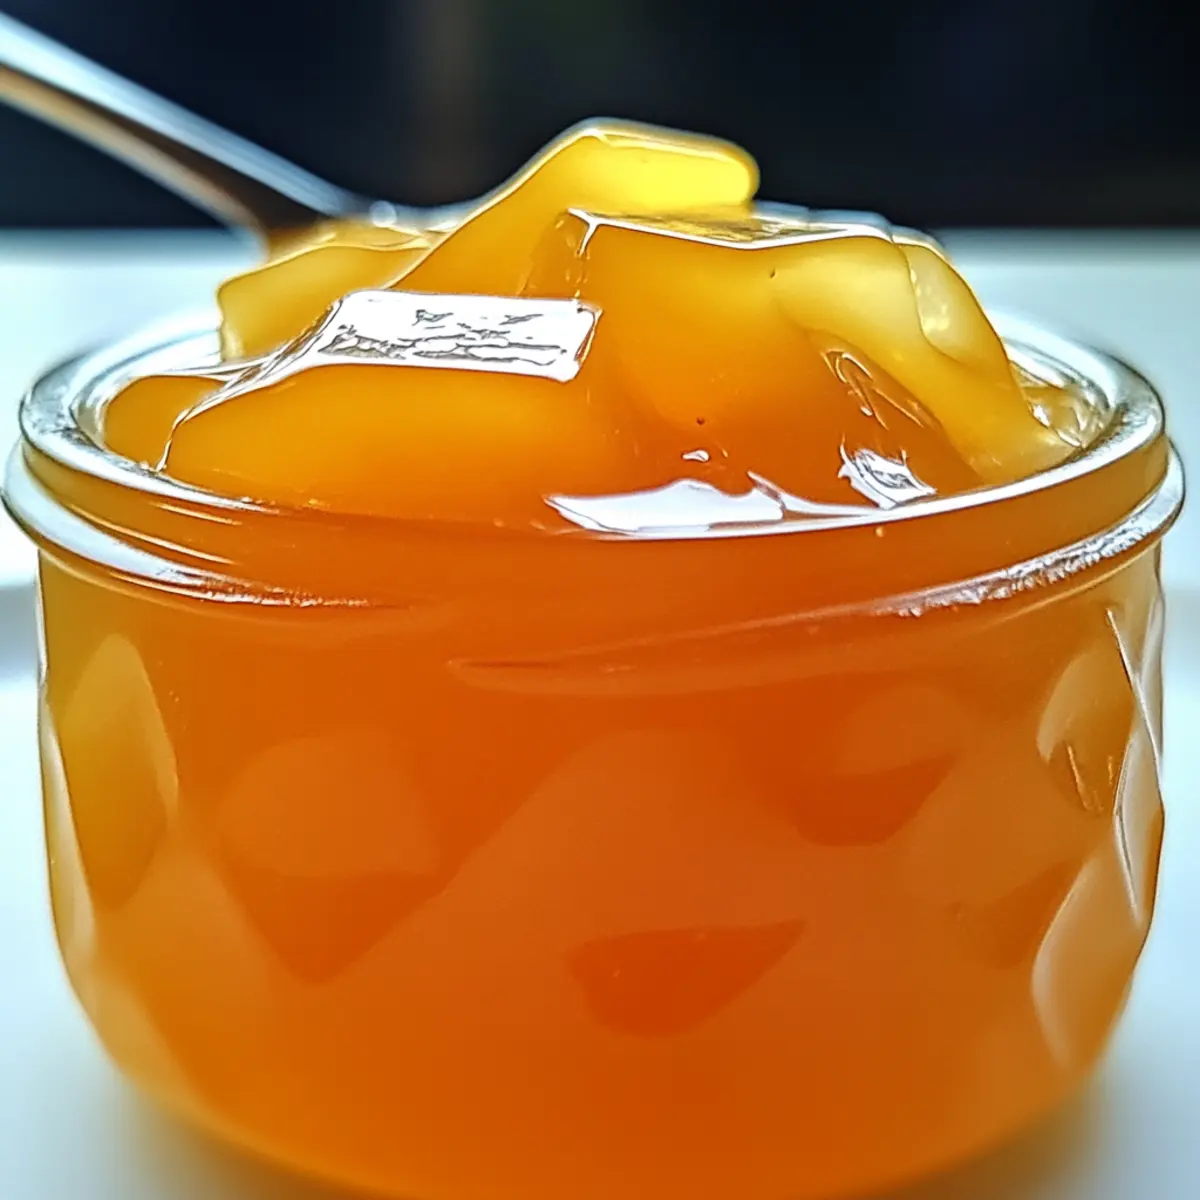
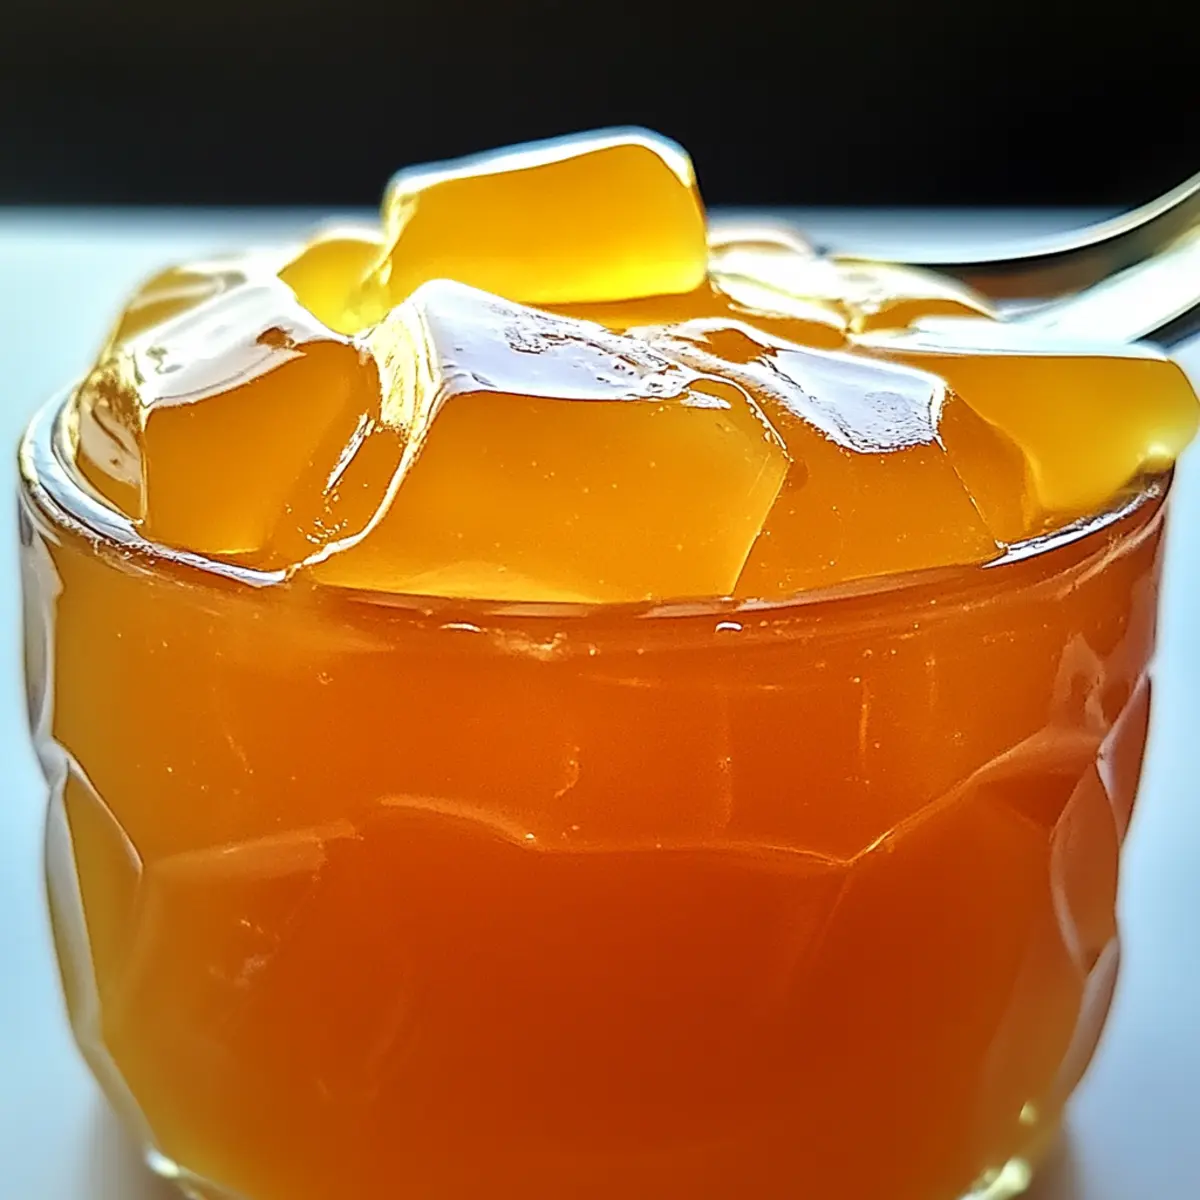
As I stood in my kitchen with the aroma of fresh oranges filling the air, a wave of nostalgia washed over me, transporting me back to sun-drenched summers of my childhood. This is how I fell in love with making Dreamsicle Jelly—a delightful treat that captures the essence of those sunny days in every wobbly spoonful. The combination of zesty orange juice and rich vanilla creates a refreshing dessert that not only delights your taste buds but also brings a smile to your face. It’s an incredibly quick and easy recipe that will impress friends and family alike, making it a perfect addition to any gathering or a sweet pick-me-up on a warm afternoon. Curious about how to make this enchanting jelly? Let’s dive into the creamy, citrusy goodness!
Why is Dreamsicle Jelly a Must-Try?
Nostalgic Flavor: A delightful blend of citrusy oranges and creamy vanilla takes you back to childhood summers with every bite.
Quick Preparation: You only need a few simple ingredients and about 10 minutes of active time, making it perfect for busy days.
Versatile Dessert: Serve it in fancy jars for an elegant touch or enjoy it straight from the fridge as a refreshing snack.
Customizable Options: Feel free to experiment with different juices or even swap in coconut milk for a version that’s equally delicious and dairy-free. If you love light and fruity desserts, this jelly is a wonderful addition to your collection!
Perfect for Entertaining: Impress your guests and enjoy happy faces with this stunning jelly at your next gathering. Get ready to elevate your dessert game with this refreshing treat!
Dreamsicle Jelly Ingredients
• Get ready to make this refreshing treat!
For the Jelly Base
- Orange Juice – The primary flavor component; fresh juice yields the best taste, but bottled works too.
- Gelatin – Essential for that wobbly, jiggly texture; always go for unflavored for a clear jelly.
- Sugar – Balances the acidity of the orange; adjust to your sweetness preference.
For the Cream Layer
- Vanilla Extract – Provides a luscious vanilla flavor; absolutely necessary for that dreamy jelly experience.
- Heavy Cream – Creates a smooth and rich layer; substitute with coconut milk for a delicious dairy-free option.
Step‑by‑Step Instructions for Dreamsicle Jelly
Step 1: Heat the Orange Juice and Sugar
In a small saucepan, combine fresh orange juice and sugar over medium heat. Stir gently as the mixture warms, allowing the sugar to dissolve completely, which should take about 3-5 minutes. Watch for small bubbles forming at the edges of the pan but avoid bringing the mixture to a boil, as you want a smooth base for your Dreamsicle Jelly.
Step 2: Dissolve the Gelatin
Once the orange juice mixture is hot but not boiling, sprinkle unflavored gelatin over the surface. Stir vigorously until the gelatin is fully dissolved, which should take around 2-3 minutes. You’ll know it’s ready when the mixture is perfectly smooth and slightly thickened, creating a beautiful blend of citrus flavors for your jelly.
Step 3: Pour and Cool
Carefully pour the orange mixture into molds or individual jars, filling them about halfway. Allow the jelly mixture to cool at room temperature for about 30 minutes. This allows it to set gently before you refrigerate, helping to maintain the lovely color and transparency of your Dreamsicle Jelly.
Step 4: Prepare the Vanilla Cream Layer
In another saucepan, gently warm the heavy cream over low heat until it is just warm to the touch, about 2-3 minutes. Stir in the vanilla extract and sugar until well combined, and then sprinkle the gelatin over the warm cream. Mix until the gelatin is fully dissolved, ensuring the richness of the vanilla infuses beautifully.
Step 5: Add the Vanilla Layer
After the orange jelly has set for at least 2 hours in the refrigerator, carefully pour the vanilla layer over the top of the orange jelly. For an artistic touch, pour slowly to create a swirl effect. Return the molds or jars to the refrigerator and let chill for an additional 2 hours, allowing both layers to become firm and luscious.
Step 6: Serve and Enjoy
Once both layers of your Dreamsicle Jelly are set, remove them from the fridge. If using a mold, gently run a knife around the edges before carefully inverting onto a plate. Serve as is or topped with a dollop of whipped cream and a slice of orange for a beautiful presentation. Enjoy this nostalgic treat that’s perfect for parties or a sweet afternoon delight!
Expert Tips for Dreamsicle Jelly
-
Perfect Gelatin Dissolution: Ensure that the gelatin is fully dissolved in the warm orange juice to avoid any clumps in your Dreamsicle Jelly. Stir until smooth!
-
Fresh Orange Juice: For an unbeatable flavor, always use fresh orange juice. If you’re in a pinch, bottled juice can work, but make sure to taste and adjust the sugar accordingly.
-
Layering Trick: Pour the vanilla layer slowly to create beautiful swirls. This not only looks stunning but also adds an extra layer of flavor with every spoonful.
-
Experiment with Flavors: Don’t hesitate to explore other citrus fruits or flavored extracts to enhance your Dreamsicle Jelly. A splash of lemon or lime can offer a refreshing twist!
-
Storage Made Easy: Keep any leftovers in an airtight container in the fridge for up to 3 days. This jelly keeps well and can still impress later!
Make Ahead Options
These Dreamsicle Jelly treats are perfect for busy home cooks looking to save time without sacrificing flavor. You can prepare the orange layer up to 24 hours in advance; simply heat the orange juice and sugar, dissolve the gelatin, and refrigerate until set. The vanilla cream layer can also be prepared ahead—you can even make it up to 3 days prior to serving. To maintain the jelly’s quality, store it in airtight containers in the fridge, which helps prevent drying out or absorbing odors. When you’re ready to impress your guests, just pour the vanilla layer over the orange jelly, let it set for another 2 hours, and enjoy this delightful treat with ease!
Dreamsicle Jelly Variations & Substitutions
Get ready to explore delightful twists that will make your Dreamsicle Jelly uniquely yours!
-
Dairy-Free: Substitute heavy cream with coconut milk for a luscious, creamy layer that’s entirely plant-based.
Transform your dessert into a tropical vacation with this simple swap! -
Citrus Twist: Try using lemon or lime juice instead of orange for a zesty, tangy flavor.
These bright alternatives will create a fresh and exciting jelly that’s sure to surprise! -
Berry Bliss: Incorporate pureed strawberries or blueberries into the orange base for a vibrant color and berry flavor.
Mixing berries can add a beautiful hue and deliciously complimentary taste to your nostalgic treat. -
Adult Indulgence: Add a splash of orange liqueur to the vanilla layer for a sweet adult twist that enhances the flavors.
This small change brings an elevated sophistication, perfect for summer parties with friends. -
Flavored Gelatin: Use flavored gelatin in place of unflavored for a fun, colorful variation.
Imagine wild berry or mango jello giving your creation an unexpected flair! -
Honey or Agave Nectar: Swap granulated sugar with honey or agave for a different sweetness profile and a hint of floral notes.
This will offer a softer sweetness, enriching the natural flavors of the orange juice. -
Nutty Infusion: Add crushed nuts, such as pistachios or almonds, on top of the vanilla layer for added texture and flavor.
The crunch complements the smoothness of the jelly beautifully, creating a delightful experience.
You might also enjoy using your jelly as an elegant topping for a homemade pound cake or layering it in a dessert glass alongside whipped cream. Embrace the creativity and let each spoonful be a moment of joy!
What to Serve with Dreamsicle Jelly
Elevate your dessert experience with delicious accompaniments that enhance every delightful bite of this nostalgic treat.
-
Whipped Cream: A fluffy dollop adds airy texture, complementing the jelly’s creamy layer and enhancing its refreshing flavor.
-
Fresh Berries: Juicy strawberries or blueberries provide a lovely contrast in flavor and texture, adding vibrant color that makes the dish pop.
-
Shortbread Cookies: Crisp and buttery cookies offer a delightful crunch that contrasts beautifully with the smooth jelly, making each bite a harmony of textures.
-
Coconut Whipped Topping: For a dairy-free option, this light and creamy topping brings tropical notes that beautifully pair with the orange and vanilla flavors.
-
Ice-Cream Floats: Pair a scoop of vanilla ice cream with the jelly for a playful twist, creating a sweet treat that delights on hot summer days.
-
Sparkling Citrus Beverage: A bubbly drink with fresh citrus notes enhances the jelly’s refreshing qualities, making it a fun and festive way to celebrate any occasion.
-
Chocolate-Covered Almonds: The rich chocolate provides a lovely contrast that balances the vibrant sweetness of the jelly, creating a satisfying dessert experience.
-
Marshmallow Fluff: Spread a thin layer over your jelly for an extra touch of sweetness and a unique, nostalgic flavor that transports you back to childhood.
How to Store and Freeze Dreamsicle Jelly
Fridge: Store your Dreamsicle Jelly in an airtight container for up to 3 days. This will keep it fresh and ready to enjoy anytime.
Freezer: While it’s best enjoyed fresh, you can freeze the jelly for up to 2 months in a freezer-safe container. Remember to leave space for expansion as it freezes.
Thawing: To enjoy frozen Dreamsicle Jelly, thaw it in the fridge overnight for a smooth texture. Avoid refreezing after thawing to maintain quality.
Serving Suggestions: For an impressive presentation, serve chilled jelly topped with a dollop of whipped cream and a slice of orange for added elegance!

Dreamsicle Jelly Recipe FAQs
How can I select the best orange juice for Dreamsicle Jelly?
Absolutely! For the best flavor, I recommend using fresh-squeezed orange juice. Look for juicy, ripe oranges with a fragrant aroma. If using bottled juice, check that it’s 100% pure without added sugars or preservatives for a more authentic taste.
What’s the best way to store Dreamsicle Jelly?
Store your Dreamsicle Jelly in an airtight container in the fridge, and it will stay fresh for up to 3 days. Just ensure the lid is tightly sealed to keep out any odors from your refrigerator.
Can I freeze Dreamsicle Jelly, and how?
Yes, you can freeze Dreamsicle Jelly for up to 2 months! First, pour the jelly into freezer-safe containers, leaving some space at the top for expansion. Once ready to enjoy, thaw it slowly in the refrigerator overnight for the best texture.
What should I do if my gelatin doesn’t dissolve correctly?
Oh no, let’s fix that! If your gelatin isn’t dissolving, ensure you’re heating the liquid just enough (hot but not boiling) for it to blend seamlessly. Give it a good stir for 2-3 minutes. If it’s clumpy, you can strain it through a fine mesh sieve before pouring into containers to catch any lumps.
Is Dreamsicle Jelly suitable for those with allergies?
Very! This Dreamsicle Jelly is vegetarian-friendly and can easily be made dairy-free by substituting heavy cream with coconut milk. If you have specific allergies, always check or substitute ingredients accordingly—like using plant-based gelatin, if needed!
What can I do if I want to add more flavors to my jelly?
Feel free to experiment! For a twist, try adding a splash of lemon or lime juice, or incorporate different fruit juices like berry blends. If you love citrusy desserts, these alternatives can add exciting new dimensions to your Dreamsicle Jelly!

Dreamsicle Jelly: Refreshing Summer Delight to Savor
Ingredients
Equipment
Method
- In a small saucepan, combine fresh orange juice and sugar over medium heat. Stir gently as the mixture warms for about 3-5 minutes until the sugar dissolves.
- Once hot, sprinkle unflavored gelatin over the surface and stir until fully dissolved, about 2-3 minutes.
- Carefully pour the orange mixture into molds or jars, filling halfway. Allow to cool for 30 minutes at room temperature.
- In another saucepan, gently warm the heavy cream over low heat for 2-3 minutes, then stir in vanilla extract and sugar. Sprinkle gelatin over warm cream and mix until dissolved.
- Once the orange jelly has set for at least 2 hours, pour the vanilla cream layer over it. Chill for an additional 2 hours.
- Once set, serve chilled, optionally topped with whipped cream and a slice of orange.
Leave a Reply