
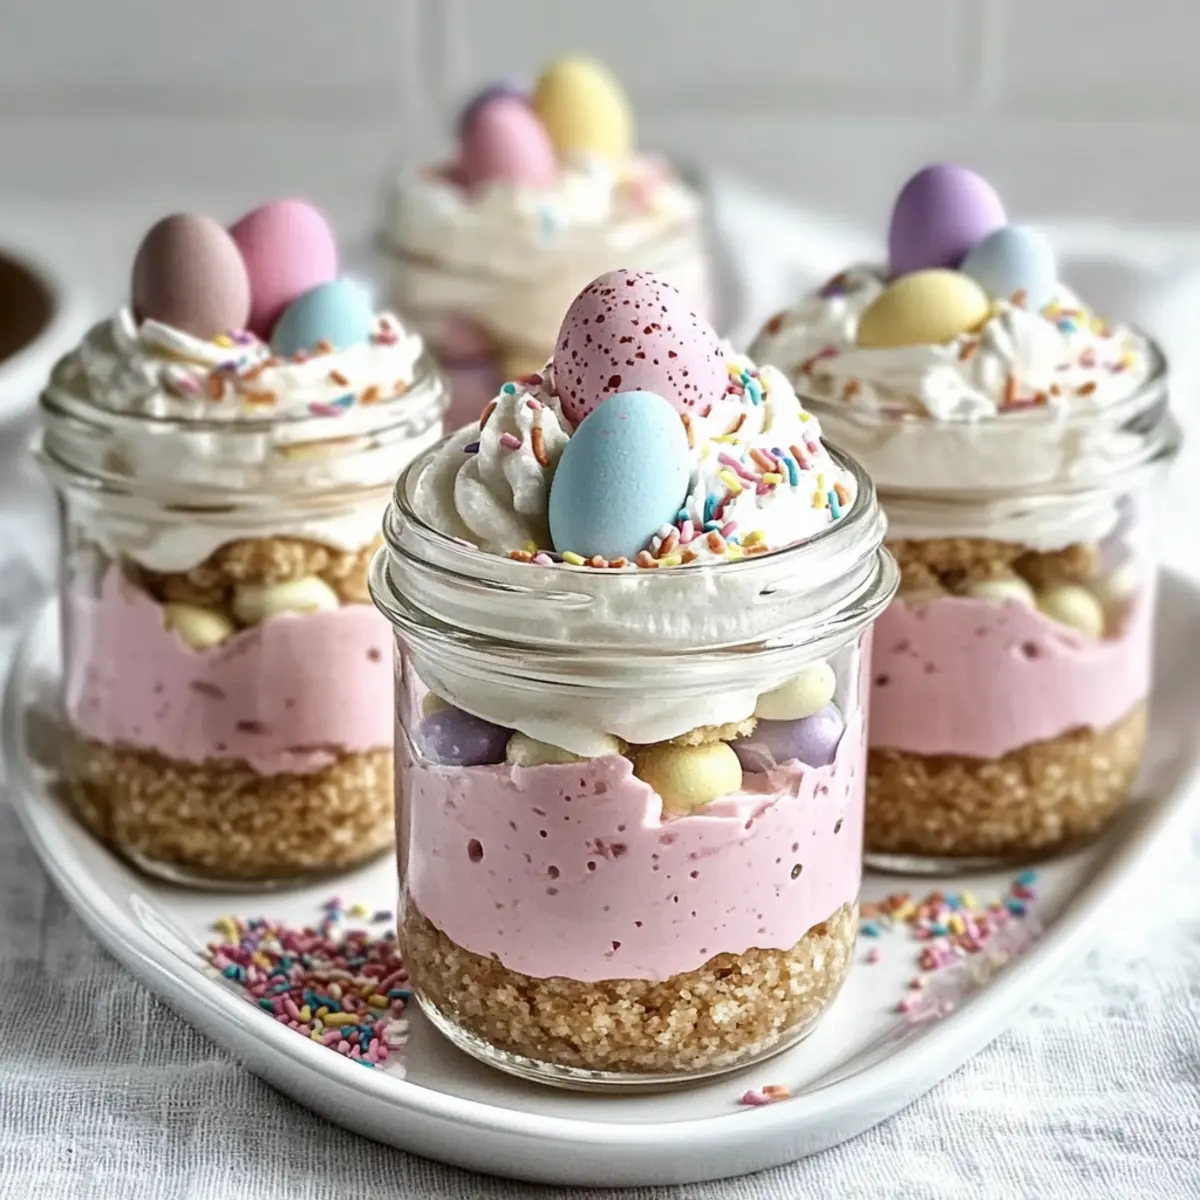
As I gazed out at the blooming tulips and felt the warmth of the spring sun on my face, I knew it was time to whip up something special for the season. Enter these enchanting Easter Egg Cheesecake Jars! This no-bake dessert combines a velvety cream cheese filling with a crunchy graham cracker crust, creating an irresistible treat that’s as delightful to look at as it is to eat. With their playful layers and customizable toppings, these jars not only elevate any festive gathering but also allow for make-ahead convenience. Imagine serving these elegant creations at your next family brunch—what a sweet way to celebrate togetherness! Are you ready to dive in and create some springtime magic in your kitchen?
Why Are Easter Egg Cheesecake Jars So Special?
Delectable Layers: The unique combination of creamy cheesecake filling and crunchy graham cracker base will have everyone wanting more.
Customizable Toppings: Get creative and tailor the jars to your liking with pastel candy eggs or seasonal fruits—perfect for any occasion!
No-Bake Convenience: Ideal for spring celebrations, these jars are a breeze to make ahead of time, letting you enjoy your gathering stress-free.
Picture-Perfect Presentation: Their stunning layers make them a show-stopping dessert that’s just as pleasing to the eyes as it is to the palate.
Family-Friendly Fun: Kids and adults alike will love the playful nature of these jars. It’s a delightful treat to share at Easter brunch or family picnics.
Why not check out our delicious Millionaires Cheesecake Indulge for another sweet surprise?
Easter Egg Cheesecake Jars Ingredients
• Prepare to delight with these Easter Egg Cheesecake Jars that make the perfect springtime dessert!
For the Crust
- Graham Cracker Crumbs – A delicious base that holds everything together; crushed Oreos or shortbread can be used for a twist.
- Granulated Sugar – This adds just the right amount of sweetness to the crust; no substitutes necessary.
- Unsalted Butter, melted – Helps bind the crust mixture; try using coconut oil for a dairy-free option.
For the Cheesecake Filling
- Cream Cheese, softened – Creates a rich base for the filling, ensuring it mixes easily when at room temperature.
- Powdered Sugar – Sweetens the cheesecake with minimal grit; coconut sugar can provide a less processed alternative.
- Vanilla Extract – Enhances the flavor of the cheese mixture; switch to almond extract for a delightful variation.
- Heavy Cream – Lightens the texture of the filling; coconut cream serves as a dairy-free substitute.
- Pink Gel Food Coloring or Freeze-Dried Strawberry Powder (optional) – Uses to add a vibrant color to cheesecake layers; feel free to omit if desired.
For the Topping
- Whipped Cream – Adds a light, creamy layer on top; store-bought or homemade works perfectly.
- Pastel Candy Eggs – An adorable decorative element; chocolate eggs or fruit-shaped candies are fun alternatives.
- Rainbow or Pastel Sprinkles – A festive touch that brings joy; edible glitter is an excellent option for extra sparkle.
Dive into these Easter Egg Cheesecake Jars and transform your festive gatherings into moments filled with sweetness and smiles!
Step‑by‑Step Instructions for Easter Egg Cheesecake Jars
Step 1: Prepare the Crust
In a mixing bowl, combine graham cracker crumbs, granulated sugar, and melted unsalted butter until the mixture resembles damp sand. This should take about 2 minutes of stirring. Use about 4 small jars for assembling the cheesecake jars, ensuring you have enough room for layers as you build.
Step 2: Form the Base
Evenly distribute the crumb mixture into the bottom of each jar, pressing down firmly with your fingers or the bottom of a glass to form a compact base. Aim for a thickness of about 0.5 inches. This step should take approximately 5 minutes, and the crust will provide a satisfying crunch against the creamy filling.
Step 3: Mix the Cream Cheese Filling
In a large mixing bowl, beat the softened cream cheese using an electric mixer on medium speed until smooth and creamy, typically 2-3 minutes. Make sure to scrape the sides of the bowl to incorporate all the cream cheese. This creates the luscious base for your Easter Egg Cheesecake Jars.
Step 4: Sweeten the Mixture
Add powdered sugar and vanilla extract to the smooth cream cheese, continuing to mix on medium speed until light and airy, which should take around 1-2 minutes. The mixture will double in volume and become fluffy, enhancing the overall texture of your cheesecake filling.
Step 5: Whip the Heavy Cream
In a separate bowl, whip the heavy cream using a clean whisk or electric mixer until stiff peaks form, which will take about 3-5 minutes. This step is crucial as it lightens the filling, making your cheesecake jars delightfully airy. Be careful not to overwhip, or your cream may become grainy.
Step 6: Combine Filling Elements
Gently fold the whipped cream into the cream cheese mixture using a spatula until fully combined. This process should take about 2 minutes. The goal here is to maintain the light texture while ensuring uniformity, so be gentle and be sure to incorporate all areas of the bowl.
Step 7: Color the Cheesecake
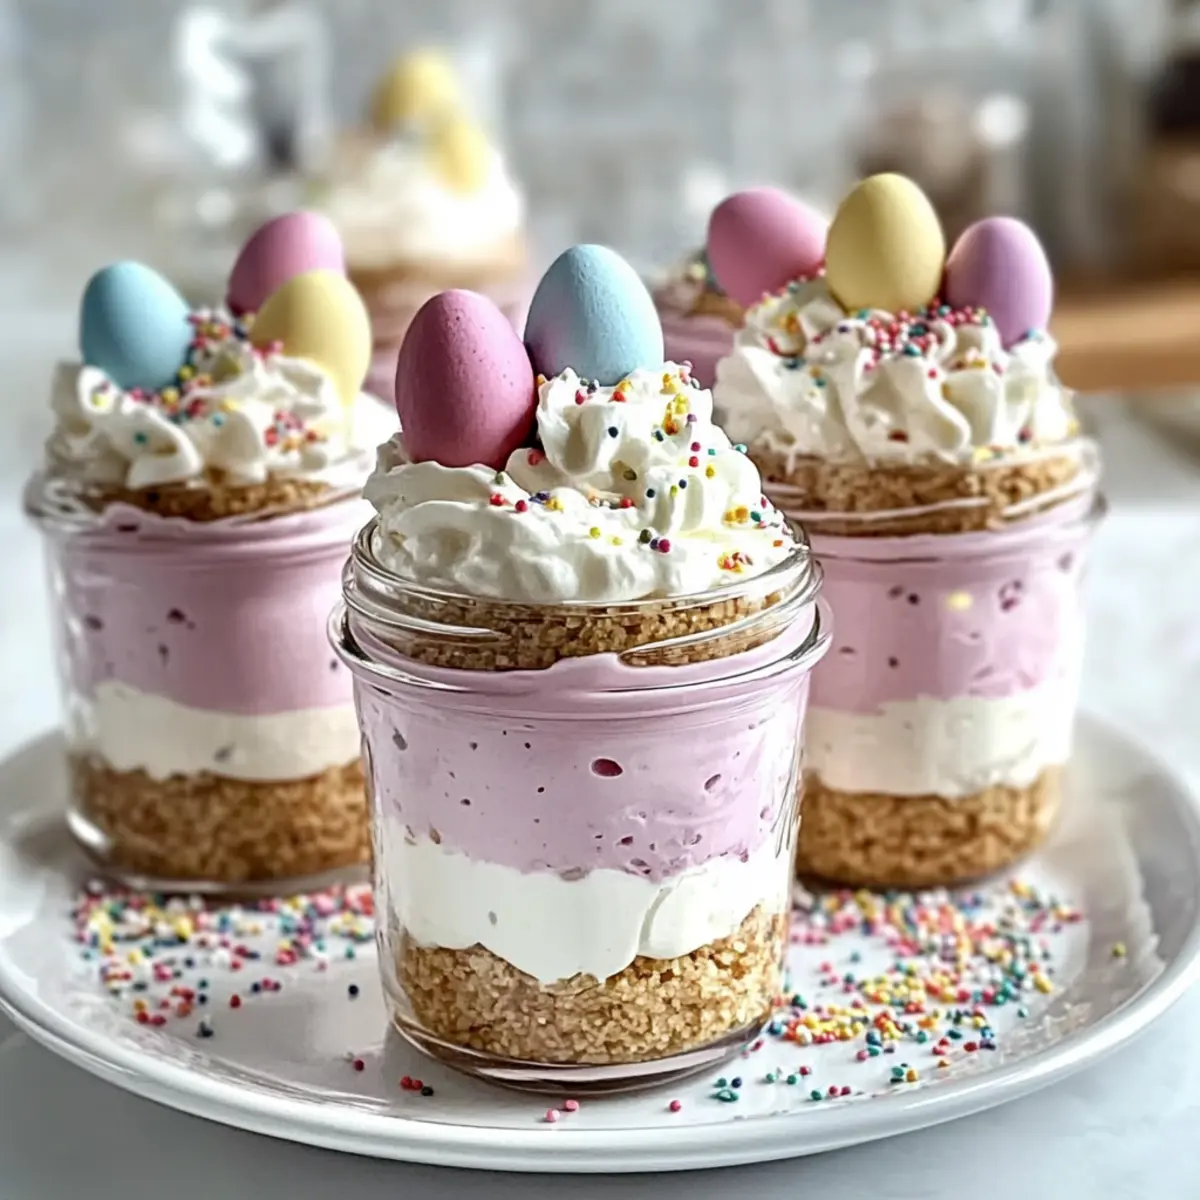
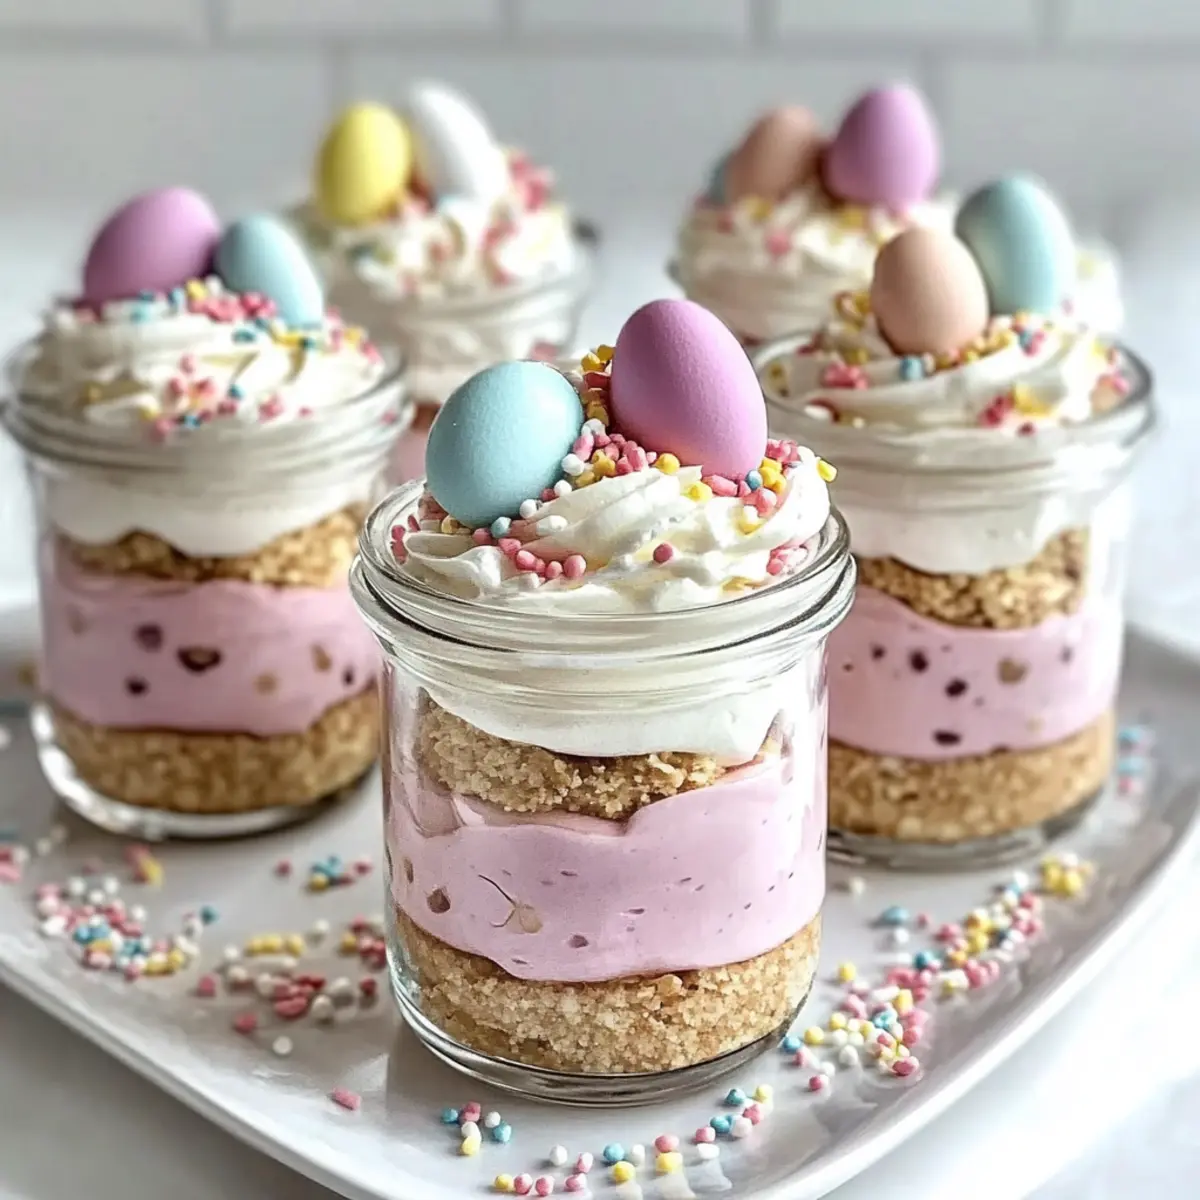
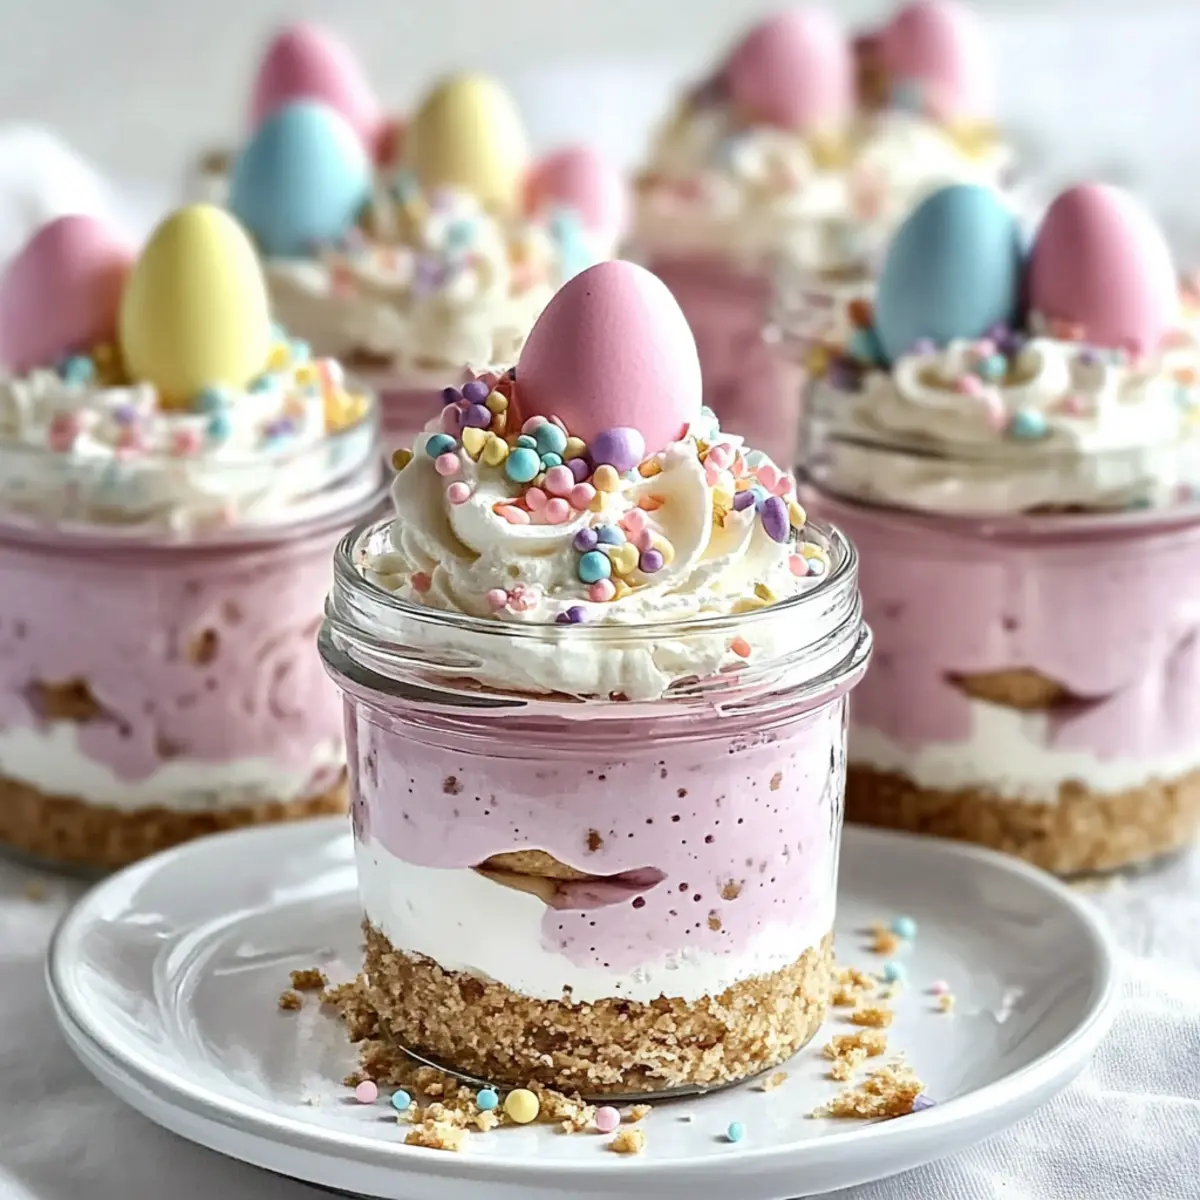
Divide the cheesecake mixture into two bowls, leaving one bowl white and adding pink gel food coloring or freeze-dried strawberry powder to the other. Stir until fully blended. This colorful layer will add a festive touch to your Easter Egg Cheesecake Jars, making them visually appealing.
Step 8: Layer the Cheesecake
Using a piping bag or a spoon, layer the white and colored cheesecake mixtures into the prepared jars, alternating between the two. Aim for neat ribbon-like layers to create a striking visual effect. This layering should take about 5-10 minutes, and remember, practice makes perfect!
Step 9: Add the Toppings
Top each jar with a generous swirl of whipped cream and decorate with pastel candy eggs and rainbow sprinkles for a festive finish. Try to make each jar unique with different designs. This step makes for an eye-catching presentation that’s sure to impress your guests.
Step 10: Chill Before Serving
Cover the jars with lids or plastic wrap and refrigerate for at least 2 hours, allowing the cheesecake to firm up. This chilling time is essential for achieving the perfect texture in your Easter Egg Cheesecake Jars. If you can, let them chill overnight for the best results!
How to Store and Freeze Easter Egg Cheesecake Jars
Fridge: Store your Easter Egg Cheesecake Jars in the refrigerator for up to 3 days, covered with lids or plastic wrap to keep them fresh.
Freezer: These jars can be frozen for up to 2 months. Just make sure to use airtight containers or wraps to prevent freezer burn and stick to a smooth texture.
Thawing: When you’re ready to enjoy leftovers, move the jars to the fridge to thaw overnight. This ensures they maintain their delightful consistency.
Reheating: These cheesecake jars are best served cold. Just give them a gentle stir if they slightly separate after freezing to reinvigorate their creamy texture.
Egg Cheesecake Jars Variations & Substitutions
Feel free to let your creativity soar and customize your jars for a truly personal touch!
- Dairy-Free: Substitute cream cheese and heavy cream with dairy-free alternatives like cashew cream and coconut cream for a vegan-friendly option.
- Gluten-Free: Use gluten-free graham crackers or alternative cookie bases like almond flour for those with dietary restrictions, ensuring everyone can enjoy!
- Flavor Infusions: Experiment with different extracts, like lemon or hazelnut, to introduce new flavor profiles that might surprise your taste buds.
- Seasonal Fruits: In summer, add fresh fruit layers such as strawberries or blueberries instead of pastel candy eggs; this adds a refreshing touch!
- Chocolate Lovers: For a decadent twist, swirl in some melted chocolate or cocoa powder into the filling for a rich, chocolatey flavor.
- Texture Twists: Fold in crushed cookies or crumbled candy bars into the cheesecake filling for an unexpected textural surprise in every bite.
- Spicy Kick: Add a pinch of cinnamon or nutmeg to the crust or filling to enhance the flavors, creating an aromatic dessert loved by all.
- Make it Festive: Change toppings based on holidays—think red, white, and blue sprinkles for the Fourth of July or pumpkin spice for autumn!
And remember, if you’re looking for another delightful dessert, why not explore our scrumptious Strawberry Crunch Cheesecake recipe for your next gathering? It’s sure to impress your loved ones just like these festive jars!
What to Serve with Easter Egg Cheesecake Jars
Elevate your spring gatherings with delightful pairings that beautifully complement the creamy sweetness of these jars.
-
Fresh Berries: The tartness of strawberries or raspberries balances the rich cheesecake, adding a vibrant pop of color and freshness.
-
Minty Fruit Salad: A refreshing mix of seasonal fruits with mint adds a lightness that contrasts wonderfully with the creamy jars.
-
Lemon Sorbet: A tangy, frozen dessert that cleanses the palate, making each spoonful of cheesecake even more enjoyable.
-
Coffee or Espresso: The rich warmth of a freshly brewed cup enhances the sweetness of the jars, creating a delightful after-meal treat.
-
Sparkling Lemonade: A bubbly, citrusy drink adds a festive touch, perfect for any spring celebration alongside your cheesecake jars.
-
Chocolate-Dipped Strawberries: Indulgent and sweet, these treats offer a luxurious contrast to the cheesecake’s smoothiness, making for a delightful bite.
-
Vanilla Bean Ice Cream: A classic pairing, its creaminess mirrors the cheesecake while the cold temperature provides a lovely contrast.
-
Cheese Platter: A selection of tangy cheeses can balance the sweetness of dessert, adding sophisticated flair to your celebration.
Serving these Easter Egg Cheesecake Jars alongside these delicious options will make your spring gatherings truly special and memorable!
Expert Tips for Easter Egg Cheesecake Jars
Chill Time Matters: Allow the jars to chill for at least 2 hours to ensure the cheesecake is firm and has the perfect texture.
Piping Perfection: For cleaner and more decorative layers, use a piping bag to layer the cheesecake mixture into the jars.
Soften Cream Cheese: Make sure your cream cheese is completely softened before mixing to avoid lumps in your filling for these Egg Cheesecake Jars.
Add Zest for Flavor: Consider mixing in some lemon zest to the cheesecake layer for a refreshing citrus kick that brightens up the flavors.
Be Creative with Colors: Feel free to experiment with food coloring or natural powders to create vibrant layers, making your jars visually stunning.
Make Ahead Options
These Easter Egg Cheesecake Jars are a fantastic option for meal prep, allowing you to create a joyful dessert with ease! You can prepare the graham cracker crust (up to 3 days in advance) and store it in airtight containers in the fridge to maintain its crunchiness. The cheesecake filling can also be made and chilled for up to 24 hours—just remember to wait until you’re ready to serve before adding the whipped cream and festive toppings, ensuring they remain fresh and vibrant. When it’s time for your gathering, layer the fillings, top with whipped cream and your decorative treats, and you’ll be left with a stunning dessert that’s just as delicious as if you made it on the day!
Easter Egg Cheesecake Jars Recipe FAQs
How do I choose ripe ingredients for my Easter Egg Cheesecake Jars?
Absolutely! For the best flavor in your cheesecake filling, make sure your cream cheese is at room temperature—this helps achieve that luxurious, smooth texture. If using fresh strawberries or fruits as toppings, opt for ones that are bright in color and firm to the touch, avoiding any overly soft or bruised pieces. They should give off a sweet aroma, signaling ripeness.
What is the best way to store leftover Easter Egg Cheesecake Jars?
Very! Store your Easter Egg Cheesecake Jars in the refrigerator for up to 3 days. Make sure to cover them with lids or plastic wrap to keep them fresh and prevent any absorption of odors from your fridge. If you’re not planning to eat them within this timeframe, the freezer is your friend.
Can I freeze Easter Egg Cheesecake Jars, and if so, how?
Absolutely! To freeze your Easter Egg Cheesecake Jars, first, allow them to set completely in the fridge for at least 2 hours. Once they are fully chilled, transfer them to airtight containers, avoiding any extra toppings like whipped cream or candy for best results. They can last in the freezer for up to 2 months. When ready to enjoy, simply move them to the refrigerator to thaw overnight.
What if my cheesecake filling is too runny?
Don’t worry; this can happen! If your filling is too runny, it’s likely due to not whipping the heavy cream enough or not chilling the jars long enough. Ensure your heavy cream reaches stiff peaks while whipping—this helps create that desired lightness and structure. If your filling is already mixed, try adding a little more softened cream cheese and whip to bring it back together. Remember, patience is key!
Are there any dietary considerations I should think about for my guests?
Very! When making Easter Egg Cheesecake Jars, it’s essential to consider dairy allergies, which can be common. You can substitute the cream cheese with a dairy-free cream cheese and replace heavy cream with coconut cream for a vegan version. Always check for allergies to specific toppings like candies or colorings if you’re serving these jars at gatherings—better safe than sorry!
Delicious Egg Cheesecake Jars for Your Spring Celebrations
Ingredients
Equipment
Method
- In a mixing bowl, combine graham cracker crumbs, granulated sugar, and melted butter until it resembles damp sand. This takes about 2 minutes.
- Evenly distribute the crumb mixture into the bottom of each jar and press down firmly to form a compact base.
- Beat the cream cheese with an electric mixer until smooth and creamy, about 2-3 minutes.
- Add powdered sugar and vanilla extract, mixing until light and airy, about 1-2 minutes.
- Whip the heavy cream until stiff peaks form, about 3-5 minutes.
- Gently fold whipped cream into the cream cheese mixture until fully combined.
- Divide the cheesecake mixture into two bowls. Add food coloring to one bowl, and stir until blended.
- Layer the mixtures into the jars alternately, aiming for neat layers.
- Top with whipped cream, pastel candy eggs, and sprinkles.
- Cover and refrigerate for at least 2 hours to set.
Leave a Reply