
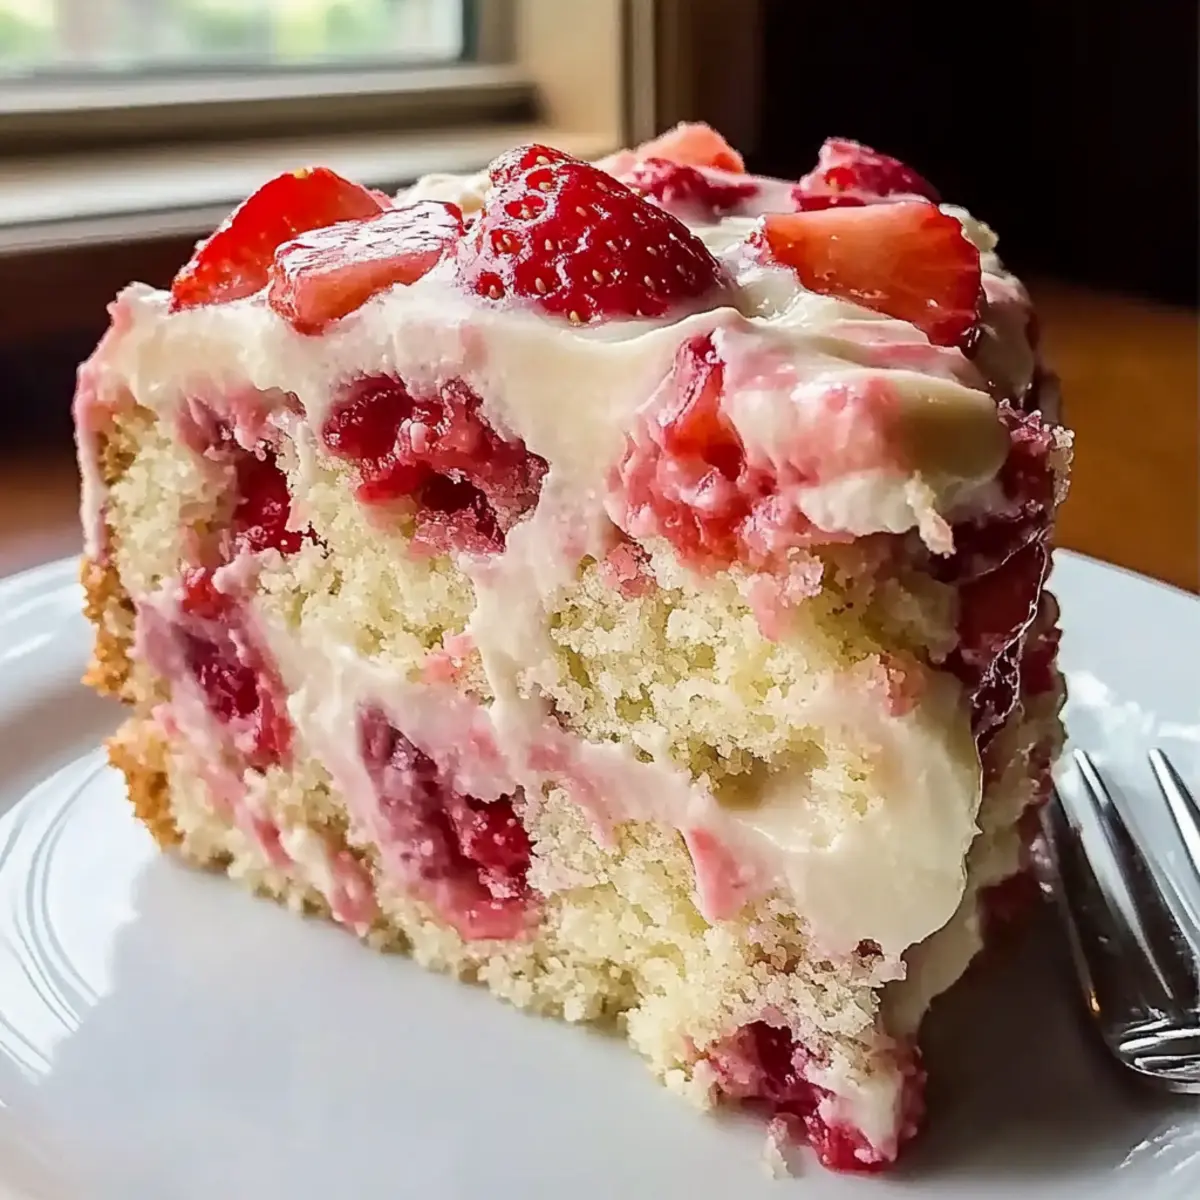
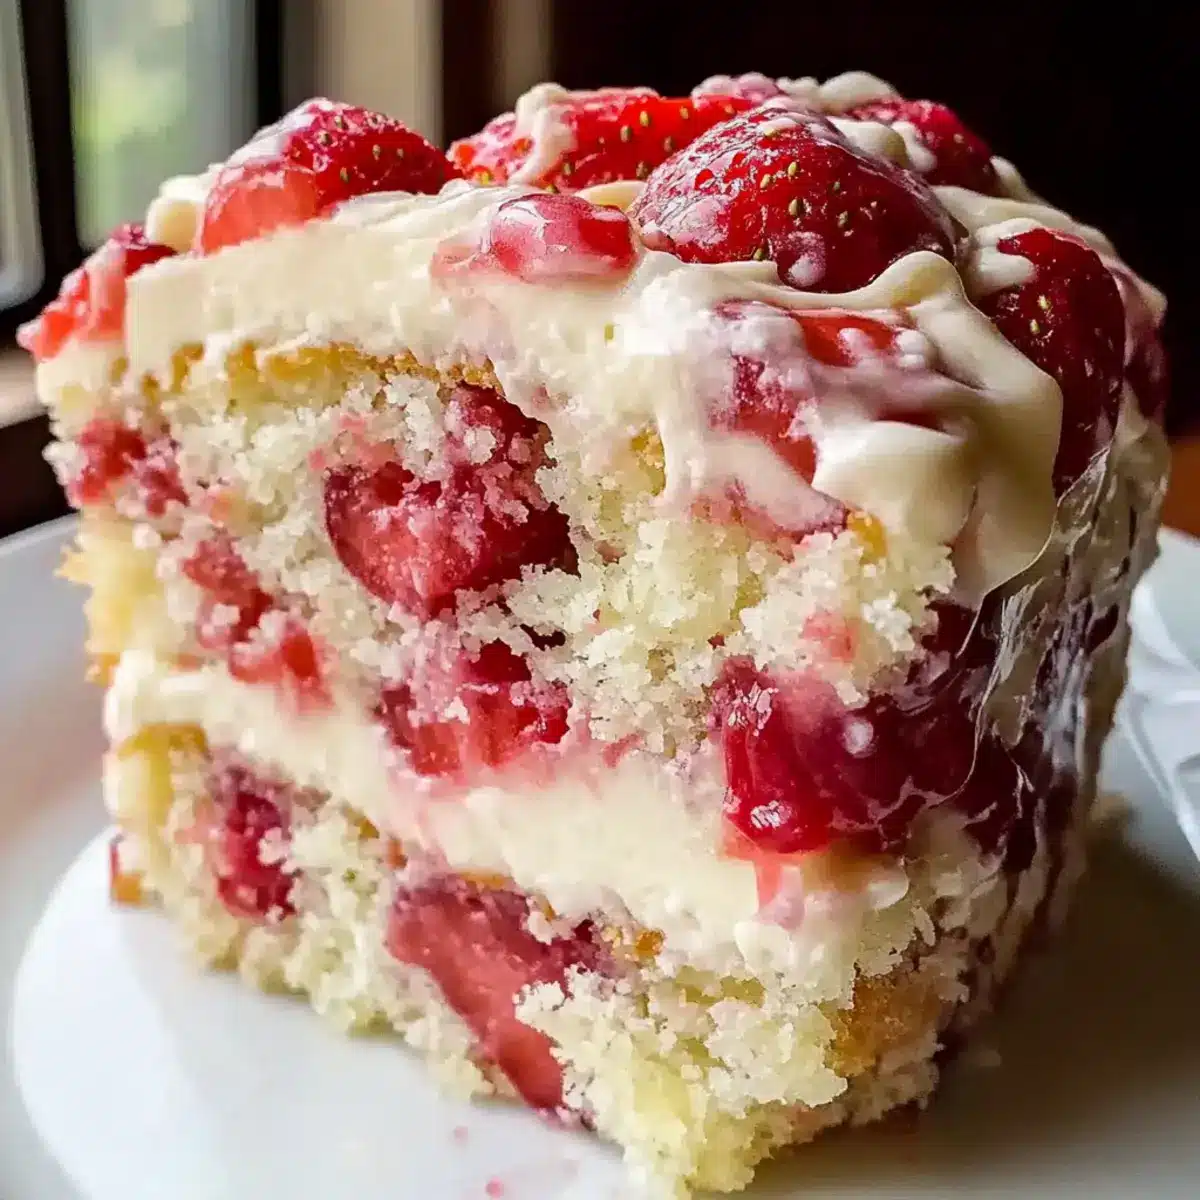
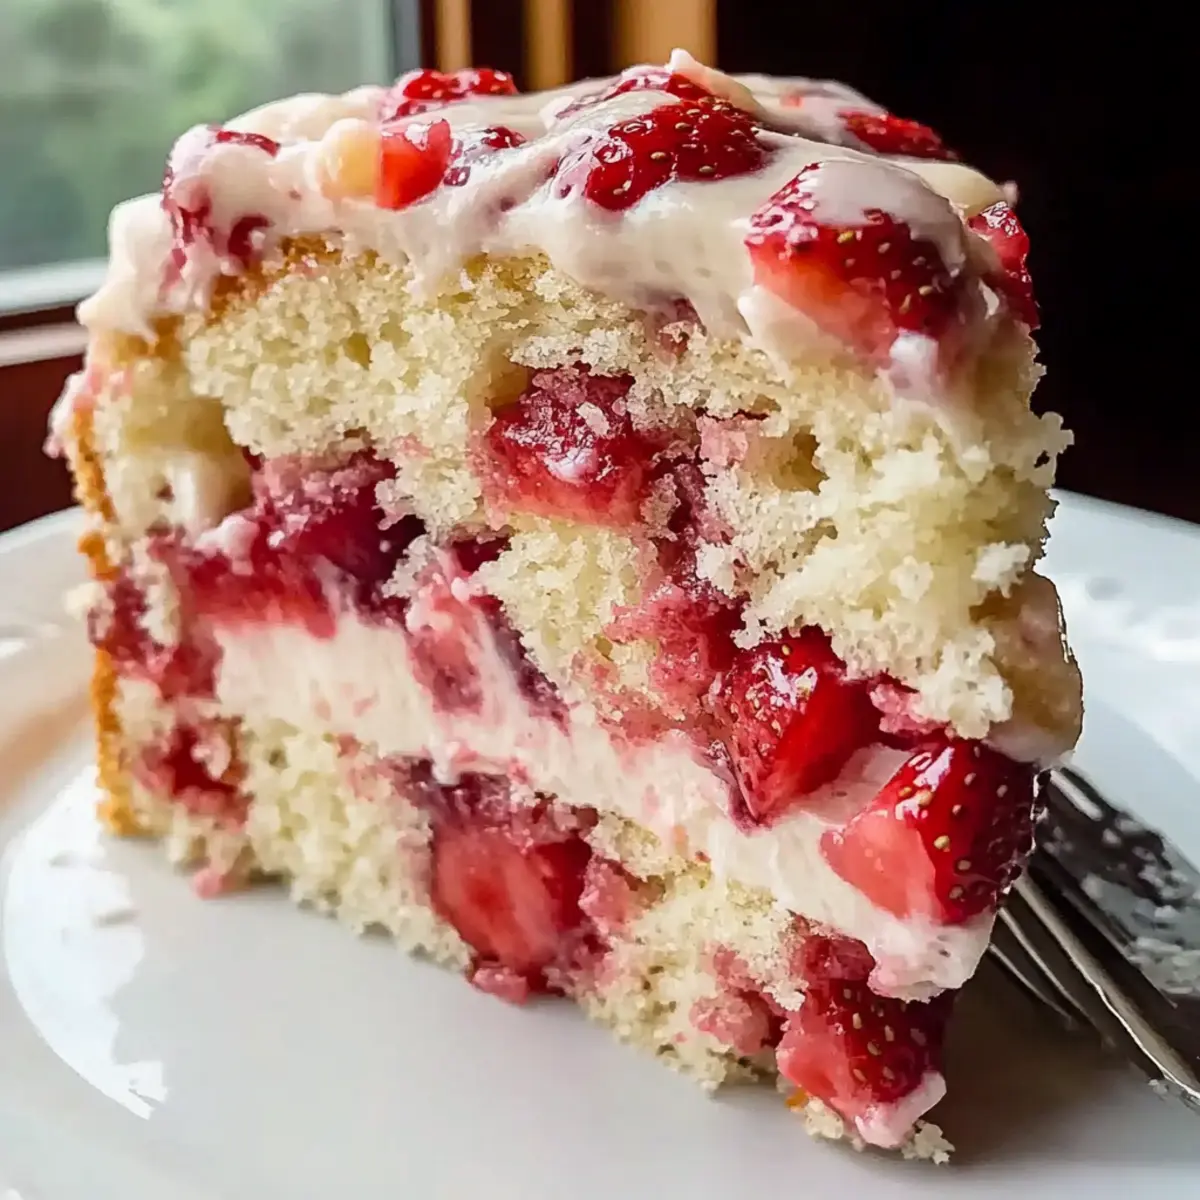
The moment I lifted the lid on my mixing bowl, a warm wave of fruity sweetness enveloped the kitchen. I knew I was about to create something special: a Decadent Strawberry Earthquake Cake with Cream Cheese Swirl. This cake is not just a treat; it’s a celebration in every slice! Perfect for summer gatherings, its light, fluffy texture, combined with tangy cream cheese ribbons and juicy strawberries, makes it a crowd-pleaser at any potluck. Plus, it’s vegetarian-friendly, allowing everyone to indulge without compromise. The best part? It’s surprisingly simple to whip up, letting you spend less time in the kitchen and more time sharing laughter and joy with loved ones. Are you ready to make a dessert that will have everyone asking for the recipe? Let’s dive in!
Why is this cake a must-try?
Indulgent, irresistible flavor: The tasty combination of strawberries and cream cheese creates a dessert that’s both sweet and tangy, perfectly balanced for any palate.
Effortlessly simple: With just a few ingredients, you can create a stunning cake that looks as gorgeous as it tastes—ideal for busy bakers!
Perfect for gatherings: This Strawberry Earthquake Cake is a guaranteed showstopper at family gatherings, just like my Coffee Cake or German Chocolate Cake.
Versatile enjoyment: While delicious as is, you can easily customize it—try swapping out strawberries for blueberries for a fresh twist!
Satisfies every sweet tooth: Whether it’s a summer picnic or a cozy dinner, this cake will delight your friends and family, making you the star of the table.
Strawberry Earthquake Cake Ingredients
For the Cake
- All-Purpose Flour – Provides the structure for a fluffy cake.
- Granulated Sugar – Adds sweetness; feel free to substitute with suitable sugar alternatives.
- Baking Powder – Acts as a leavening agent, helping the cake rise beautifully.
- Salt – Enhances overall flavor, making each bite delightful.
- Large Eggs – Serve as the binding agent; you can replace with a flax egg for a vegan option.
- Whole Milk – Adds moisture; any dairy or dairy-free milk works well too.
- Unsalted Butter – Contributes richness; use at room temperature for easy mixing.
For the Cream Cheese Swirl
- Cream Cheese – Full-fat is ideal for creaminess; low-fat can be used but may change the texture.
- Sugar – Sweetens the cream cheese mixture; adjusts for taste if using less sweet strawberries.
- Vanilla Extract – Infuses a lovely aroma, enhancing the overall flavor profile.
For the Strawberries
- Fresh Strawberries – Essential for flavor and moisture; remember to adjust sugar when using alternatives like frozen.
This mouthwatering Strawberry Earthquake Cake is your ticket to a deliciously memorable dessert experience!
Step‑by‑Step Instructions for Strawberry Earthquake Cake
Step 1: Preheat and Prepare
Preheat your oven to 350°F (175°C) and grab an 8-inch non-stick round cake pan. To ensure the cake doesn’t stick, lightly grease the pan with butter or use parchment paper at the bottom. As the oven warms, this setup helps create a perfect environment for our Strawberry Earthquake Cake to rise beautifully.
Step 2: Mix Dry Ingredients
In a mixing bowl, whisk together 2 cups of all-purpose flour, 1 cup of granulated sugar, 1 tablespoon of baking powder, and a pinch of salt. Make sure there are no lumps for a light, fluffy cake. This dry mix provides the foundation that allows your Strawberry Earthquake Cake to rise and maintain its delightful texture.
Step 3: Combine Wet Ingredients
In a separate large bowl, combine 3 large eggs, 1 cup of whole milk, and ½ cup of softened unsalted butter. Use a whisk or electric mixer to blend them until fully incorporated and smooth. The creamy consistency will ensure our cake remains moist, adding to the delicious indulgence of the Strawberry Earthquake Cake.
Step 4: Combine Mixtures
Gradually pour the dry ingredients into the wet ingredients, gently mixing with a spatula until just combined. Be careful not to overmix; you want to keep that lightness in your batter! This step is crucial for creating the soft texture that makes this Strawberry Earthquake Cake so irresistible.
Step 5: Fold in Strawberries
Gently fold in 1 ½ cups of diced fresh strawberries into the batter, taking care not to crush them. Their vibrant color and sweetness will shine through in every bite. This step adds not only flavor but also visual appeal to your Strawberry Earthquake Cake, making it a showstopper!
Step 6: Layer the Batter
Pour half of your cake batter into the prepared cake pan, spreading it evenly. This first layer sets the stage for the creamy swirls to come. The anticipation builds, and you’re one step closer to enjoying the deliciousness of your Strawberry Earthquake Cake!
Step 7: Prepare the Cream Cheese Swirl
In a separate bowl, mix together 8 ounces of room-temperature cream cheese, ½ cup of sugar, and 1 teaspoon of vanilla extract until smooth. This creamy mixture is what gives your Strawberry Earthquake Cake its signature swirl and irresistible flavor, creating a delicious contrast.
Step 8: Assemble the Cake
Dollop the cream cheese mixture over the first batter layer, distributing it evenly but leaving some gaps. Then, pour the remaining batter over the top, creating a second layer. This layering technique ensures that the cream cheese swirls beautifully throughout the cake as it bakes, enhancing each slice of your Strawberry Earthquake Cake.
Step 9: Swirl for Effect
Using a knife, gently create swirls through the top batter and cream cheese mixture, making sure to not mix too much. The swirls give the cake its characteristic “earthquake” appearance, enhancing both the look and taste of your Strawberry Earthquake Cake.
Step 10: Bake to Perfection
Place your cake pan in the preheated oven and bake for about 60 minutes. The cake is ready when it’s golden brown, and a toothpick inserted in the center comes out clean. Aromas of strawberries and sweet cream cheese will fill your kitchen, leaving you eager for that first bite of Strawberry Earthquake Cake.
Step 11: Cool Down
Once baked, remove the cake from the oven and let it cool in the pan for 15 minutes. This cooling phase is important to prevent breaking as you transfer the cake. Enjoy the delicious smell wafting through your space as you prepare for the final step!
Step 12: Transfer and Serve
Carefully turn the cake out onto a wire rack to cool completely. Letting it cool thoroughly enhances the flavor, allowing the layers to set. Once cool, slice and serve your stunning Strawberry Earthquake Cake, sharing this delightful treat with friends and family!
How to Store and Freeze Strawberry Earthquake Cake
Fridge: Wrap the cooled Strawberry Earthquake Cake in plastic wrap or store in an airtight container for up to 3 days, ensuring it stays fresh and moist.
Freezer: For longer storage, slice the cake, wrap each piece tightly in plastic wrap, and place them in a freezer bag. It can be frozen for up to 3 months while retaining its delicious flavors.
Reheating: When ready to enjoy, thaw the cake in the refrigerator overnight. For a warm slice, microwave on low for 10-15 seconds or enjoy it chilled.
Strawberry Earthquake Cake Variations
Feel free to get creative with your Strawberry Earthquake Cake and tailor it to your taste buds or dietary needs!
-
Fruit Switch-Up: Try using blueberries or raspberries instead of strawberries for a delicious twist on flavor. Each fruit brings its unique sweetness and tartness, creating delightful variations every time you bake!
-
Nuttier Notes: Add almonds or chopped pecans to the batter for an extra crunch and nutty flavor. Not only does this enhance the texture, but it also elevates your cake, making it a richer experience.
-
Gluten-Free Swap: Substitute half the all-purpose flour with almond flour for a delightful gluten-free option. You’ll love the nutty flavor and moist texture that almond flour provides, making the cake even more indulgent!
-
Chocolate Lovers: Incorporate chocolate chips into the batter for a decadent chocolate-strawberry combo. The melted chocolate mixed with the cream cheese swirl adds a delicious depth that every chocoholic will adore!
-
Zesty Citrus: Add the zest of one lemon or orange to the batter for a refreshing citrus twist. This brightens the flavors beautifully, complementing the strawberries and creating an even more delightful dessert.
-
Extra Creamy: For a richer cream cheese swirl, blend in a bit of heavy cream with your cream cheese mixture. This adds a luxurious creaminess that takes each slice to a new level of indulgence.
-
Spicy Surprise: Add a hint of cinnamon or nutmeg to the cake batter for a warm, spice-infused twist. This adds a cozy flavor that’s perfect for fall gatherings, making your cake stand out in every season.
-
Serving Suggestions: Don’t forget to serve your cake with a scoop of vanilla ice cream or a drizzle of caramel sauce for an unforgettable finish! Just like my Chocolate Mug Cake, this cake is fantastic when dressed up with toppings that delight!
What to Serve with Decadent Strawberry Earthquake Cake
This delightful dessert promises to be the star of your table, pairing wonderfully with other dishes to elevate your dining experience.
- Creamy Vanilla Ice Cream: The cool, creamy texture of vanilla ice cream beautifully complements the tangy cream cheese swirl, enhancing the overall indulgence.
- Fresh Fruit Salad: A vibrant mix of seasonal fruits adds a refreshing contrast to the cake’s sweetness, evoking that summertime spirit.
- Whipped Cream Topping: A generous dollop of freshly whipped cream adds lightness and pairs perfectly with each slice of strawberry goodness.
- Chocolate Ganache: Rich, smooth chocolate drizzle elevates the dessert by adding a touch of decadence that plays well against the fruity flavors.
- Minty Chocolate Iced Tea: A refreshing minty iced tea balances the richness of the cake while providing a cool beverage option for warm days.
- Lemonade Splash: The bright acidity of lemonade cuts through the sweetness, making each bite of the Strawberry Earthquake Cake even more delightful.
- Pecan Praline Bars: These nutty treats offer a crunchy texture and flavor contrast, complementing the soft cake without overwhelming it.
- Sparkling Water with Lime: A refreshing sparkling water elevates your cake experience by cleansing the palate between bites.
Make Ahead Options
These delightful Strawberry Earthquake Cakes are ideal for meal prep, allowing busy cooks to plan ahead. You can prepare the batter up to 24 hours in advance—simply mix the dry ingredients and wet mixture separately, then combine them before baking. Additionally, the cream cheese swirl can be prepared and stored in the refrigerator for up to 3 days. When ready to bake, fold in the strawberries, layer the batter and cream cheese mix, and swirl as instructed. This way, you’ll have a fresh, decadent Strawberry Earthquake Cake that’s just as delicious, saving you precious time for those last-minute gatherings!
Expert Tips for Strawberry Earthquake Cake
Avoid Overmixing: Mix the batter gently until just combined to maintain that light, fluffy texture, ensuring the best possible Strawberry Earthquake Cake.
Room Temperature Ingredients: Make sure your cream cheese and butter are at room temperature; this makes for a smooth, creamy swirl that blends perfectly into your cake.
Cool Before Serving: Allow the cake to cool completely, as this enhances the flavors and makes it easier to slice without crumbling.
Proper Storage: Wrap leftovers in plastic wrap to keep them fresh for up to 3 days in the refrigerator or freeze for longer enjoyment.
Adjust Sweetness: If using alternative sweeteners or strawberries that aren’t super sweet, adjust the sugar in the cream cheese mixture to balance the flavors perfectly.
Strawberry Earthquake Cake Recipe FAQs
What type of strawberries should I use for the Strawberry Earthquake Cake?
Absolutely! Fresh, ripe strawberries are recommended for the best flavor and moisture. Look for berries that are bright red with a sweet scent, avoiding any with dark spots or squished areas. If you must use frozen strawberries, make sure to thaw and drain any excess moisture to prevent a soggy cake.
How long can I store leftover Strawberry Earthquake Cake?
You can wrap the cooled cake in plastic wrap or store it in an airtight container in the refrigerator for up to 3 days. If you want to enjoy it longer, you can freeze individual slices for up to 3 months. Just make sure to wrap them tightly to prevent freezer burn!
Can I freeze the Strawberry Earthquake Cake? If so, how?
Yes, you can freeze this delectable cake! First, let it cool completely. Then, slice the cake and wrap each piece tightly in plastic wrap. Place the wrapped slices in a freezer-safe container or a resealable freezer bag. This method preserves the texture and flavor so you can enjoy a taste of summer anytime!
What should I do if my cake didn’t rise properly?
If your Strawberry Earthquake Cake isn’t rising as it should, there could be a couple of factors at play. First, check that your baking powder is fresh; expired leavening agents won’t provide the necessary lift. Additionally, ensure you’re not overmixing the batter, as this can lead to a denser cake. Remember to follow the mixing instructions carefully for a light and fluffy result!
Is there a vegan option for this cake?
Very! To make a vegan version of the Strawberry Earthquake Cake, substitute the large eggs with a flax egg (mix 1 tablespoon of ground flaxseed with 2.5 tablespoons of water and let it sit until gel-like) and replace whole milk with any plant-based milk. Make sure to use dairy-free cream cheese for the swirl, and you’ll have a delightful vegan treat that everyone can enjoy!
Are there any dietary considerations for this recipe?
Yes, the recipe is vegetarian-friendly! If you’re considering allergies, make sure to check for any specific concerns regarding dairy, gluten, or sugar involved in the ingredients. For a gluten-free option, substitute half the all-purpose flour with almond flour, and adjust your baking powder accordingly. Plus, if you’re using sugar alternatives for a healthier cake, make sure they’re compatible for baking!
Strawberry Earthquake Cake: A Creamy Dreamy Delight
Ingredients
Equipment
Method
- Preheat your oven to 350°F (175°C) and lightly grease an 8-inch non-stick round cake pan.
- In a mixing bowl, whisk together 2 cups of all-purpose flour, 1 cup of granulated sugar, 1 tablespoon of baking powder, and a pinch of salt.
- In a separate bowl, combine 3 large eggs, 1 cup of whole milk, and ½ cup of softened unsalted butter until smooth.
- Gradually pour the dry ingredients into the wet ingredients, mixing gently until just combined.
- Fold in 1 ½ cups of diced fresh strawberries into the batter.
- Pour half of the batter into the prepared cake pan.
- In a separate bowl, mix together 8 ounces of cream cheese, ½ cup of sugar, and 1 teaspoon of vanilla extract until smooth.
- Dollop the cream cheese mixture over the first layer of batter, then pour the remaining batter on top.
- Gently swirl with a knife to create swirls through the batter and cream cheese mixture.
- Bake for about 60 minutes until golden brown and a toothpick comes out clean.
- Let the cake cool in the pan for 15 minutes before transferring to a wire rack.
- Cool completely before slicing and serving.
Leave a Reply